Mini-world invitation to play – arctic playscape

IMG_0570

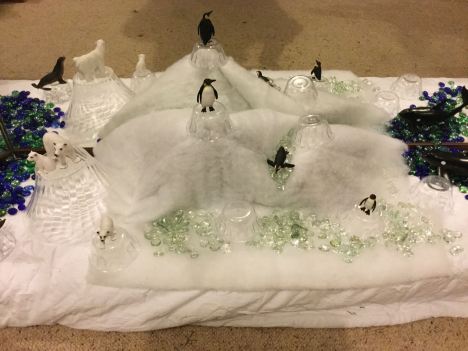
Mini-world play continues with our ice and snow landscape. Some wadding over rocks to create snow-capped mountains, plastic dishes for icebergs, glass jewels for water and ice-flow and a selection of plastic penguins, polar bears and a killer whale complete our scene. While not technically correct (for instance polar bears and penguins do not live in the same pole) it looked inviting and was something different.

IMG_0567

As is usually the case for our mini-worlds, the older girls set up the scene repeatedly and the younger boys provided them with many opportunities to do so as they wrecked it almost immediately, with polar bears and killer whales eating penguins and beaching themselves on the mountains. Surprisingly the scene didn’t really interest the children long term, but was revived when they collected some boats and divers from the bath toys and NOW the little boys had some interest. Penguins dived into piles of jewel water and divers crashed their boats all over the place, fighting off killer whales along the way.

IMG_0765

My 5 year old made a snow dam with a white blanket and spent quite some time building towers with the small plastic iceberg bowls and jewels. While the boys didn’t use the scene as I had imagined, they enjoyed it in their own way.

IMG_0611

The 2 year old just wanted to tip and pour the jewels and insisted on taking them off the step and onto the carpet for her play. She also loved the bears and wanted to put them in her handbag and take them away to her bedroom, chucking a big tantrum becoming rather unhappy when told they needed to stay in the scene.

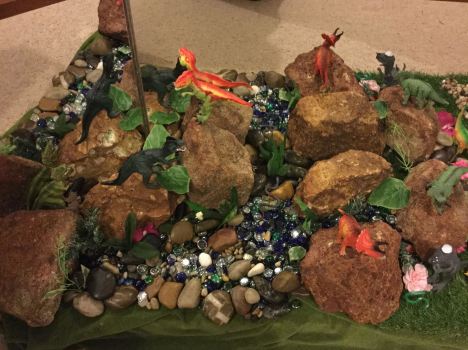
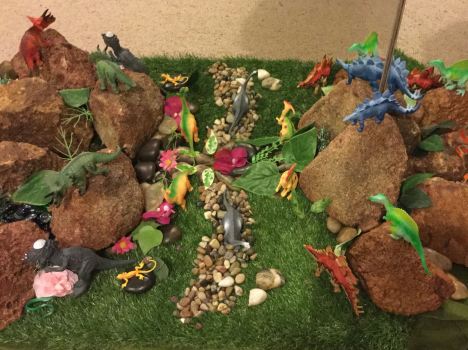
Target and Kmart now have a range of realistic plastic animal models similar to the Schleich brand but much more affordable and that is where I sourced this selection. Later on I will put them out again with some frozen sheets of ice in trays and a variety of ice blocks in the water trolley; perhaps in the summer months I think!

Light table play – coloured shot glasses

Our latest invitation to play at the light table was a simple selection of colourful plastic shot glasses. For the first few days only the glasses themselves were on offer and it was interesting to see the different ways each age group approached their play.

I had to resist the urge to show the younger children how to build with them, knowing that given enough time they would figure it out for themselves. They initially used the glasses to construct in a way I had not thought of; laying them down and creating 2D style robots and spaceships. My 2 year old was quite content stacking and unstacking the cups and sorting them by colour. There was some counting as they wondered how many layers they would need to use exactly 100 cups in a tower.


After a few days of playing and constructing with just the cups themselves, I added 3 plastic rulers and some see-through plastic cars. This opened up a whole new realm of play as the older children in particular worked together to make balancing structures and car garages.

There are many simple “hacks” out there for making your own inexpensive light table; see this post for links to my Pinterest page.

Mini world invitation to play – dinosaur kingdom

IMG_0450

Imaginative play is important in the early years and small world play gives children plenty of opportunity for creativity in an open-ended setting. It also gives us a defined play area that can be included as part of our daily routine. As the rainy weather kicks in it is helpful to have an activity that the children can do when outside play is not an option.

IMG_0444

I let the little kids help me set it up this time, which they enjoyed immensely. We used large rocks from someone who was cleaning out their garden and small pebbles and river-stones I have previously purchased as the base of the scene. A small off-cut of artificial grass and some tattered bits of well-used artificial plants give it some greenery and green, blue and clear glass jewels serve as our swampy river area. The dinosaurs were the cheapest I could find in our local discount variety store and just to make it more fun, I hid them around the house for a dinosaur treasure hunt before we started.

IMG_0445

While the mirror background is certainly not necessary, it does give an added dimension to the set-up. It makes our world look twice as big, allows the children to see their play from a different perspective and they enjoy watching their own reflections! Plus, it just looks good and provides a nice backdrop while defining the space.

IMG_0442

Light table play – our new toy


IMG_0323

We have been blessed this week to acquire a new  light table through our local secondhand buy, sell and trade list – for free!! It does have a crack along one edge of the glass (thus the piece of wood we clamped along one side), but other than that, all it needed was to have the legs cut shorter and a new fluorescent light fitted to make it a working entity (thanks Dad 🙂 )

IMG_0267

We added a couple of different materials for the children to experiment with to get them started and it was a hit. These magnetic construction tiles glow beautifully and pretty much anything plastic or acrylic looks attractive with the light behind it. Of course the boys had a car involved within the first 5 minutes and a Duplo man or two soon joined the mix.

IMG_0353

We tried a few different materials just to see what looked good and my 2 year old spent some time sorting out all the pink items; her “best ones” as she called them.

I wasn’t sure we would use it that much, but after searching through Pinterest I now have enough ideas to keep us going for a very long time. I’ll be posting some more of these as we change what’s available.

If you don’t have a light table but would like to make one, there are several simple “light table hacks” as they are usually termed on Pinterest. They range from altering an Ikea children’s table to putting strings of LED Christmas lights inside crates. They would all make a serviceable light box without too much fuss or cost, depending on your level of handyman ability.

We love it so far and it is just the thing to keep little people productively occupied while I am feeding my twin babies. When we get sick of it I’ll send it off for a vacation at one of my homeschooling friend’s houses.


Christmas traditions in someone else’s house

My friend Kristy is at it again with amazing Christmas activities and traditions for her children. Here is a pictorial compilation that may spark a few ideas for your own family.

Truth in the Tinsel” is another bible based advent count-down to Christmas that is used in the same way as a Jesse Tree count-down. Kristy got together with some friends and did a symbol swap so they each ended up with one complete set for the days of December.


Her daughter is loving decorating the felt Christmas tree each morning before breakfast and her MIL is knitting this amazing wool nativity piece by piece for them.

img_6590

Kristy’s knock and run nativity is wrapped, labelled and ready to go. Both of us chose the same wooden nativity from Target this year as a fairly inexpensive way to bless a friend/neighbour and share the true story of Christmas with someone who may not have heard it before.


While not necessarily Christmas, this pizza shop invitation to play was so inviting that I want to have a go!


Kristy is super organised and makes up all kinds of amazing sensory tubs and activities for her little ones to enjoy. A little bit of preparation makes for some peaceful times ahead. Thanks for letting me share your ideas Kristy.

Now, all my other wonderful friends/readers who are busy making amazing traditions happen this Christmas at your house – how about some pics to share on my blog? We all feel inspired when we get to take a peak into what others are doing to make this Christmas season meaningful and special.

Invitation to play

img_1626

Once again our pretend play home-corner had become a sadly neglected play choice. Time for a change! Toy rotation is a marvellous thing – I simply packed away the play materials that have been out for some time and pulled out a few items the children haven’t seen in a while. Placing them out in an attractive invitation to play makes all the difference. Even the older children were itching to get in there and have a play once these “new” items were in view and the little ones are now happily “cooking” away.

Guest post: Sensory tub play centres


IMG_3388

Kristy is back again today to share about loose play centres or sensory boxes as they are sometimes known. These are a great idea for free play times for toddlers. It gives them an attractive area to play in with many open-ended possibilities while providing a boundary for play at the same time. Depending on the material you have out, it may be helpful to spread out a mat or sheet underneath to catch the spills. Once playtime is finished it can simply be gathered up and tipped back in to the tub to save on clean-up time.

Here’s Kristy…

I’m also inspired by Angela’s idea of using the water table as a loose play centre for children to explore. So far it has become an Iceland and a posting table with pipe cleaners, colanders, pop sticks, gems and bottles with all different opening sizes.

It is now a rice table where my children are loving pouring, filling, scooping and shaking. After the rice table I am going to again copy Ang’s idea and create a pom-pom and tong loose play centre. I love watching my children explore, try new things with what is available, and just have the opportunity to learn at their own pace.

Sensory tubs: pompoms

IMG_1304

Interest in our icecream sensory tub has waned so it is time for something new. A couple of bags of assorted pompoms in a variety of sizes and colours, along with tongs, scoops, chopsticks and a variety of containers to fill, tip, pour and create with complete the invitation to play. The children haven’t seen it yet, but I am confident they will be drawn to this open-ended play opportunity. A smaller version would also make a great mat time,  playpen time or room time activity. Quiet, cheap and easy to clean up – love it!

Epsom salt snowscape mini-world

IMG_1084

Our latest mini-world invitation to play has been a hit with the children 6 and under. As is usually the case, the older children love setting it up but don’t actually sit and play with it.

IMG_1077
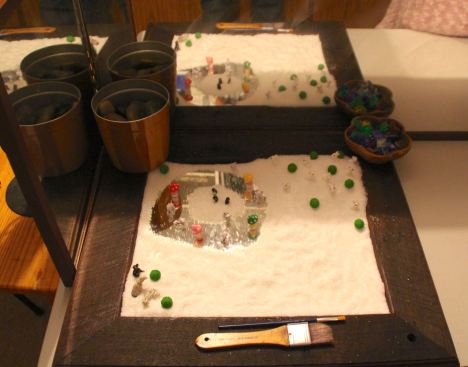
Epsom salts spread onto a mirror gives the impression of snow and the mirror showing through appears to be ice. I purchased a selection of miniatures that are actually terrarium decorations very cheaply on eBay and added brushes and some jewels and rocks. I later added a small sweeping brush to keep the salt off the edges of the mirror.

Epsom salts can also be added to a sensory tub for imaginative play or tipping, pouring and filling activities.

IMG_1074

As interest wanes I’ll add a couple of extra items I’ve kept in reserve for further exploration.

IMG_1081

The folding mirror is a new ($10 secondhand!) addition to our school area. The moment it was on the table my two daughters were found seated side-by-side in front of it drawing self-portraits as they observed themselves in it.

Children just love to watch themselves in mirrors and including one behind pretend play areas adds another dimension. There are also lots of ways to use them for symmetry activities, multiplication and art projects where being able to see behind what they are manipulating  is an added stimulus. The Reggio educational approach includes mirrors in many of their classroom activities and I have a host of ideas pinned to try in the future.

IMG_1088

We later added the bulldozer to the snow mini-world which the little boys loved, plus a Lego slide and matchbox sled made by one of the children for the rabbits to pull. I filled a salt shaker with epsom salts which allowed the children to make it snow and a variety of jewels and rocks to build onto the scene. This has probably been one of our longest lasting mini-worlds and the children are still using it most days after having had access to it for more than 3 weeks.

Icecream sensory tub invitation to play

IMG_1036

We have been doing some op-shopping lately to collect bits and pieces for our loose parts activities and to set up a variety of invitations to play in our newly organised playroom. After hearing my plans to set up an ice-cream shop in the water trolley as our next sensory tub activity the children have been quite keen to get rid of the popsticks and matchsticks and move on to cotton wool ball ice-cream right away.

IMG_1020
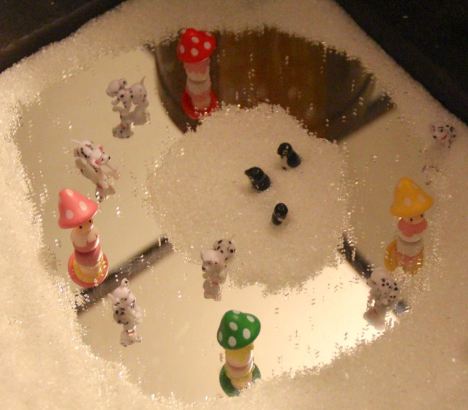
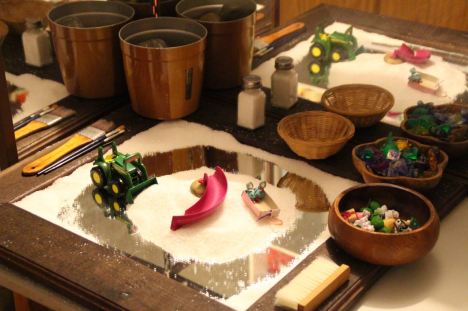
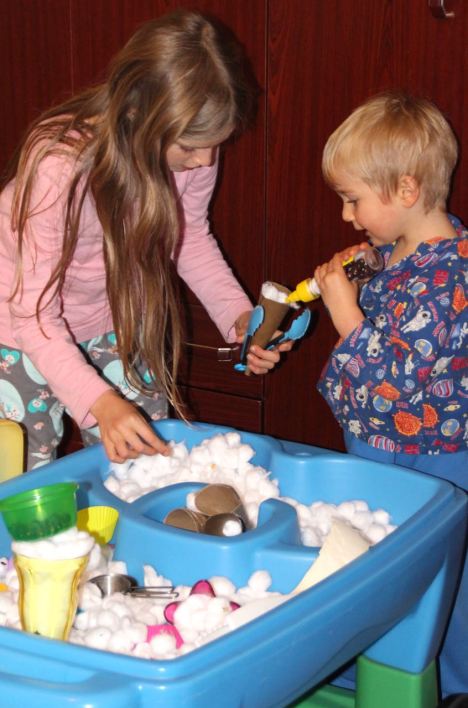
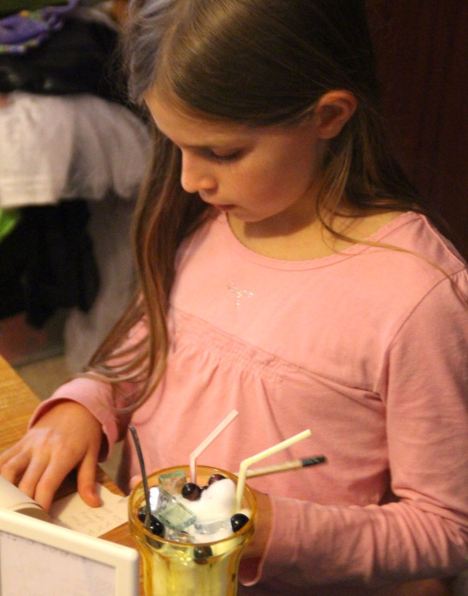
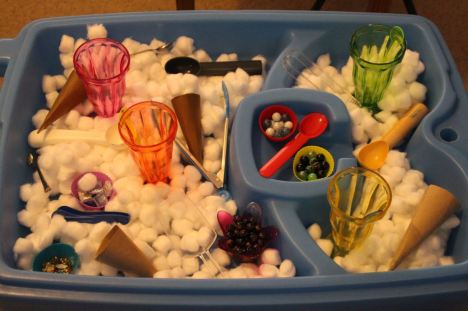
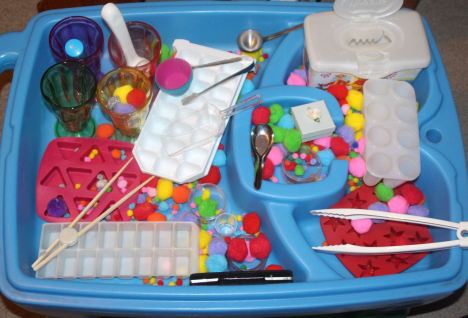
Cotton wool balls are a cheap base for a sensory tub and lend themselves well to being transferred by tongs, scoops or little fingers and the addition of some marbles, jewels and beads for toppings gave it a fun aspect. A few plastic Sundae cups, swizzle sticks, icecream scoops and sequins allowed for some interesting creations.

IMG_0990
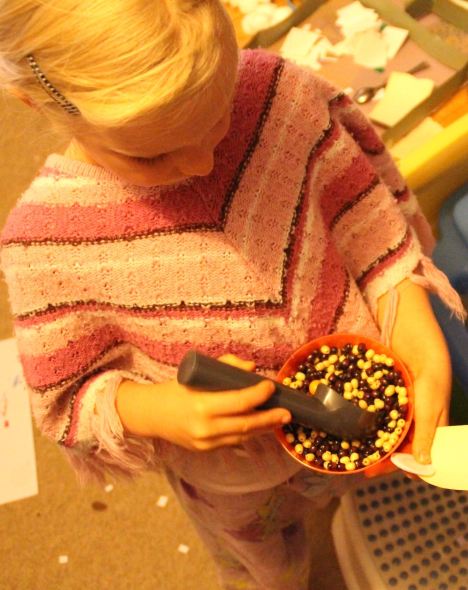
Having the sensory tub right next to the pretend play home corner area meant that the children could expand into dramatic play and they soon opened an ice-cream shop. There aren’t many play activities that can keep everyone from the 13 year old to the 2 year old happily occupied together, but this did the trick.


The addition of a menu board ($2 from Ikea), a roll of receipt paper from an old cash register, a couple of clip boards and some plastic tokens for money provided the stimulus for lots of copywork, writing and maths as the children wrote out orders and receipts and charged each other for their extremely expensive ice-cream Sundaes.

IMG_0998

An old squeeze honey container was amongst the favourite items, as were the dark brown beads for chocolate drops.

Extra products such as paper doughnuts and choc-chip biscuits were created to add to the repertoire and the menu was rewritten to include several new additions.

IMG_1017

When you charge for every ice block, choc drop, scoop of ice-cream and berry that goes into the Sundaes it makes for some good maths practice.

IMG_0988

This was the original sensory tub that was offered as a provocation for play. The children thought of the many other additions and made it far better by the time they had finished.