Mega list of table activities for preschoolers

Following on from yesterday’s post (list of highchair and table activities for babies and toddlers), here is my collection of preschool ideas to use for any time a quiet, attention grabbing activity is needed. Please see yesterday’s post for links to articles on how to train your children to sit for an extended period of time, even at a young age. Even the most interesting activity will not stop a child from wandering about if that is what they are used to doing.

There were too many ideas to fit on the one page, so there are 2 pages to download. Please be aware that because of the large number of photographs on the posters, the downloads may take a long time to come through. Just walk away and have that cuppa!

I mentioned giving no choices for toddlers yesterday. My preschoolers are beginning to have some choice of activities. They are given a small selection to choose from and occasionally I choose for them. If they resist the choices I make, then they lose the freedom to choose for themselves until this attitude improves. (See choices post for a full explanation of why we do this.)

You’ll notice some activities are repeats from the toddler list. I have done that so those who do not have a toddler do not need to print out that chart as well as this one. Having said that though, you may find ideas from the older (coming next post) or younger category that I haven’t repeated may still be of interest to your child.

table activities for preschoolers master list download

table activities for spreschoolers p1

table activities for spreschoolers p1 1

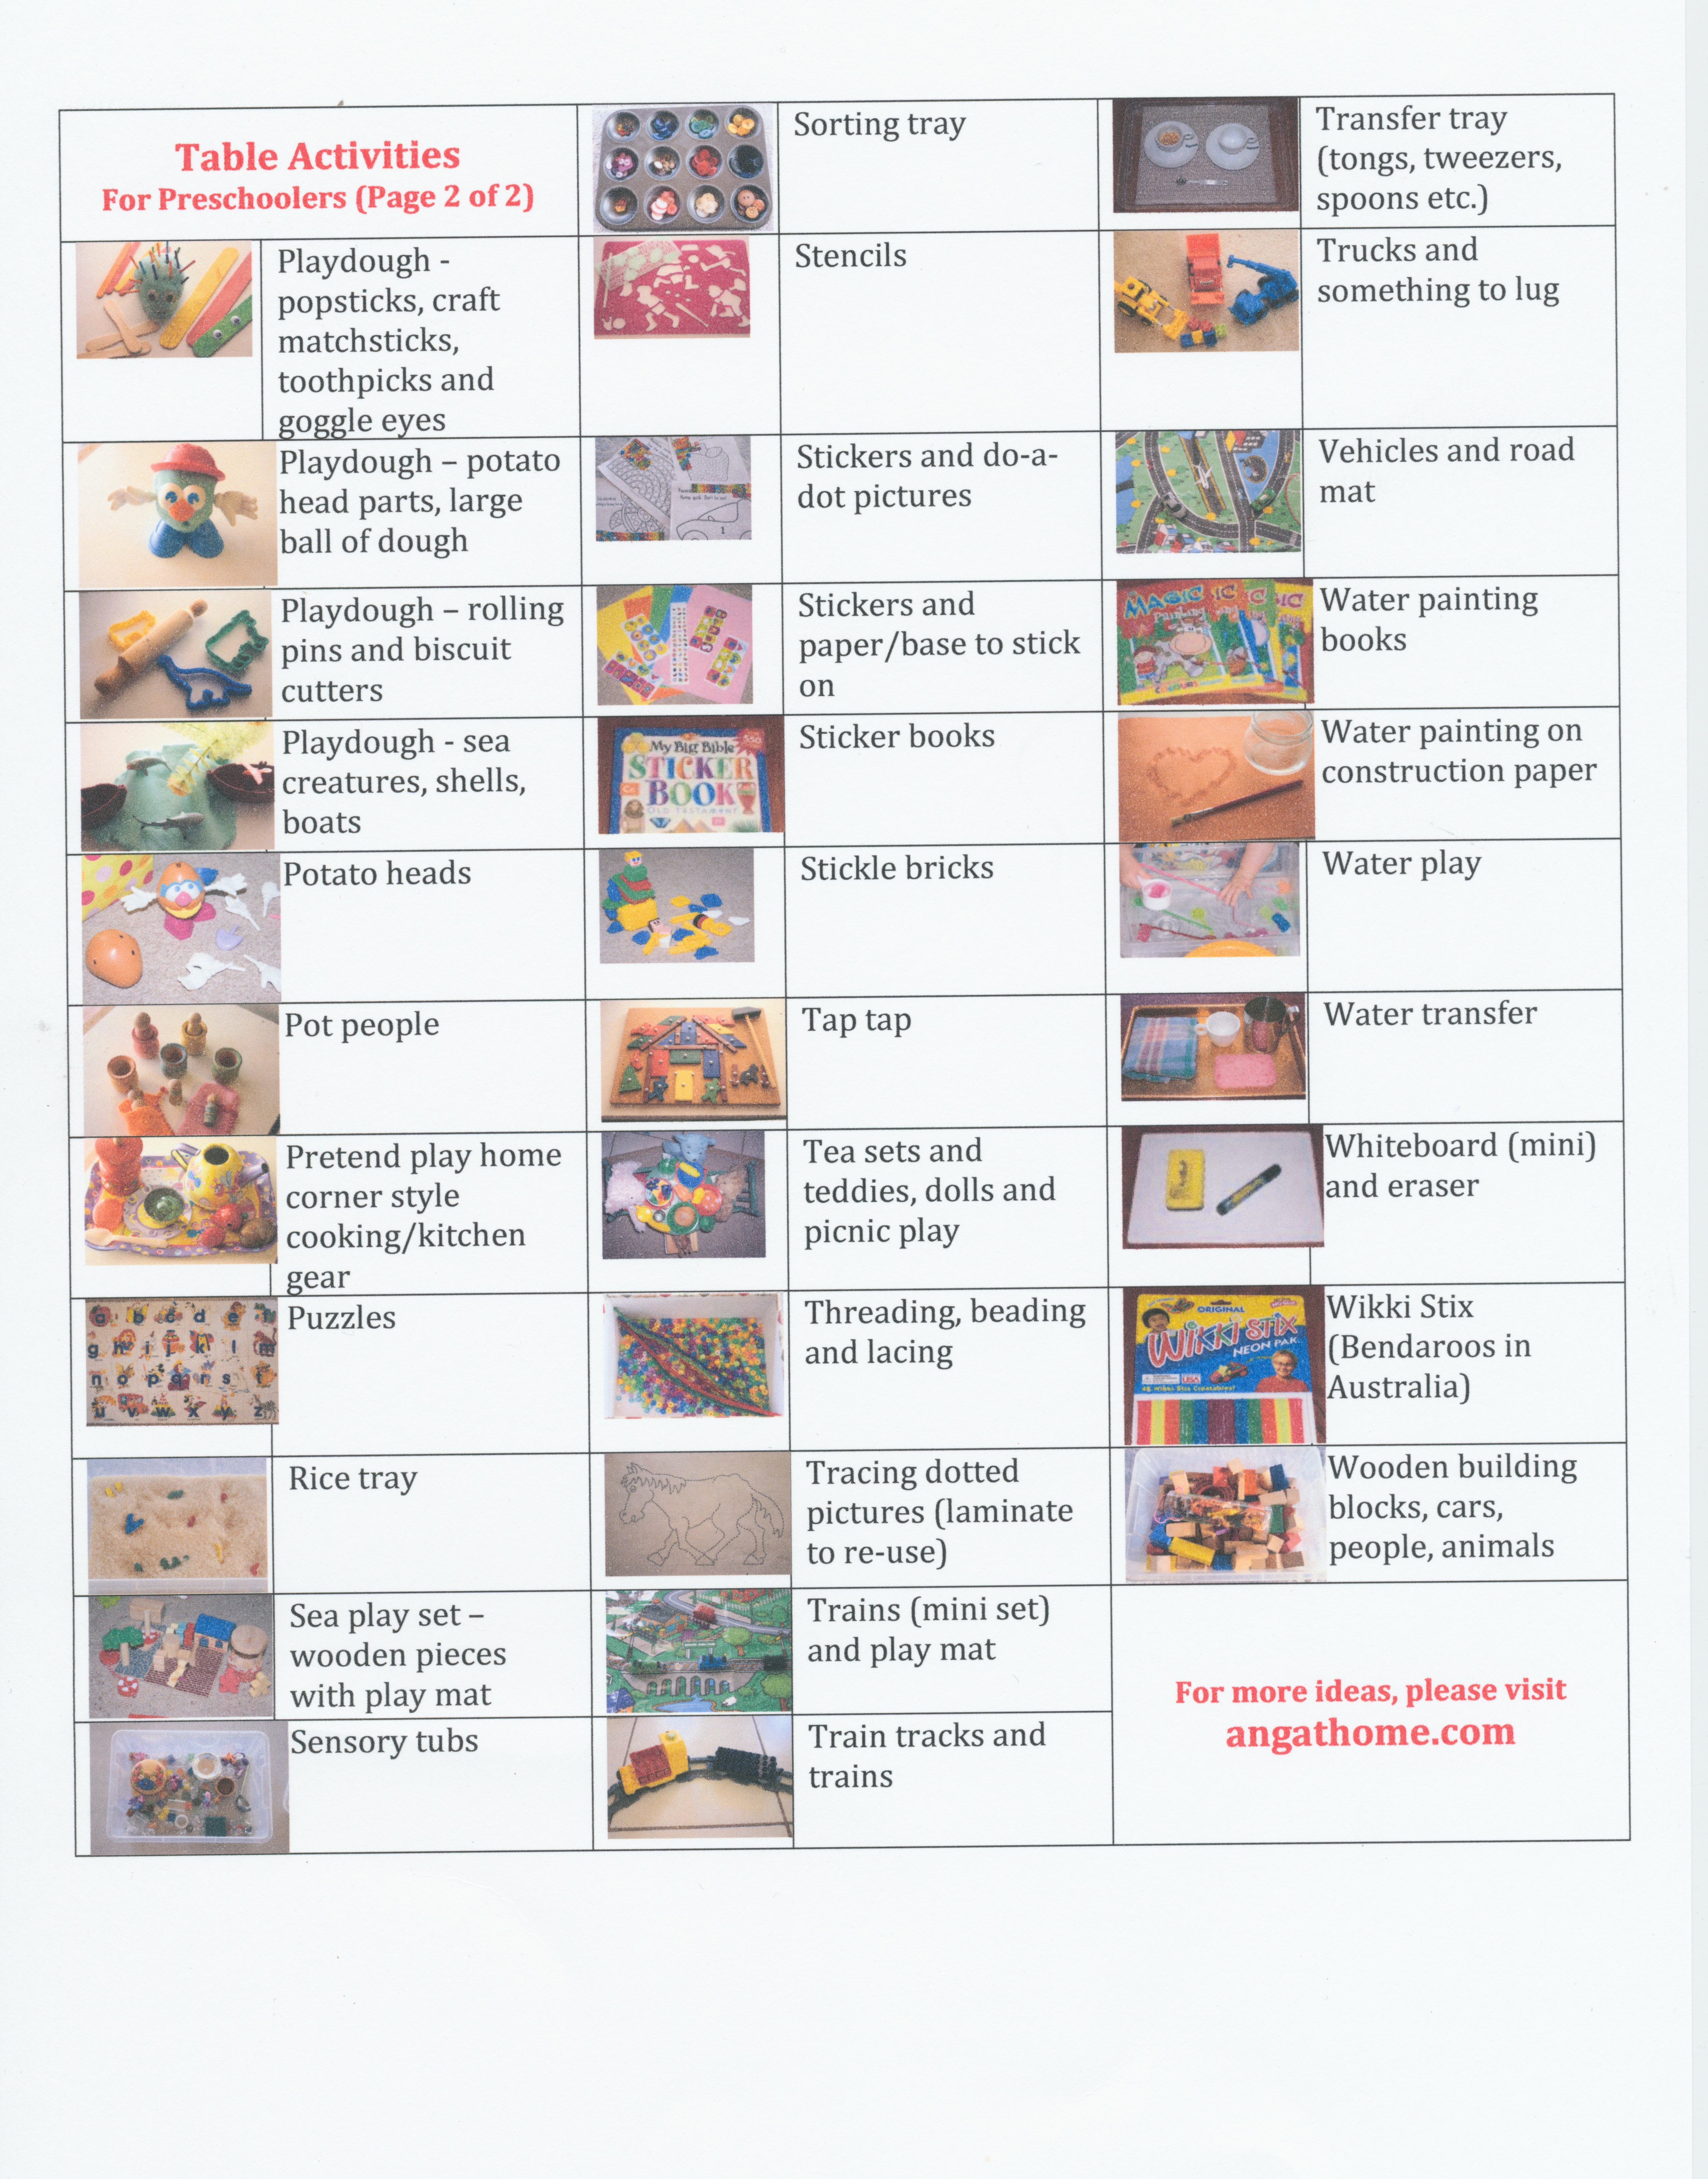
table activities master list for preschoolers download

For older posts with heaps more activity ideas, please follow this link; Workjobs & Montessori activities for highchair, mat or table time(mathematics, language, practical life & others)

Advertisement

Ziploc activity bags for toddlers and preschoolers

Noodle threading is always fun, just remember to tie one on the end to stop all the others sliding off while children are threading. When they have had enough of threading they can pretend to cook the noodles for dinner.

Ziploc activity bags are simply self-contained activities for toddlers, preschoolers and young children that include everything necessary for the child to complete the activity. Thus named because they are often stored in Ziploc plastic bags that are readily available from the supermarket. These bags have a plastic zip-style closing system that is easy for young children to manipulate, however we haven’t found them to be very long-lasting. Shoe boxes, trays or other containers are of course equally suitable but not so easily transported. Press-loc or snap-loc plastic bags are not as good because young children are not able to re-seal them independently, but if you don’t mind a few seconds to close each bag when they are done, they seem to last longer.

The kind of activity you can include is endless and their uses wide and varied. Some Mothers save them for school time activities while the older children require their attention. Others use them to take on holidays, while travelling in the car or when visiting with friends. They are useful for meals out in a restaurant, at home for mat time, blanket time, highchair time or table time activities. Whenever you need to keep a young child happily occupied these can be whipped out for hours of entertainment.

So what do you put in them? Almost anything really. Ideally they wouldn’t contain anything too messy if you want them to be easily transportable, but for home use anything goes.

Department stores have packs of paper shapes in the scrapbooking section which are great for gluing.

  • Glue stick and paper shapes for gluing

    When young toddlers first start to draw, tape one page at a time onto the table or highchair tray. For two reasons – it won’t keep slipping around and every page of the colouring book will not end up with a single blue line down the middle!

  • Drawing
  • Playdough
  • Stamping (stamp pads and ink stamps)
  • Lacing, threading or beading
  • Puzzles
  • Books
  • Construction toys
  • Pattern blocks
  • Stickers and sticker books
  • Small tea sets and mini teddies

    Finger puppets work best when the characters represent well knows stories that the children have heard you tell before.

  • Finger puppets
  • Mini whiteboard and eraser
  • Small chalk board and duster

    Simple stacking pegs are interesting once toddlers have the dexterity for it. This one kicked in at about 2 years when they could handle the quite stiff pegs.

  • Peg boards
  • Board games
  • Dot-to-dots and mazes
  • Colour-by-number
  • Stencils

You could include learning activities for basic maths and language skills. Starter Styles are a maths activity that cover a variety of beginning language and mathematical skills.

There are heaps of brilliant websites and blogs with an abundance of ideas for Ziploc bag activities;

Chasing Cheerios is one of my favourites with lots of wonderful toddler activities.

Natural Parents Network has some good ideas, including coloured pasta beading, pasta sorting, mini-books and stickers, lid sorting, playdough, cut and glue collage bag, and mini-playmats with cars and things.

Intrepid Murmurings has preschooler activity bags here.

There are lots of ideas for what they call “tote bags” here – just scroll down. They get better as they go.

Routines: Room time

Amazing things can be created in room time!

At around 18 months to 2 years of age, a toddler is ready to transition to room time instead of playpen time. Having said that, my two and a bit year old twins still have playpen time rather than room time for a number of reasons – space and lack of available rooms being two!  The following are some ideas for how to go about room time. My next post will help you to transition to room time smoothly. (It may be helpful to have a quick read through these posts first: playpen time, toys and starting late, choices)

What is room time? A time each day that is set by Mum when a child plays in their room (or a designated room) for a period of time determined by Mum. Do not confuse room time with a child choosing of their own volition to spend time playing in their room. This is a time chosen by you, with toys chosen by you (or a limited choice for older children) for the length of time chosen by you.

Tips for successful room time: 

  • try to arrange the room so that you can check on the child but they can’t see you.
  • start with 10-15 minutes and work up to longer time periods over several days. Even children who have been contentedly spending an hour in their playpen need smaller time increments to start with. This is a new freedom and you want to be able to praise them for their success in staying in their room and making wise play choices. Once the transition has been made and all is running smoothly you can increase the time again.
  • get the child started on an activity they enjoy before you walk out.
  • do not plan to use this time for the first week or so. Hover nearby, check on children frequently and deal with situations before they get started. Remember, the purpose of the short time period to start with is to finish while it is going well and praise, praise, praise! Do not be tempted initially to extend the time because it is going well and leave it until a problem happens – end on a good note.
  • start when you know you will be able to be home for a few days in a row
  • for young children, consider doing it through the weekend until well established
  • have it at a similar time each day
  • set out the toys you want a toddler to use or provide a limited selection of toys for an older child to choose from – not unlimited access to everything in the room.
  • introduce packing away from first use – demo, help, then independent. Have an easy storage system such as open crates. Sort toys out. One large toy box for everything not a good idea. Toys get lost, pieces are mixed up, toys are buried and forgotten and children can’t be bothered digging through to find what they need.
  • The success of room time depends on the focus and control that you are modelling and teaching throughout the whole day. A child who has too many freedoms and will not obey you during the day will not suddenly obey you when it comes to room time. Using a gate in the doorway can be useful for little ones during the initial transition and takes away the temptation to keep coming out. However a child who is not being trained in obedience will find a way to get out if they REALLY want to, despite the barrier.

 Toys:

  • You may like to keep room time toys only for room time so that the interest level stays high. Alternatively, toys can be sorted into crates for each day of the week or changed on a monthly basis.
  • Have a system in place to put the crates/boxes etc. into. A low bookshelf or cupboard that the child can reach is ideal. A few shelves that are out of reach can also be handy for those toys that are not for general playtime but are saved only for room time or for playing with Mummy and Daddy etc.
  • Clear plastic crates allow you to see contents at a glance.
  • Remove lids and simply have open containers that slide onto shelves. Remember, the easier it is to pack away, the more likely the child will do it without a fuss.
  • Sort toys out into smaller containers of similar sort (as children get older, toys become more complicated and have more pieces – mixing sets or kits with other toys makes it difficult to access.)
  • Do not store toys in draw-string bags, cardboard boxes with lids etc. until the child is able to manage those by themselves. If they have to ask you to take a lid off for them, they will be coming out of their room to do so and/or unable to pack up without your assistance.
Transitioning from playpen time to room time:
  • Put the playpen in the bedroom to begin with.
  • Use a mat or some other kind of blanket/carpet etc under the playpen that will become the designated play area in the room once the playpen is removed.
  • Have the toys sorted out and in the same places you will put them when room time begins without the playpen.
  • Take down only one crate at a time and say every day that this crate must be packed away before another one can come out – while in playpen one crate is all they get, so include enough variety to last the entire session. This means that later there should be a controlled amount of mess – no more than the contents of one crate should ever be out at one time.
  • Pack up with the child to begin with, one kind of item at a time, in a methodical way – remember you are teaching them how to pack up for all those times later they will do it themselves. Say out loud what you are doing, “First lets put away all the cars, now lets find all the books” etc.
  • Once the child is used to helping you, do some together then leave them to finish a set amount. No consequence for not packing up is needed, they are simply not free to come out until it is done.
  • If  there is a lot to pack up, simplify the pile into perhaps one or two kinds of toys – too many items from different containers/kits will be confusing and children often end up sitting there packing away nothing at all. For example, if a box of Duplo is out, along with books and a puzzle, perhaps clean up the books and puzzles for the child and require them to do only the Duplo.

Removing the playpen:

  • Explain that they need to play on the mat or other area you have designated.
  • Remind them of the toys that they may choose from – the same system you have well established while still in the playpen.
  • Initially, continue with the crate system. As children get older and toys become more complicated, begin to slowly hand over the choice to the child eg. you choose 3 items from the shelf, I will choose the rest.
  • Pack away most of the toys in the bedroom to begin with and only have out a few options that the child can choose from. More can be added later.
  • Remove any treasures or irresistible things that shouldn’t be touched.
  • Always have a set place for items. Teach how to pack away every toy as it is re-introduced back into the bedroom or a new toy is added.

Troubleshooting:

  • Try to ensure that household traffic is not passing by the door of a child who is having room time or they will be constantly distracted and more likely to want to come out.
  • Keep activities that sound like a lot of fun away from the sight and hearing of a child in room time. If they love to paint and you use this time for the older children to paint, it is much more difficult for them to be content knowing what they are missing out on.
  • In large families where children share rooms there may not be enough room time rooms to go around. If you are homeschooling and have older children at home, they could perhaps use this time to complete school work and have their room time at a different time of day. I prefer to have everyone in room time together so I get a break therefore we use almost every room of the house. Toddler and baby nappers go in portacots in rooms other than those they sleep in. Middle ages have their own desks and toys set up in separate bedrooms, including their own sleeping room and the baby room. The eldest is the most mobile as his interested are more portable. A crate with wheels makes his Lego set moveable and books are easy to pick up and cart about. Any other project is collected before room time begins and moved to where he will be. This may be the family room or loungeroom or even outside if the weather is nice.
  • Make sure that the toys are age appropriate, interesting and provide enough stimulus to last the whole time. Older children move away from just toys and in my household are given their own desk around the age of 4. We give them a mini set of drawers stocked with all manner of craft and drawing items, scissors, glue, construction paper and all sorts of bits and pieces and they have a wonderful time creating with these every day. Construction toys are pretty much essential for boys and good books are great for all.

Having room time for everybody every day leaves me with a chunk of time every day to recharge and gives the children a much-needed break from each other. They are often refreshed and in much happier moods when they re-emerge. Those personality types who crave time alone are rested and recharged and the more sanguine children benefit from learning to be by themselves and using their time in a worthwhile fashion. The projects the older children get up to are often quite amazing and the time is rarely wasted.

Montessori style toddler tray activities: Water transfer

A basic Montessori style practical life tray activity to set up for your toddlers or preschoolers is water pouring. A tray with low edges will contain any spills and little ones will have a great time pouring themselves cups of pretend tea and up their water intake for the day dramatically!

Start simple, with two small tumbler style cups that fit neatly into the hand for your toddler to pour from one to the other. Next try a small jug for pouring and finally introduce a teapot. Teapots are more difficult to manage as it is harder to judge the distance the water will pour out from the spout.

A good introduction to water pouring - a small jug (not too heavy for little hands) with a sponge to squeeze spilt water back into the jug and a tea-towel for the final drying up of the tray and dishes

For older toddlers more accessories and little tea-sets can be included with perhaps a dolly to hold tea parties with. An activity that is useful for highchair time and as a table activity, I prefer to use it at the highchair so that my younger toddlers can have a go without trailing water behind them.