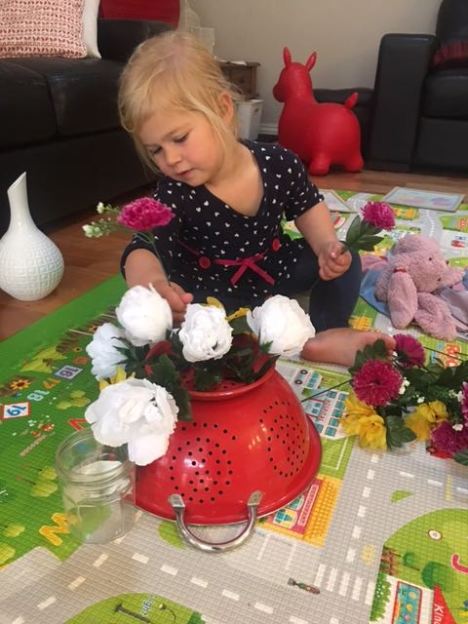
If you are blessed with a kinesthetic learner, providing hands-on learning experiences is vital. All young child however need to move from tactile or concrete mathematical experiences (where they manipulate objects to develop mathematical understanding) to abstract (“on paper”) experiences.
There is no better way to teach children to count than to have them go ahead and count! The first step is to ensure that they are able to recite the number order. The next step is to develop one-to-one correspondence (matching one number to one object.) After that, let the counting begin! You will need to step them through the process initially with lots of opportunities to count. Use everyday activities around the house to introduce this skill; setting out 4 plates, counting 3 sets of cutlery, placing 5 sultanas on a celery stick, collecting 5 hats for outside play etc.
To transition to the tray activities, you will also need to teach the children how to recognise and order the numerals to 5. This can be done as they complete the activities with self-checking number strips to match the numbers (see the egg carton castles example below) or taught separately before you give them the tray activities.
For homeschoolers, or those who are wanting educational ideas for highchair, mat or table time, here are some hands-on ideas for presenting counting from 1 to 5. While children can easily develop this skill through their every-day experiences around the home, these workjobs will help them to develop concentrating and focussing skills and are a great introduction to more complicated workjobs and Montessori style tray activities that will extend their skills as they grasp each basic beginner skill.
My older toddlers begin with these simple counting activities which virtually guarantee their success and I am able to teach them the general concept of how the experiences are presented and what they need to do. I can then change the materials, extend the numbers and gradually increase the difficulty of the experience to match their developmental levels. They love to manipulate the materials and enjoy the sense of accomplishment once they are able to complete each activity.
Before expecting a child to do the activities independently you will need to spend some time teaching them how to set out the containers, order the numbers and add the appropriate number of objects. Depending on their previous experiences with counting, this may be a very quick or more long-term process. Once they have mastered one counting experience though, the skill is then transferred to the next new activity with only a quick demonstration from Mum.
Any kind of container can be used and with a bunch of something to count and 5 numbers to order you are all set. Ideally workjobs should be self checking so that the child is able to self-correct their own work without your assistance.
This is the first tray counting experience I use. The popsticks are first sorted into colours (with the child already having completed many colour matching and sorting activities previously) before being counted and popped into the correct cup. If children do not yet recognise their numbers they are able to count the small chunks of popstick next to the number to find out which numeral it is. Those who are just beginning can simply match up the colours to find out which cup to put them in. If they are completing the activity with colours rather than numbers, I simply spend time with them counting the number of popsticks in each cup as we pack away the activity until they are able to transition to relying on their counting skills rather than the colours.
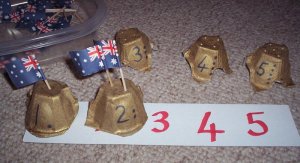
Including a number strip for the child to match to as they order their numerals means they can be successful without already knowing the number order. The dots next to the numerals on the side of the castles mean they can count to check how many even if they do not recognise the numeral itself. The correct amount of holes are poked in the castles so that the castle must have the correct number of flags.

Milk bottle tops marked with liquid paper are the numerals here (you could include a number strip to match to if needed) and the size of the cups can be ordered as well for an extra dimension. The child sets out the 5 cups, orders the numerals, then counts out the correct number of pegs for each cup. Pegging is also an excellent fine motor skill.

Coloured pompoms are matched to the same colour sticker in the muffin tin. This is more a one-to-one correspondence experience as no numerals are included, however I have the child count how many there are in each hole before they pack them away.
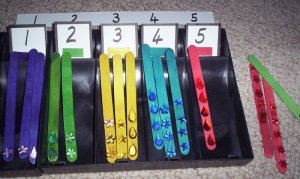
The numbers are set out first (following the number strip if needed) then the jewels on each popstick are counted to match the correct number. Popsticks are colour coded to the numerals to make them self-checking.
Check through your cupboards to find a group of containers, write some numbers on anything handy, add something to count and you have a simple counting workjob. Two dollar shops and other discount stores are great for finding appealing bits and bobs to count and manipulate and a multitude of activities can be set up with very little expense or effort required. Young children love to do “school” with their older siblings and this is the perfect introduction for them.
Filed under: Workjobs & Montessori activities for highchair, mat or table time(mathematics, language, practical life & others) | Tagged: counting activities for toddlers, hands-on math, highchair activities, home-made Montessori, homeschooling with toddlers, mat time or blanket time, Montessori style tray activities for toddlers, table activities, workjobs | Leave a comment »