Fussy eaters and 2 plate dinners


Do you have picky eaters who have somehow come under the delusion that your kitchen operates like a restaurant and dinners are made to order? Perhaps mealtimes are a chore and constant battle is being waged with a child who feels that the meal you have served fails to fit within their stated parameters of acceptable food preferences. Take heart, today’s training tool is for you.

The pervading advice around the traps seems to be along the lines of “Keep meal times positive” and “offer a variety of healthy choices and children will be sure to eat some of them” etc etc. Now I know my own children and their response to these methods would have been very positive – “I positively will not be eating these vegetables” or perhaps, “Thank you Mother dear for this wonderful array of spring vegetables, but tonight I will be having the sausage and bread with a side of sauce and perhaps a dash of mayo.

As a Mother, my aims for our children regarding meals are fairly straight forward. I would like my children to:

  • eat what is set before them
  • do so with a positive attitude
  • keep negative opinions to themselves
  • be able to eat what someone else serves them in a social situation regardless of whether they like it or not
  • be willing to try new things
  • finish within a reasonable timeframe

There are obviously exceptions to the rules. Sick children will not eat well, babies (especially those without all their teeth!) are not expected to plough through a plate of carrot and celery sticks and I do not serve mind blowingly hot and spicy meals etc. But within reason, I expect my children to eat what I serve.

They all have food preferences, in fact so do I. I often do work around these, but only once the children are characterised by eating what they are given. Every now and again, my tomato hating daughter is served a slice of tomato in her sandwich and is expected to choke it down. The mushroom hating son is occasionally expected to slide one of those little suckers down his throat without gagging. I do not serve him a bowl of mushrooms or her a heavily laden tomato bruschetta. I do teach them to quietly put the offending morsels on the side of their plate without comment. (Our rule here is that if they complain aloud about said offending item, they will eat every bite. If it silently appears on the side of the plate it can stay there, unless previously stated that they will be eating it this time.)

If you have ever been at someone else’s house and had one of your children loudly and rudely state that they do NOT like this food and refuse to take even a bite, you will know why I have chosen to occasionally deliberately give them something they prefer not to eat.

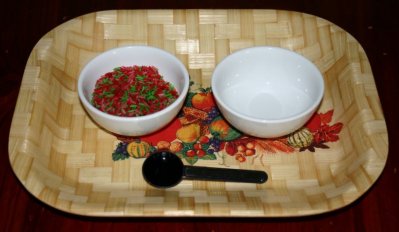
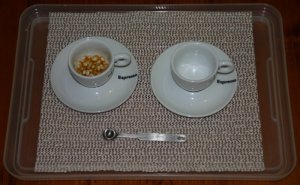
So now for the 2 plate dinner tool. It is very simple. Place a small amount of whatever food it is that your picky eater will likely be reluctant to eat on one plate and the rest of the meal on the other. The plates are both set in front of the child at meal times, however the least liked plate is directly in front of them and the rest of the meal is a little out of their reach, but where they can still see it.

With a positive tone and pleasant attitude, explain that you will happily pass them the second plate once they have finished everything on the first plate. Inform the child calmly that when the rest of the family is finished their meals (or at a time set by you) both plates will be removed and dinner will be over. That’s it! No nagging, force feeding, threatening or anything else.

Ensure that you do not give any snacks before the meal that would take away from their appetite and do not allow the child to have a glass of water or anything else before the first plate is finished. Keep the serving very small to begin with and you may even like to have dessert on the table for a meal or two as an added incentive while the initial training is taking place. I always start with other foods that I know they love to eat, as well as a tiny amount of the veggies or whatever else we are battling over.

You may find that they do choose to go without the first couple of times. But if you stick to your guns, give no other food until breakfast, ensure they are hungry at dinner time and not full of snacks, milkshakes or drinks, this will envariably do the trick.

We will face battles with our children at some time or other. For some, eating is never an issue but the challenges arrive in other behavioural areas. With others, the battle is fought and won during meal times and spills over into positive progress across many other areas.

Out of the five children who eat solid food we now have 4 very good eaters. This has not always been the case. The fifth child is in a league of their own and is improving, but I won’t shock you with how we are dealing with those issues just yet!! (Let’s just say that they are becoming intimately aquainted with the laundry.)

Father’s Day 2012: traditions and home-made gift ideas for children

Father’s Day was loads of fun yesterday and you would have thought it was Christmas by the level of excitement in the days leading up to it! We narrowed down our home-made gifts to a select couple and the children steadily added to the pile throughout the week with their own creations. As family tradition dictates we began the day with gift giving in Mummy and Daddy’s bed. With a little one to feed and church to get to, breakfast in bed wasn’t an option so as you can see, Daddy was already dressed!

Our all together gift was this photo frame with each child holding a letter to spell out Daddy. With a large number of children all needing to give gifts, we look for ways to make that easy. Our Mummy and Daddy shop works well, but for Father’s Day the rule is we have to make something and we usually try to find a project that everyone can do together. This fitted the bill nicely.

All that was involved was making a couple of card letters and taking the photos. The trickiest part was getting a baby and a 9 year old to look good at the same time and making sure that the letters were about the same size in each shot. No need to make three letter D’s though – one will do. It did take me a little while to work that out so thought I’d mention it! I found the idea here.

Everyone wanted to help make Daddy’s special Father’s Day breakfast, even the toddlers. Having kids in the kitchen can be a challenge but it is worthwhile teaching young ones to enjoy cooking. Cutting up bananas is something even my 2 1/2 can do as long as I’m not too particular about how even the slices are! My other 2 1/2 year old was busy putting away the “cutleries” from the dishwasher and setting out spoons on the table.

Our gift to the two Grandparents was a framed message saying Happy Father’s Day with the children spelling out Grandad and Grandpa with their bodies. Here’s “Dad” below to give you the idea. Having done it once, I strongly suggest you use a plain coloured background or just have them lay on the grass. The letters weren’t very straight but I couldn’t straighten them for cropping because of the striped picnic blanket background. Oh well, you live and learn! This idea came from here.


Both of these would make great birthday and Christmas gifts for any parent or Grandparent and are an inexpensive way to bless a special person in your life. Have fun building great family memories and showing those close to you how much they mean to you.

Father’s Day 2012

Like most celebrations in our house, Father’s Day traditionally starts in Mum and Dad’s bed with gift giving. The children can’t wait to give their home-made cards and presents.

We have a loose family policy that for Father’s Day and Mother’s Day we will get the kids to make gifts, rather than spend a lot of money buying something. So in light of the fact that Father’s Day is this Sunday, I had a bit of a search for Father’s Day gifts for the children to make this week and found some great ideas. I can’t show you a photo of mine because said Father would see it, but here are some of the other cheap and relatively easy ideas that all the children in the family can participate in.

  • The poster in the photo above has all the children’s footprints on it. I cut them out because we find it very difficult to get a good print right away and usually end up doing several prints per person to get a good set. In the centre is a photo compilation of all the children. My husband likes to have something to put up at work so our gifts are usually photo based.
  • Children are photographed holding large cardboard letters to spell out “Dad” here
  • The wall hanging above is my own idea. We made this a couple of years ago with the older two (7 and 5) doing the sewing which was their own design. The calico style fabric is sewn around dowel sticks using blanket stitch so that Daddy can hang it in his office at work. They also wound wool around cardboard frames to make the mini photo frames and we put photos of all the children in them.
  • Children are photographed in the shape of letters here to make a “We love you” message. You could also do Daddy, Grandad or Grandpa the same way if you have lots of children.
  • There are a number of nice ideas for the kids to make here. I like the handprint tree and the fingerprint tree. We are going to use one of these to make Father’s Day cards and add Psalm 128:3 to the bottom; Your wife will be like a fruitful vine within your house; your children will be like olive shoots around your table.

  • Another of my own ideas in previous years were these screwdriver flowers. We wound strips of green crepe paper around the screwdriver to make the flower stems. The flower heads are made by cutting a two-inch wide strip off the end of a crepe paper roll (still rolled up) and making tiny slices into it all the way across, without cutting through the strip. When the rolled up strip is unrolled, you end up with a very long fringed ribbon of crepe which is then wound round and round the tip of the screwdriver and taped in place.
  • kidspot has a nice handprint flower scroll to make that would be quick and easy. A large family could fill a garden with everyone’s handprint on their own flower.
  • Another cute card idea here. Make footprints inside a larger print from Dad’s shoe with the caption “Walking in our daddy’s footsteps.” Don’t forget to clean the paint off Dad’s good work shoes though!
  • We make cards every year with the degree of difficulty dependent on the age range of the children and the time and patience available from Mum. These were very simple collage photo cards. I just set out the cardboard frames already cut and a bunch of materials and let the little ones glue on whatever they wished. A picture of themselves was added once the frames were dry.
  • To add to the family traditions that we like to keep going, I thought it would be nice to give Dad a themed breakfast or lunch. Cupcakes with Daddy on top, pancakes or sandwiches cut into letters to spell his name, pizza with a letter D on top… I’m sure with some thought this could be good.

Whatever your choice, spend some time to show Dad just how special and important to the family he is. I couldn’t do it without my wonderful husband and he deserves to be spoilt!

Teaching Children To Read: Where to begin?

Teaching children to read is one of the most rewarding and challenging things a home educator can do. Watching the love of reading turn into hours of pleasure and learning while curled up with a good book is such a joy, not to mention the importance of being able to read God’s word. So where do we start?

Reading good literature to children is an excellent beginning. Spend a good amount of time every day reading to your children from a young age and they will reap the benefits later.

Apart from being exposed to the written word through books, there are many different stepping-stones along the path to reading – phonetic awareness skills that build on top of each other until competent reading is achieved. We tend to head straight for learning the letter names and sounds, but what many parents don’t realise is that there are several pre-reading skills that need to be in place before a child has that light-bulb moment as they realise they are making sense from the written word.

There is a great article by Diana Rigg here that identifies the sequential steps on what has come to be known as the phonological awareness ladder. She cites research that identifies a direct correlation between children’s grasp of each of these steps and later reading success. Spending some time with your child in the early years ensuring that their ears have been trained to hear sounds in words and have mastered each of the steps on the phonological ladder will set them up for success later.

If you are an educator (and all parents are), the small amount of time spent familiarizing yourself with these concepts will be well worth it. You may be able to skim through them with a child who easily picks them up along the way. However you just may save another child from years of frustration and difficulty in their reading journey by plugging those holes now. It’s worth the effort.

Take a moment to read through Diana’s article first, then with the couple of ideas below and your own methods, you can easily cover these skills with your child. Why not use some of the time spent travelling in the car to play some word games? Be careful to use the sounds that letters make, not their alphabet names. The letter B is called “Bee” but it’s sounds is “b” as in bat.

Level 1 – Participation in rhymes

  • Listen to nursery rhyme CD’s and books
  • Sing rhyming songs and recite fun poetry
  • Read books with obvious rhyming patterns

Level 2 – Words in sentences

  • Ask the child to put up a finger, clap each word or set out a small object for every word they hear

Level 3 – Identifying and Producing Rhyme

  • Use rhyming picture cards and find pairs of objects that rhyme
  • Say 2 words and have children tell you whether or not they rhyme
  • While reading a rhyming story, leave off the rhyming word on the end of a sentence and have the child guess what it could be
  • Make up strings of nonsense words that rhyme
  • Say rhyming words around the circle until no one can think of another rhyme
  • Play rhyming “I spy” (I spy with my little eye, something that rhymes with… )

Level 4 – Syllabification

  • Break words up into syllables or parts. Clap each syllable in words and say how many parts there are. For example, “el-e-phant” has 3 syllables, “app-le” has two, “ant” has one.
  • Sort picture cards or little toys and objects into groups according to the number of syllables
  • Put out coloured chips for each syllable in a word

Level 5 – Recognition of initial sounds in simple words

  • Aurally identify the first sound in words. Ask children to listen for the first sound that comes out when they start to say a word. Find as many things around the house as you can that start with the given sound
  • Find the odd one out within a group that all start with the same sound
  • Sort pictures or objects into their initial sound groups, focussing on 2 obviously different sounds to begin with.
  • Play “I spy.”
  • Remember, this is about training the ear to identify the sounds, not matching sounds to letters at this stage.

Level 6 – Recognition of final sounds in simple words

  • Use the same ideas that the child is already familiar with for initial sounds, focussing on the last sound in the word instead.

Level 7 – Blending

  • Say two or three sounds that make up a word for children to join together. Stretch out the sounds to make them very obvious. For example; d-ooooo-g The child blends the sound together to identify the word.
  • Play the blending game. I do use letter cards for this, but the focus is still on the sounds, not the letters. Hold 2 letters as far apart as you can. The child uses a pointer or fancy stick of some kind (just to make it fun!) and points to each letter in turn. Say the sound each time she points to the letter, moving the letters sightly closer together each time until the letters are touching and the word is blended.

Level 8 – Phonemic segmentation

  • Give lots of practice in segmenting words into sounds. For example, you say dog and the child segments it into d-oooo-g
  • Have a bag or decorated container of pictures or objects that have three obvious sounds. The child takes a lucky dip and segments the word.


Coming of Age 13th Birthday

I had the privilege of attending a young lady’s coming of age 13th birthday recently. It was a memorable celebration and commemoration of this important milestone and transitional point in her life –  a rite of passage experience to help mark the first stage of a girl’s cross-over into womanhood. After reading “Raising A Modern Day Knight” and “Raising a Modern Day Princess” I have several ideas stored away for my own children’s coming of age ceremonies and have added some of the special things I saw at this event to my mental list.

The birthday girl and her friends spent a little time together first, with some games and gifts to celebrate their friendship. One-handed present wrapping was one of the games they enjoyed.

A delicious afternoon tea was served during the adult gift presentations. We all loved this ring tin sandwich idea.

One of the themes of the day was “The Proverbs 31 woman” with this charm bracelet given to the 13 year old by her parents. The charms were carefully chosen to represent each of the bible verses in Proverbs 31 and symbolise the qualities that a Godly woman possesses. It will be an ongoing reminder and symbol of her faith and the moral foundation that a Godly woman’s character is based on.

Another gift to mark the occasion was a beautiful hope chest (glory box). Guests were invited to contribute something to the chest to start building a collection in preparation for the 13 year old’s future life. “The Hope Chest; A Legacy of Love” by Rebekah Wilson includes ideas on how to use a hope chest and what you may like to include.

Continuing on with the Proverbs 31 theme, 5 of the women took a section each from the bible passage and presented a symbolic gift to go with each part, along with a bookmark with the bible verse printed on it. Many other beautiful gifts were given, with the women explaining their choices and reading out their words of wisdom as they were presented.

These gorgeous spoons were inscribed with “a heap of love, a spoonful of family, a pinch of friends and a dash of joy.”

This wonderful handicraft kit was put together by one of the ladies. She had made a couple of items herself and included the materials needed to complete several more little projects.

One of the lovely letters of wisdom. The box held hand-made doilies and table runners that had been handed down through several generations.

Some of the gifts could be used right away and some were to be put away for her future home.  Each one was chosen for a reason and the givers had been previously asked to include a letter explaining their choice and any symbolism involved, as well as sharing wisdom or encouragement for the future.

The celebration was a simple but memorable one and hopefully left the young lady knowing without a doubt that she is well-loved and supported by many around her and with a sense of excitement and joy as she looks forward to her future. Whether your event is small and simple or big and amazing, plan to mark these pivotal points as stepping-stones towards Godly womanhood (or manhood.) See this post for some links to interesting websites.

Raising a Modern Day Knight/Princess

Raising a Modern Day Knight: A Father's Role in Guiding His Son to Authentic Manhood

Do you have a son on the verge of manhood? A daughter about to become a woman? Do they know what it means to be a man or woman in today’s society? When exactly do they become a man or woman and what marks this transition?

Robert Lewis, in his book “Raising a Modern Day Knight” identifies three key areas that are vital in this process of becoming a man; a biblically grounded definition of manhood, a directional process to help him get there and ceremonies to celebrate and commemorate important transitional points in a young man’s life.

Along with the role of the community and the church, Lewis emphasises the importance of parents who are actively involved in their children’s lives, fully present and doing all they can to provide excellent role models. He outlines 4 principles of manhood that form the cornerstones of the foundation of authentic manhood and presents ideas for a code of conduct; ethical standards from the moral law of God to guide our sons on their path to manhood.

The second half of the book is devoted to developing ceremonies to mark important transitional points throughout a young man’s life. He emphasises the incredible impact these ceremonies have and gives some excellent ideas for developing symbols and ceremonies of your own, the first of which is generally around the age of 13.

Raising a Modern-Day Princess

Pam Farrel and Doreen Hanna have written a similar book for girls titled “Raising a Modern Day Princess” with ideas for creating a rite of passage experience to celebrate a young lady’s cross-over into womanhood. They aim to help girls see themselves as daughters of a heavenly Father (their King) and true modern-day princesses.

They discuss the importance of the Father’s role in their daughter’s lives and the opportunity Mothers have to act as mentors in the lives of our own daughters and other young ladies.

Jewish girls celebrate a bat mitzvah, Latinos a Quinceanera, Navajo girls go through a Kinaalda ceremony and American teenage girls may be involved in a Debutante or Purity ball. The authors offer some ideas for creating your own Modern Day Princess ceremonies (that may or may not include purity rings and other symbols of purity) and implementing traditions that could be passed down for generations. These ceremonies may include blessings, special gifts, feasts and outings and can take on many different forms to suit your family.

I would highly recommend both of these books. Young men are well covered in Robert Lewis’ book, however if you only have a girl I would recommend reading both. The ideas for boys gave me a great springboard for coming up with rites of passage ceremonies for my girls, with a different approach than I would otherwise have taken. (I did always think Boy Scout camps were way better than Girl Guide camps though!)

However you do it, please take the time to plan ahead so that you don’t miss these important milestones in your child’s life. They will be 13 before you know it and these ideas take time, planning and financial investment. I am excited to think about what we can put together for our own children and hope that these traditions will be one more building block that knits our family together and helps us to raise children who stand strong in their faith as they grow into Godly adults.

Other Resources:

“The Hope Chest; A Legacy of Love” by Rebekah Wilson is a book I haven’t read thoroughly yet, but comes recommended by a good friend of mine. As the name implies, it explains what a hope chest is and how they may be used. They could be readily included as part of a rite of passage ceremony.

Unfading beauty reading for  womanhood ceremony.

Fantastic blog account of an amazing manhood ceremony physical challenge that a Father and son completed. 12 stones with character qualities, mountain climbing, ring ideas.. I loved this.

A blessing example.

One family’s example of manhood ceremony scriptures and symbols.

I’ll be blogging next about a young lady’s rite of passage 13th birthday that I had the privilege of attending last weekend with a Proverbs 31 theme. Stay tuned!

Teaching toddlers to count: 1 to 5 workjobs and Montessori style tray activities

Here are some more counting activities for toddlers and preschoolers who are learning to count from 1 to 5. If your child has learnt the number order by rote (ie. can count out loud to 5) and is beginning to develop one-to-one correspondence (matching one verbal number to each object being counted) then they are ready to start simple hands-on counting activities like these. You may even like to set out only the numbers 1 to 3 to begin with. If you are new to teaching toddlers how to count, it might be helpful to read this post first.

I ask the children to order the pie tins from 1 to 5 and sort out the golf tees by colour before counting each group and placing them into the correct pie tin. Use a number strip for young children to follow until they know the number order without help.

Kinesthetic learners (and all young children) love the hands-on style of these activities and despite the fact that  this group is far from my favourite set of tray activities, I included them to show you how a quick search around the house will furnish you with plenty of materials to set up your own.

This is one of the first counting activities I introduce. The shapes are sorted by type, matched to the example at the start of the row and counted into the bottle tops. Beginners will often just fill up the bottle tops without having any idea of the numbers, but I simply have them read the number and count the objects as we take them out and pack them away.

Unfortunately this workjob doesn’t photograph well but the shiny silver contact paper and blue jewels are very attractive to little ones. The box comes from a packet of plastic food wrap. The jewels are placed into plastic shot glasses which are numbered from 1 to 5.

I bought these secondhand metal goblets for our pretend play home corner because they are unbreakable. Pegs of many varieties slide nicely over the thin sides. Placing dots under the numerals means that children who do not recognise their numbers can count how many dots there are until they can recall the numeral name.

All my young ones have enjoyed hammering golf tees and other items into these polystyrene foam blocks covered with loose weave hessian-like fabric. The red washers come from a set of many shapes and sizes raided from Grandad’s shed with the numerals marked on them in permanent marker.

Chip and dip trays are handy for many different activities.These wooden numbers came from a baby puzzle toy and the items are an eclectic assortment from my Montessori materials drawers.

Pegging is good for fine motor development. The child counts the number of feathers on each peg and matches the peg to the correct number of dots on the card circles left from used sticky tape rolls. The box is just the storage for the feathers and rolls.

These beads and frame are a commercially produced toy that I picked up secondhand for a couple of dollars. Keep an eye out for this kind of material at op shops and swap-meets. The tiles are from an old game I bought for $2 at a secondhand store. I threw out the game and just kept the tiles.

Another commercially produced toy picked up for a couple of dollars with baby food jar lids for the numbers.

Sizzlers and grace.

Our treasure tree after a day or two. (It is now quite well covered, but as we had cut up a LOT of leaves, it is by no means full.)

We are going out to dinner in a restaurant tonight. It is the culmination of our treasure tree character reward system. No, the tree is not full, but after reading “Give Them Grace” by Elyse Fitzpatrick we have decided to implement one of her suggestions. She mentioned marble jars and other reward systems and suggested that occasionally we should simply fill them up and have the reward as an act of grace towards our children.

We have been a very intentional recently about the message of grace and how we present the gospel to the children since reading her book. We have focussed more often on how our good works, right living and good character (being a “good” person) cannot earn our way to heaven or gain God’s forgiveness. We have discussed how we will never measure up to the perfect standard that God expects from us.

Of course, the message does not stop there. When we are finally able to admit our sin and see our need for a saviour, we can turn to Jesus and through His death on the cross, bearing the sin of us all, we can repent, receive forgiveness and be made holy in God’s sight.

We presented the children with the treasure tree chart and asked them what they were requires to do to earn their reward.  (Fill the tree with leaves by displaying acts of Godly character.) We asked if they had earned that reward – did they deserve it? As the tree is far from full, they could only say that they didn’t. By this stage, the older children were beaming as they had already guessed what was coming. We then announced that we would be taking them to Sizzlers as a demonstration of grace to remind them to think about the amazing free gift of salvation that they have available to them through Jesus, despite the fact that they haven’t earned it and don’t deserve it.

Who knows whether they will remember this in time to come, or if it will make any difference to their spiritual walk in the long run, but we will all have a wonderful family night out together and who knows what lasting impact it may have?

Scooping tray activities for toddlers and preschoolers

Scooping is one of the easiest Montessori style tray activities for toddlers and can be introduced at the same time as they are perfecting their spooning skills during meal times – giving them a little extra practise when spills are not so difficult to clean up!

Start with large, non-slippery objects that fit easily into a scoop (see mega marbles) and move to more fiddly materials like the popcorn or rice examples below. All you need is two containers (one to  to scoop from and one to scoop into), something to scoop with (spoon, scoop, ladle, etc.) and something to scoop (pompoms, noodles, rice, jewels, marbles, beads, dried beans, pasta etc.)

Have a look through your art and craft supplies, kitchen cupboards and junk drawers and you will be surprised at what you can put together in just a few minutes.

These pompoms are scooped into a plastic chocolate container insert with depressions in it. The scoop comes from a washing powder container.

This is a piece of packing foam that has indentations all over it; perfect for filling with marbles. The scoop is a pasta spoon from a child’s cooking set.

Dry popcorn kernels in espresso coffee cups with a 1/2 teaspoon measuring spoon.

Montessori trays are traditionally presented with the material to be scooped on the left hand side to help with left to right directionality for later reading and writing skills.

Green split peas are scooped from bowl to bowl.

Coloured rice is a very attractive scooping material.

When my toddlers were older and no longer finding simple scooping activities very interesting, I gave them this tray with a variety of containers to scoop, pour and tip with. They loved it.

Thankfulness and gratefulness

We all want thankful children who notice the things others give to them or do for them and express this thankfulness freely and without being reminded to do so. We love it when others are grateful for the things we do for them and let us know. How intentional are we though when it comes to teaching our children the character quality of thankfulness?

Before Christmas, we talked a lot about receiving gifts, thankfulness and good manners in relation to receiving gifts. I have tried to take this one step further with the children by instilling in them the importance of giving thankyou cards. It’s almost a lost art these days. A quick email or phone call is easy to do and better than nothing, but it is so much more personal and special to receive a handwritten card of thanks.

A friend of mine always sends thank you cards, (well done Miss Jaq!) even after a visit for dinner. They are so pretty and such a bright spot in my day and I have endeavoured to make it a habit for myself and the children with varying degrees of success; in busy seasons it just sometimes gets away from me.

Yesterday we all sat down and had a card making session together (minus the baby and toddlers.) It was lots of fun and we all enjoyed creating a variety of designs. We used a bunch of pretty papers, some silver thank you stickers, flowers and butterflies and some coordinated card. My scrapbooking shape cutters came out, a stick of glue and some flowers and leaves we had previously pressed.

The result is a lovely collection of pre-made cards that will be ready and waiting the next time we need to thank someone. Now all I need to do is get better at actually posting the cards we do make…