Hands-on maths; solving for the unknown tray activities

img_2599

(Free printables below!)

Success in higher level maths requires mastery of basic addition, subtraction, multiplication and division concepts. The answers need to come quickly, without requiring mental effort to work them out, otherwise the more difficult problem solving is slowed considerably and errors result. Working through simple problems over and over cements the answers in children’s heads and helps them stay in long-term memory. Lets face it though, page after page of the same kind of problems in a maths textbook can be… well.. boring!

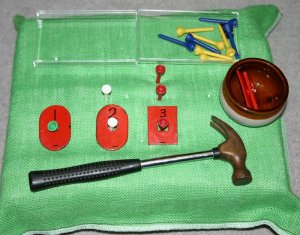
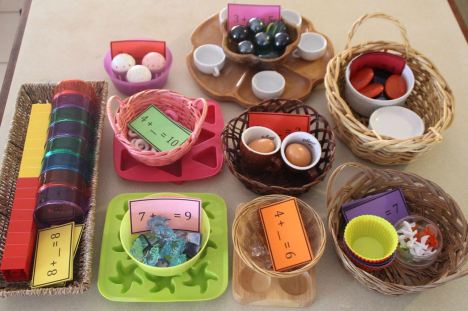
My solution is to gather a range of attractive materials and allow the children to complete problems repeatedly, but in a way that means they hardly notice it is the same skill over and over.

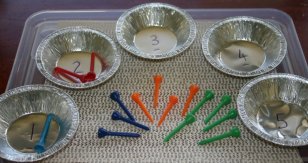
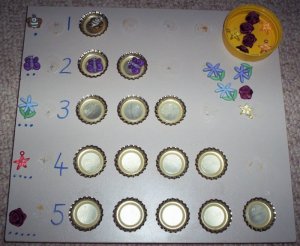
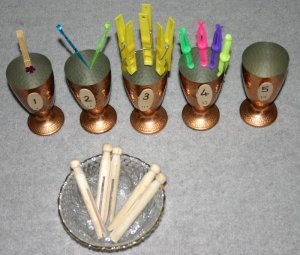
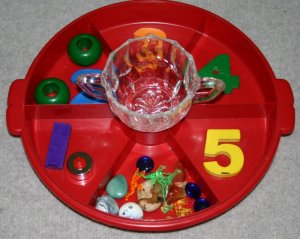
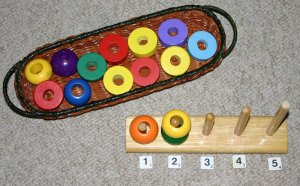
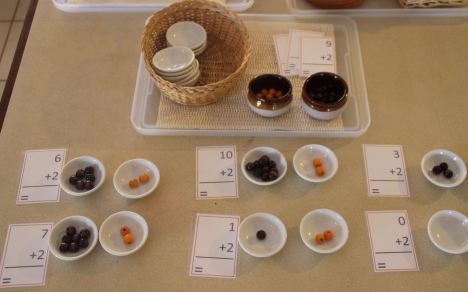
These are our ‘solving for the unknown’ trays and like the addition trays, the cards are in sets. This cards all have the same end total, for example 0+_=3, 1+_=3, 2+_=3 and 3+_=3. Containers of the same number as the answers are filled with 2 distinctly different types of materials to illustrate the problem shown on the cards. The children can start with the smaller numbers and work on them until they no longer need manipulatives and can compute them almost instantly before moving on to the larger numbers.

The materials are attractive and any cards they can already do they simply tell me the answer to and set aside so that they are not wasting time practising combinations they already know.

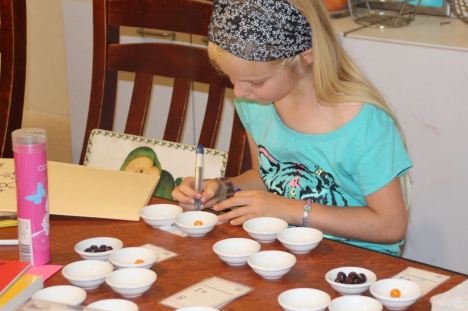
Not all learners love hands-on activities. My 7 year old book work lover is happily working through page after page of these same problems in her maths text. She finds manipulatives frustrating and thinks that they slow her down. When she meets a problem that she cannot do in her head or on paper, she pulls out the relevant materials and works it through until she can move on – in her book. Children have different learning styles and maths is one subject that can easily be adapted to suit.

Free printable problem cards for solving for the unknown:

solving-for-the-unknown-totals-of-2-3

solving-for-the-unknown-totals-of-4

solving-for-the-unknown-totals-of-5

solving-for-the-unknown-totals-of-6

solving-for-the-unknown-totals-of-7

solving-for-the-unknown-totals-of-8

solving-for-the-unknown-totals-of-9

solving-for-the-unknown-totals-of-10


Advertisement

Learning Styles & hands-on learners

img_2656

(Free printable vertical addition cards below.)

Catering for a variety of learning styles can sometimes be a challenge for homeschoolers. If you have a number of children you have probably worked out by now that not every curriculum works well for all students and that as wise educators we need to adjust our approach to suit the learning styles of our children. That said, I believe that ALL children must learn to sit still and concentrate as a necessary life skill, regardless of whether they find that easy or difficult. The difference is that requiring all learning to take place in the same way (bookwork for example) will make life very unpleasant for you and your hands-on kinaesthetic learners.

img_2659We have started school for the year and the past week has been full of the usual teething problems that a new year and new programme presents. I started my 3 youngest students on a completely hands-on mathematics programme this term. After trialling it for a week, my 7 year old daughter has gone back to purely bookwork, using manipulatives only when absolutely necessary to understand a concept. She loves to work in books, especially brand new ones and it was killing her to have her maths book just sitting there while she was being forced to work through problems with manipulatives when she’d much rather do it on paper or in her head. My 7 year old son has settled on a midway compromise; one day of bookwork followed by one day of hands-on experiences to back up the concept being covered.

img_2658

My 4 year old does not get a choice – he will be working with concrete manipulatives because I believe that at his stage of development this is the most successful method for developing a good handle of the basic mathematical concepts and skills he needs as building blocks for higher level concepts.

So in light of all that, here are some of the hands-on trays that we are using this year for maths, with more to come in subsequent days if and when I get a chance to photograph them!

img_2602

Our addition trays have 2 kinds of materials to make it visually clear that we are counting out 2 separate groups before adding/joining them together to work out how many there are altogether. The cards are in sets that only work on adding 1 number at a time, for example 0+3, 1+3, 2+3, 3+3, 4+3, 5+3, 6+3, 7+3, 8+3, 9+3 and 10+3.

img_2608

I printed and laminated the cards and provided felt pens (textas) to write the answer or wooden numbers to “build” the answer for those who prefer not to have to write. (For free printable vertical addition cards click here.)

img_2605

I also added several types of containers so that the materials could be set out in pairs to contain them and illustrate the problem being worked on. These included stiff cardboard cupcake liners, disposable tinfoil pie tins and these white dishes.

These hands-on Montessori style trays complement the Math-U-See curriculum that we choose to use in the early years and provide the extra practise needed by some in order to grasp the new concepts.

Hands-on maths; skip counting

I like to keep much of our early mathematical skills as hands-on as possible. If an area will need to be drilled over and over again until mastery is achieved, then it is far more interesting for my children to do that using Montessori style tray activities rather than repetitive book work. Learning addition and subtraction facts, multiplication tables and the like are great examples of this. Lots of work is necessary, but it need not be all written bookwork.

This week my 6-year-old son needed to polish up on his skip counting. I pulled out some plastic Easter eggs and wrote the 2, 5 and 10’s on each hump of the caterpillar, poking a pipecleaner through the first one to make the caterpillar’s head. He placed each in order and recited them to me once finished. Next time I will remove a couple and get him to say them (including the missing numbers) until he can eventually say them all without any numbers as prompting.

Montessori subtraction trays: Hands-on mathematics

subtraction tray IMG_8368

These Montessori style hand-on subtraction activity ideas are great for preschoolers and young children who need plenty of experience with concrete materials to consolidate basic mathematical skills. (See my last post for more info.)

As with the addition trays, the subtraction facts that  the child has already memorised are added to the screw-top jar to provide a visual indicator of their progress.

Initially, the subtraction problems are split into sets; subtract 0, subtract 1, subtract 2 and so on and only 1 set is out at a time.  Once they know the sets fairly well individually, we combine the lot, taking out the ones they have mastered and working on what is left. As with addition, learning to take away 0, 1, 2, and 10  is very easy, so starting with these gives the child a boost of confidence as they quickly master the first sets, filling that jar almost immediately.

sub tray set out IMG_8371

The subtraction materials are set out as above. The first and last plate are deliberately different from the second to provide a visual reminder of the relationship between the two. Subtraction must be done in order (numbers are not interchangeable as they are for addition and multiplication problems) so the child first counts out the number of objects they are starting with into the first plate. The smaller plate shows what has been taken away (removed, subtracted etc.) and what is left on the first plate is scooped over to the final plate, providing the answer.

When the novelty of the plate tray wears off, I present the subtraction problems the child has not mastered in different formats to provide extra practise and revive interest in the activity.

icecream cont sub pegging

Subtraction problems on pegs are pegged onto the side of the container with the correct answer. The counters are the manipulative. Provide more than one container or a multi-sided container if you want a broader scope of answers.

Cinderella's slipper subtraction

These subtraction cards are a set from Kmart that we were given. A dry erase marker can be used to mark the answers on the cards. The “glass” slippers are wedding favours. My girls love this activity just because they get to handle the tiny shoes! An attractive material will draw them in every time. Add an interesting story to the tray (How many spare slippers Cinderella keeps in her closet?) and you will have them begging to have a go.

bead string subtraction

The same subtraction card set paired with any manipulative of your choice gives you a fresh “new” activity. This time the children were doing the problems in their heads and finding the correct bead string for the answers – good for those who find writing a chore. There is exactly the right number of bead strings so if the strings do not match the last cards this alerts the child to an error that they can find and address.

It doesn’t take too much extra time or effort to keep learning engaging and enjoyable. Have a look around your house or check out your local discount variety store for a couple of different kinds of manipulatives and you are on your way.

Posts you may find useful:

List of useful materials to collect and buy for hands-on tray activities  

Building focussing and concentrating skills in toddlers

Workboxes – homeschooling multiple ages

Surviving new babies, sick kids and interruptions 

Teaching toddlers to count: 1 to 5 workjobs and Montessori style tray activities

Here are some more counting activities for toddlers and preschoolers who are learning to count from 1 to 5. If your child has learnt the number order by rote (ie. can count out loud to 5) and is beginning to develop one-to-one correspondence (matching one verbal number to each object being counted) then they are ready to start simple hands-on counting activities like these. You may even like to set out only the numbers 1 to 3 to begin with. If you are new to teaching toddlers how to count, it might be helpful to read this post first.

I ask the children to order the pie tins from 1 to 5 and sort out the golf tees by colour before counting each group and placing them into the correct pie tin. Use a number strip for young children to follow until they know the number order without help.

Kinesthetic learners (and all young children) love the hands-on style of these activities and despite the fact that  this group is far from my favourite set of tray activities, I included them to show you how a quick search around the house will furnish you with plenty of materials to set up your own.

This is one of the first counting activities I introduce. The shapes are sorted by type, matched to the example at the start of the row and counted into the bottle tops. Beginners will often just fill up the bottle tops without having any idea of the numbers, but I simply have them read the number and count the objects as we take them out and pack them away.

Unfortunately this workjob doesn’t photograph well but the shiny silver contact paper and blue jewels are very attractive to little ones. The box comes from a packet of plastic food wrap. The jewels are placed into plastic shot glasses which are numbered from 1 to 5.

I bought these secondhand metal goblets for our pretend play home corner because they are unbreakable. Pegs of many varieties slide nicely over the thin sides. Placing dots under the numerals means that children who do not recognise their numbers can count how many dots there are until they can recall the numeral name.

All my young ones have enjoyed hammering golf tees and other items into these polystyrene foam blocks covered with loose weave hessian-like fabric. The red washers come from a set of many shapes and sizes raided from Grandad’s shed with the numerals marked on them in permanent marker.

Chip and dip trays are handy for many different activities.These wooden numbers came from a baby puzzle toy and the items are an eclectic assortment from my Montessori materials drawers.

Pegging is good for fine motor development. The child counts the number of feathers on each peg and matches the peg to the correct number of dots on the card circles left from used sticky tape rolls. The box is just the storage for the feathers and rolls.

These beads and frame are a commercially produced toy that I picked up secondhand for a couple of dollars. Keep an eye out for this kind of material at op shops and swap-meets. The tiles are from an old game I bought for $2 at a secondhand store. I threw out the game and just kept the tiles.

Another commercially produced toy picked up for a couple of dollars with baby food jar lids for the numbers.

Sorting: Montessori Style Tray Activities

Here are some more Montessori style tray activities for sorting. These are a little more open-ended and follow on from sorting experiences already presented (Click here for an explanation of how to introduce and sequence sorting experiences and here for the follow-on with 4 and 5 category sorting ideas.)

DESCRIPTION:

  • The child uses the plates to sort the plastic cutlery according to their chosen attribute. There is more than one way to sort the cutlery and once children have sorted one way (usually by colour) I ask them to see if they can do it another way (by type; knives, forks, small and large spoons.)

CATEGORY/SUBJECT AREA:

  • Mathematics

CONCEPT/SKILL:

  • Sorting, classifying, identifying attributes

EQUIPMENT & MATERIALS:

  • 4 plates
  • 4 sets of real or plastic cutlery

DESCRIPTION:

  • Children place the chopsticks into the egg carton holes then drop the beads onto each chopstick according to their colour.

CATEGORY/SUBJECT AREA:

  • Mathematics

CONCEPT/SKILL:

  • Sorting, classifying, identifying attributes

EQUIPMENT & MATERIALS:

  • large beads (same shape) with 4 colours or
  • large beads of the same colour with 4 different shapes
  • 4 chopsticks
  • egg carton segment

DESCRIPTION:

  • Children sort the animals into the craft container according to their chosen attribute (type of animal, colour, number of legs, zoo or farm etc.)

CATEGORY/SUBJECT AREA:

  • Mathematics

CONCEPT/SKILL:

  • Sorting, classifying, identifying attributes

EQUIPMENT & MATERIALS:

  • plastic animals (these are called cocktail animals and came from the party section of a discount variety store.)
  • segmented container or collection of small containers to sort animals into.

DESCRIPTION:

  • Children place the chopsticks into the holes before sorting the beads onto each chopstick according to their chosen attribute. (This is a commercial set of attribute beads and can be sorted by several different attributes.)

CATEGORY/SUBJECT AREA:

  • Mathematics

CONCEPT/SKILL:

  • Sorting, classifying, identifying attributes

EQUIPMENT & MATERIALS:

  • attribute beads
  • 6 chopsticks
  • cardboard box with contacted top for strength and holes for chopsticks

Please see my pages titled “Workjobs and Learning Styles” and “Brief Montessori Overview” for more general information on Montessori and workjob activities.

5 Category Sorting: A Montessori style tray activity

(For a detailed introduction on how to introduce sorting to toddlers, it may be helpful to read this post first.)

4 colour metal patty-pan sorting.

After my toddlers have been introduced to sorting and have extended their skills to independently identifying 4 or 5 attributes or more, I continue to swap the materials that they sort, but keep the base tray or sorting containers the same. This means that I can change the material and present a “new” tray activity with little or no explanation. The children are immediately familiar with the type of activity and therefore already know what to do.

This is important for when I am teaching older children at the same time as a toddler is working on their Montessori style activities so that I am not constantly interupted. It also means that I am not having to demonstrate or “teach” every single new tray activity – once the format is familiar, I can change materials and off they go.

I set up each term’s worth of tray activities with chosen categories (transferring, sorting, matching, counting, pouring etc.) and simply update the materials as necessary without having to re-introduce each activity.

This wooden tray lends itself well to 4 or 5 attribute sorting and by simply changing the materials I can easily update it throughout a term with very little effort. I also add a pair of tongs, tweezers, scoop or spoon to incorporate fine motor skills and turn it into a transferring activity at the same time, which adds an extra level of challenge to the activity.

5 colour pony bead sorting. (The bowl needs to be moved off to the side to provide room for the 5th colour.)

5 colour jewel sorting. Most of these objects pose a choking hazard so take care with young children who still like to put things in their mouths. Jewels are so tempting for toddlers to suck on.

4 colour plastic flower sort.

5 types of dried beans.

5 kinds of buttons.

5 colours of Christmas craft bells.

5 kinds of pasta and dried beans.

5 coloured marble sort.

5 kinds of pasta.

5 kinds of shells.

5 kinds of farm animals.


An introduction to Sorting: A Montessori Style Tray Activity

Two colour bead sort with attribute or category already given. The first exposure to sorting for my toddlers.

Sorting is an important foundational skill requiring reasoning, logic and mathematical thinking. It enables children to be able to look at a group of objects and identify similarities and differences and to make logical decisions as to how to categorise the objects. Sorting skills will transfer into other academic subjects such as science and mathematics later in life.

Sorting frequently covers other basic skills such as colour recognition and counting and if combined with some kind of transfer tool such as tongs, spoons, tweezers or scoops, will develop fine motor skills at the same time.

I usually tape a peg to the top of each container to designate the attribute category until the child is able to determine a category independently.

I present sorting to my toddlers with only 2 categories to begin with, in the form of a Montessori style tray activity. In other words, only 2 attributes are present. These attributes could be the colour of the object, the shape, size, length or thickness etc. but whatever it is, there are only 2 possible ways to sort them. I also tape or glue one of each kind of object to the sorting container so it is essentially a matching activity as well as sorting for their first experience.

Once they are able to look at the objects (in this case beads) and identify the similarities (all beads of the same size and shape) and differences (colour) they are ready to sort according to the attribute they have identified without a pre-determined category to guide them.

We talk about the objects; what they are, what colour, size, shape etc and focus on what is the same and different about them. I then sort the first few objects (talking about their attributes) while the child watches and ask them to see if they can tell why I am separating them as I am. If they are able to tell me, I ask them to see if they can sort the rest or simply explain why I have sorted as I did and demonstrate further before asking them to have a go.

Once they are able to sort by the two attributes with a category already given (one of each object taped to the container) I present two attribute sorting again without the categories already chosen and help the child to identify the two attributes themselves and sort accordingly.

An example of 3 category/attribute sorting. Generally colour is an easy way for toddlers to sort as a beginning skill. More abstract attributes can be introduced later.

After they have mastered sorting 2 attributes with a variety of objects, I extend the possible attributes or categories to 3, 4, 5 or more attributes, until they are able to sort any objects set before them and justify their reasoning.

In this example the coloured bowls determine the category or attribute so it doubles as a matching activity also.

One-to-one correspondence

One-to-one correspondence is a basic mathematical skill and without it children are unable to count accurately. To be able to say one number to one object seems very simple, but anyone who has ever watched a child who is in the very beginning stages of counting will have seen them saying numbers out loud while pointing or touching objects, without those numbers actually matching up with the objects being counted!

Another simple developmental counting error you will see is a child who counts the same object more than once or skips objects entirely. Presenting activities that allow opportunity in a self-correcting way to practise this one-on-one correspondence helps put in place the experience necessary for successful counting.

They are self-correcting in that there should be only one object in each compartment and running out or having some left over allows the child to see that an error has been made. These activities can be presented to children anywhere from around 18 months and upwards, depending on the developmental level of the child.