Montessori style tray activities for toddlers

These square jewels were so attractive to the twins that they spent a good deal of time examining each one and just moving them around by hand. Only once they had had their fill of touching and examining them were they ready to try transferring them which was the original purpose of this activity.

The twins are 2 years and 5 months old and were in need of some new highchair and table activities. These are the latest Montessori style trays that I made up for them in under an hour a couple of weeks ago. Once you have a good selection of materials and equipment to work with, it’s easy to mix and match and throw together some new ideas. Using a category for each tray type is helpful to me. (See Montessori tray activities for toddlers: starting out.)

I have done tray activities in the traditional Montessori style before (on a piece of carpet to designate a work space) but I find it easier at this age and with two at a time to keep them in their highchairs. This means I can use the time to prepare or clean up a meal or any other task and flit in and out of the room while they work on their activities without coming back in to find 5 trays up-ended on the floor at once! It also helps them to concentrate on the task at hand and learn to fully complete each activity before starting a new one. Concentration time is extended as they learn to stay focussed until I am ready to change the materials for them.

Pegging is excellent fine motor practice. Make sure the pegs you use are easy to press to begin with as toddlers do not have the finger strength to open very firm pegs. Dolly pegs or pegs that slide are a good option for those who cannot manage regular squeeze style pegs.

Providing a four sided container and pegs in four colours quickly turns this into a colour sorting activity. If you added some coloured sticky dots in the same colours as the pegs then younger children can begin to match the colours by pegging each peg onto the corresponding coloured dot.

This bead threading activity was the favourite of the lot and both twins want to do this again and again. They do enjoy chewing the straw though so I have had to replace it several times. Luckily this takes only a matter of seconds to do – see below.

All you need are some large beads, a container, a straw and a piece of masking tape. Bendy straws already bend over at the ends so I simply taped it over so that the beads will not fall off the end. That’s it! I will definitely be making some more threading activities soon. Beads on pipecleaners next.

A simple tong transfer practical life activity. I found a huge packet of large hair lackies at the $2 shop and they are great for beginning tong transfer because they are so easy to pick up.

One to one correspondence is an important pre-number mathematics skill. In this activity, preschoolers scoop one pompom into each depression in the iceblock tray.

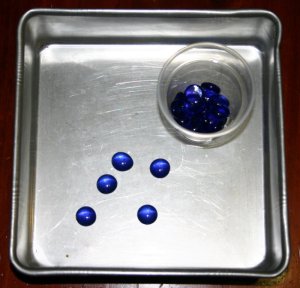
Jewels, rocks and other decorations that are used for potplants and vases make excellent Montessori materials. They are very attractive to children of all ages and even my older children love to use these for maths manipulatives. This is a simple scooping transfer activity from one bowl to another.

Another transferring activity. I tried several kinds of tongs for transfer but my son was very frustrated by them, finding them too difficult to use. I decided to leave them for him for a while and let him enjoy transferring with spoons and scoops. His pencil grip is perfect so I am not too worried about his fine motor skills at this stage!

Other related posts you may like:

Montessori style tray activity for toddlers: Bucket of giant beads

Homeschooling activities for toddlers: Pasta play

Getting dinner on the table: arsenic hour

Learning letter names and sounds

Whether you are homeschooling or have a young child at school, most of us will at some stage be helping our children learn their letter names and sounds. There are many different ways to do this, from rote learning with flash cards to games and hands on workjob style activities.

I use quite a few different methods depending on the child, their rate of learning and preferred learning style and the time I have available to teach them. One of the more hands-on approaches I have employed is an alphabet chart. Again, this is something I made way back in my Uni teacher training days that has been useful through 7 years of teaching and now has made it’s way to the third child in our family.

I do not introduce the letters for the first time using the chart – there are too many all at once and it is too overwhelming. We go through the alphabet one letter at a time, adding more as the child is ready. (I’ll post about this another time.) Once the child knows quite a few letter names and most sounds I introduce the pocket chart. It can be used in many different ways. Here are just a couple:

  • Matching lowercase letters to uppercase letters.
  • lucky dipping letter cards from a pillowslip, naming them, saying their sound and then sliding them into the correct pocket.
  • sorting small objects by their initial sound (first sound you hear when you say the word) into the correct pocket.
  • setting up a word bank system with picture and word cards that begin with each letter “filed” in each pocket for children to use during creative writing.
  • find the hidden toy games where the child checks the pockets for a hidden items and must name the letter and sound to be able to keep the item. (Just for the duration of the game though, although you could include a little treat surprise every now and then.)

These objects are one set I use for initial sound sorting.

A second set of objects for initial sound sorting.

To begin with, all alphabet chart work is done one-on-one with me, however once the child begins to grasp the concept of initial sounds, I give them a bag or box of objects to sort into the correct pocket as an independent activity. It is self-checking because there is never more than one object for each pocket so if they find one already there, they know they have made an error and can self correct.

If you are not able to sew a chart, you could make one using cardboard and add Velcro spots to attach the letter cards or large sturdy envelopes to act as pockets for the items. If you plan to use it for any length of time or with more than one sibling it would be worth taking the time to sew one up. It might be a nice project for Grandma perhaps??

Montessori inspired practical life tray activities for toddlers: Tong transfer

With a general category in mind such as “tong transfer” and a drawer full of useful bits and pieces I have collected over time, I now find it very easy to come up with new tray activities for table time, highchair time or mat time that will keep my toddlers developing new skills while they learn to focus and concentrate at the same time. (See here for a list of materials and equipment that might be useful for creating Montessori style tray activities.)

Simple two container transferring is a good starting point.

Using tongs is great preparation for writing and other skills that require fine motor control, helping to develop the hand muscles necessary for successful manipulation of writing implements.  All you need are tongs of some sort, 2 containers and something to transfer. Keep in mind that toddlers find it very difficult to manipulate tongs so look for small pairs that are not too stiff to close. Avoid those with a metal closing ring that slips down all the time – very frustrating! The best pair I have for beginners is a small set of ice tongs (see top photo) that I picked up at an op shop for 50 cents. Tea-bag tongs are also easy to squeeze and quite short. I found mine in a $2 shop.

Tonging activities link in well with other skills such as one-to-one correspondence. Plastic iceblock trays, egg cartons, chocolate trays or any other container with an obvious number of holes are ideal for this. Simply put, the child has to place one item in one hole. If there are any left over, or they run out before all the holes are filled, they are prompted by the empty space or left-over pieces to self-correct their work.

Flexible ice-block trays are an attractive material for children to work with. My girls LOVE this pink tray. (I should mention that it is the 6 and 4 year olds who clamour to do this one even though it is set out for the toddlers!)

Tea-bag tongs are easy for toddlers to manipulate.

Tonging is easily adapted to many other concepts, particularly mathematical skills. Beginning sorting with two simple categories is an easy way to combine the skill of tonging with a more challenging task for older toddlers and preschoolers. In the photo above, children sort the hair elastics into 2 separate colour piles; the first step along in learning the concept of sorting by colour.

Here we move to a slighlty more challenging activity with items to tong that require greater dexterity, 3 colours to sort and 3 bowls to match them to.

Attribute beads can be sorted more than one way and are quite difficult to pick up. They are a good challenge after simple tonging has been mastered.

Linking tonging to counting is fun for the preschooler and provides valuable practice of fine motor skills. Here the child tongs the correct amount of jewels into each segment of the dip plate. My 3 year old is pictured doing this activity in the photo at the top of this post. The counting side of things wasn’t too difficult for her to do even early on, but it was a test of her endurance and concentration skills to persevere with the tongs to complete all 10 segments.

Montessori inspired practical life: dry pouring tray activities for toddlers

If you are looking for inspiration for toddler tray activities, dry pouring is a great place to start. It is a practical life skill that is easily introduced in a simplified form and can be gradually made more challenging as your toddler progresses. Learning to pour liquids carefully and accurately is difficult for young children, so starting with a dry material is a more forgiving and easily mastered beginning. Giving children cups and containers to pour water in the bath develops the skill in a non-messy environment and dry pouring activities are great for mat time, highchair time or table time.

This is the first dry pouring experience I give my toddlers. Tipping the jewels out of the cup into a baking tin and collecting them up again is surprisingly absorbing and makes a satisfying racket as they do it. If you prefer a quieter option, try pompoms (see below), however I can guarantee the children will enjoy the jewels, beads, rocks or other noisy versions more!

Pouring from one container to another is the next step. Choose 2 containers of the same size, without handles. A set of straight-sided small tumbler type cups is best; something that is easily gripped in a toddler’s hand. Add small objects such as dried beans to pour from one to the other and change the containers and material to pour every so often to keep interest high.

Rice is one of the last materials to introduce. If you colour it, it is very attractive but it is almost guaranteed to spill and is not quite as easy to clean up. Toddlers need to be taught how to collect the spilt rice in one corner of the tray and carefully pour it back into the container.

I was able to find a cute mini dustpan and broom which I include with my rice pouring activities to clean up the spills which is a practical life skill in itself. Tape a square shape with masking tape in the centre of the tray and teach the children how to first sweep the rice into a little pile within the tape boundary before sweeping it into the dustpan.

Adding funnels to a dry pouring activity adds yet another dimension and when I have had simple pouring activities available for quite a while, I set up a combined scooping, pouring and funnelling tray for a  more complicated experience. After I have changed this around for a while, I then add teddies and other small animals or toys and turn it into more of a pretend play type activity. This allows a broader scope of play and promotes longer engagement by older toddlers and preschoolers.

Hands-on Montessori tray activities for toddlers: Length comparison

Following on from my last post, here is an example of one of my toddler activity tray categories. For one term I designated a tray to length comparison; sorting various materials into “long” and “short.”

The child first finds the two matching pieces (strings of coloured beads in the tray above) and places them together to make a pair (a matching activity in itself.) They then sort the pair into the “long” or “short” containers which are also long and short in themselves to reinforce the concept.

After a week or two, when they are losing interest in the material they are sorting, I simply change it for a new material, leaving the containers and tray set up the same. Interest is revived and the concept is practised and reinforced.

My daughter who last used these length activities was 2 years and 2 months of age when she started and easily grasped the the concept. I used the Montessori activities while I was breastfeeding because it allowed me to supervise, encourage and explain if necessary while she was well occupied with challenging, yet age and developmental appropriate and enjoyable activities.

Matching, comparing and sorting coloured ribbons.

Matching, comparing and sorting coloured pencils.

Matching, comparing and sorting strips of coloured paper.

More lace ribbons to sort and compare.

Ideally the popsticks should be the same thickness so as not to confuse a child with two changing attributes; length and width. I may have been better to use the large popsticks and cut some shorter rather than use the two different kinds. It didn't seem to worry my daughter though.

Matching, comparing and sorting more coloured ribbons.

Matching, comparing and sorting coloured straws.

Matching, comparing and sorting coloured chenille sticks (tinsel pipe-cleaners.)

Montessori style tray activities for toddlers: starting out

Easter holidays are almost over and it’s time to get back into the swing of things. The twins are old enough to start Montessori tray activities so I thought I’d post today about some of the activities I’ve used for my beginners in the past.

The first thing you need to think about when you are setting out tray activities for the first time is how you will store and present them. They do take up a bit of space so a small bookshelf or shelved cupboard is ideal to place open trays, bowls and baskets in. If you don’t have enough space for this, perhaps you will need to use a system of shoe-boxes or similar so that they can be stacked away when not in use. They are not ideal as the toddler cannot see the contents easily, however they are better than nothing.

The tray or container itself is the next step. True Montessori style places a big emphasis on beautiful natural materials; everything being wood, metal, stone, glass etc and avoiding plastic and the like. While commercial Montessori materials are truly beautiful, the reality for me is that they are expensive and I am making my own, so I have to work with what I have. I initially visited a bunch of swap-meets, op shops, second-hand shops, discount variety stores and the like and bought a stack of wooden bowls, wooden trays, glass dishes, metal baskets and anything else that fitted into the natural and aesthetically pleasing category.

The trays were another matter. Wooden trays look great but cost too much and I couldn’t find any secondhand so I ended up using the flat plastic lids from small plastic storage crates I already had around the house. A roll of non-stick drawer liner cut to size for each tray stops the dishes and smaller items from slipping around.

The next step was to find a bunch of attractive materials to use for practical life activities. (See materials and storage ideas here)

To make it workable for me, I choose a selection of categories for my activities and have one tray for each kind. For example, one tray is for tong and spoon transfer, one tray for counting, one tray for colour matching and sorting, one for pegging and clipping, one for matching etc. Once I have my chosen categories set up, I use the same tray and containers for the whole term and only change the material that is presented.

This means that once my toddler is familiar with the tonging activity (I have presented it and demonstrated what to do) they are able to approach each new material without me having to re-explain what to do. They see a pair of tongs (different each week or two) with a new material to transfer but the same two containers to transfer back and forth from.  Eventually I change the containers too, but to begin with I keep it very similar so that they feel confidant in what they need to do.

On the first day the shelves are empty apart from 3 or 4 tray activities. I sit down and present each new activity which I demonstrate first before the toddler takes a turn. Depending on their attention span, I will introduce all 4 trays and stop for the day. Part of this process is showing them how to carry the tray to their work area (a carpet mat), complete the activity, place all materials back in their places and return the tray to the shelf.

The following day the child chooses which activities they would like to work on and completes them independently. If necessary, I will sit down and demonstrate the activities again. Once I can see that they understand what to do with the 4 that are already out I introduce just one new tray a day until I have built up to having all the categories in circulation.

Once they are confidently using one of each type of activity, I can change the materials without changing how it is presented (as explained above) and usually do not have to spend time explaining what to do as the concept is already familiar to them. (The next post will give you a photographic example of what I mean.)

Other posts you may like:

Mega marble transfer

An introduction to sorting

Teaching toddlers to cut