Our Jesse tree symbols and readings for Advent

Day 1: God's creation. (This decoration reminded us of the planets around the sun)

As we seek to focus our family on the true meaning of Christmas, we have been taking deliberate steps to create yearly Christmas traditions and memories. I have finally finished all the symbols and readings for our Jesse tree for Advent this year. The children have been involved in searching for and choosing the symbols for each day (some alternative ideas here.) Most were found in discount variety stores, some were gathered from around the house and we even made a couple. I spray-painted them all gold to keep a constant theme (and just to look nice!) and it was amazing how good even the cheap plastic animals look with a coat of gold. The readings we chose came from some of the many online choices available (links at the bottom of this post about Jesse trees.)

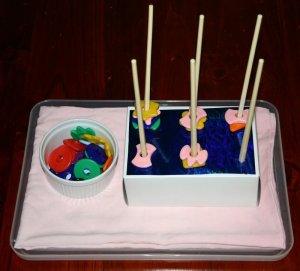
Bible reading scrolls

I have typed up the bible readings, printed them out onto thin card and hot glue gunned on thin craft sticks to make scrolls. Each one has a small circle of ribbon to hold it closed that can be slipped off to read the scroll. Each night the children will take it in turns to open the scroll and unwrap each symbol after the reading. (I thought wrapping the symbols would make it even more exciting and they could guess what symbol would represent the readings we had heard before seeing what it was.)

Day 2 Adam and Eve (The forbidden fruit)

Day 3 Noah's ark (birds sent out 3 times to find dry land) There are lots of bird decorations out this year so these were easy to find.

Day 4 Abram (descendants as many as the stars)

Day 5 Isaac (ram as sacrifice) This is just a plastic ram sprayed gold but it looks great!

Day 6 Jacob's ladder (This ladder came from a bird cage set.)

Day 7 Joseph (Sold for 30 pieces of silver into slavery)

Day 8 Moses (in basket) This miniature frame had what looked like reeds around the edge.

Day 9 The 10 commandments (Not quite a stone tablet but as close as we could get.)

Day 10 Joshua (The battle of Jericho) This was a cheap plastic tower with a plastic knight to build inside. We used the knight's shield and sword for Gideon so 2 for the price of one!

Day 11 Gideon (A sword for the Lord and for Gideon)

Day 12 Samuel (His Mother takes him a little coat each year) My least favourite decoration - fabric does not spray-paint well.

Day 13 David (5 stones for Goliath)

Day 14 Elijah (fed by the ravens)

Day 15 Hezekiah (empty enemy tent)

Day 16 Isaiah (Tongs and hot coal)

Day 17 Jeremiah (Known as the weeping prophet) Made of salt dough.

Day 18 Habakkuk (His watchtower) Already dropped and broken and we haven't even got it on the tree yet!! More salt dough.

Day 19 Nehemiah (Rebuilding the city wall) A previously useless gate from a plastic doll's house - perfect for this.

Day 20 John (baptizing in the river) Think laterally!

Day 21 Mary & Elizabeth (Messenger angel) It's impossible to find male angels!

Day 22 Zechariah (Tablet and stylus) The modern day version.

Day 23 Joseph (Loves and marries Mary) The rings are wedding favours that come in bags of 50.

Day 24 Magi (3 Wise Men's gifts to Jesus)

Day 25 Jesus' birth (Star of Bethlehem) There are 2 readings and 2 symbols today - the second symbol is tree lights which are turned on to represent the light of Jesus now shining in the world.

Advertisement

Christmas Gifts: Giving tools not toys.

Are your children’s bedrooms cluttered with plastic junky toys? Do you wrack your brains each Christmas trying to come up with gifts that are well made, will last and won’t add to that pile of clutter that they really don’t need? ‘Tools not toys’ is an excellent motto that we have tried to implement in our family.

So what are tools? In the words of Jill at the Sonlight Blog“Tools will encourage imagination, develop large and small muscles, and should get the child outside daily. Tools will stand the test of time, can usually be passed down from child to child in a family, and have a lot of play value.” Many traditional toys fall into this category as well as real tools such as those that you would find in a toolbox. Jill has an extensive list of tools for children at the Sonlight blog that is well worth a look.

She describes toys as “Anything that has batteries or makes noise that drives a mom crazy, if it is meant for the child to watch it rather than interact with it ….  anything that is cheap plastic and will break easily…. anything that is meant as an entertainment.”

Our children do have and receive toys that are definitely simply for entertainment value, but we choose to put our money into the more long-lasting, useful and educational toys that sit more in the tools category.

One specific idea we have implemented in the past is to give the boys toolboxes filled with tools as gifts for Christmas or birthdays and add items to these collections throughout the years. One aim of the toolbox idea is that the boys will learn to use the tools as they work alongside their Dad’s to tackle household maintenance and projects. We hope they will eventually leave home well kitted out to be able to attack the handyman tasks around their own houses, both in tools and skills learnt over the years.

Other tools we give are sporting equipment, handiwork and craft sets and equipment, imaginative toys,  books, wooden toys etc. Again, check out Jill’s quite extensive ideas list for inspiration.

Cheap Christmas gift ideas for kids: Treasure Rocks

If you are looking for an inexpensive gift idea for children this Christmas, why not try treasure rocks. Treasure rocks are made with a simple dough mixture that is baked until hard. The recipient uses a hammer to crack open the rocks and reveal the treasure inside; usually some coins, although any little item that would survive the baking process without melting would be suitable. For a more girlish result, you could paint a layer of glue over the rocks and add glitter. The overall cost of making the rocks is negligible and the amount of money you include in the form of coin treasure can be as much or as little as you like.

I like to give mine with a poem I have written (see below) and a little hammer as part of the gift, although this does raise the price a little. All the children seem to love them and hammering them open is lots of fun. Don’t forget to wrap the coins in plastic kitchen wrap or they can be very difficult to get clean before spending! For a gift that can be made for under $5 or even under $2, these are a winner.

You can find the recipe for treasure rocks (google treasure stones) on so many websites I didn’t include it here. I have modified the online recipe because I don’t have coffee grounds and while my rocks look great they are a little harder to crack open. Very little children needed help but my older boy was just dying to get in there and give it a bash – I’m sure he could have had them smashed to smithereens in a few minutes!

Here is my poem:

Happy Birthday dear _________
May these bring you much pleasure
Hidden inside is your very own treasure
Give them a smash and a bash, but DO NOT EAT!
These treasure rocks are yours as a treat
Hammer away with all of your might
To find your surprise, hidden from sight

The recipe I use:

  • 2 cups of plain flour
  • 1 cup of table salt
  • 1 cup of strong coffee (water if you don’t want brown)
  • glue & glitter to sprinkle over rocks if desired
  • coins wrapped in plastic kitchen wrap (Gladwrap etc.)

Mix the flour, salt and water or coffee together to form a soft dough. Form into balls with a wrapped coin in the centre of each. Bake at 120 degrees until hard. Paint with glue and sprinkle with glitter or leave brown.

Mummy’s Christmas Shop

Star of Wonder

Photo: David Pascoe

When it comes to Christmas gifts for siblings it can be a little overwhelming when there are many brothers and sisters to buy for. We often get the children to make gifts and that works well for older kids but the younger ones are a little limited in what they can do. None of the children buy gifts for the adults, they make cards and small craft gifts like Christmas tree decorations.

I like the idea of the children working so that they can give gifts to each other. It then becomes a sacrifice as they spend money that they have given up time and energy to earn or give up time and creative effort to make something. I am hoping this will help in our quest to get them to think of others at Christmas time rather than themselves.

We have previously gone out shopping with the children and attempted to find suitable small gifts that the children can afford for each other, however the logistics of this is becoming difficult and we can’t always find appropriate items they can afford. The solution: Mummy’s Christmas Shop.

I don’t know the original source of this idea, but it is very simple. I gather together a bunch of small gifts that are appropriate for each child in the family. Just before birthdays or Christmas, each child takes a turn to visit Mummy’s Christmas Shop and buy something they like for their siblings. Items are not priced so that I can use a sliding scale; cheaper for the littlies who’s earning capacity is small and a little more for the older children (up to what I paid for them) who are able to earn a reasonable amount of money.

I have told them about the Mummy shop and everyone is keen to start earning money so they can start shopping. (I’d better find some stuff to put in there!) I do the rounds of all the discount variety stores ($2 Shop, Red Dot, Crazy Clarks and the like) and collect anything that is suitable. I also know that it is likely that the gifts will be in the right price range if I buy here, although the quality is often poor so I am careful not to buy toys that will break quickly.

Some ideas so far:

Girls

  • hair lackies, clips, headbands and other pretty hair accessories
  • stickers, activity books, colouring in books
  • glitter pens, gel pens, pencils, crayons, textas, scissors, note pads, novelty erasers and other stationery
  • patterned sticky tape, glitter, glitter glue & other crafty bling
  • dolls clothes, dolls house items, pretend play accessories
  • funky socks and cute knickers
  • ornament, trinket box or knickknacks
  • lip balm
  • nail file
  • costume jewellery
  • craft sets (eg plain photo frame and gems to glue on it)
  • recipe magazine or cookbook
  • coloured bandaids and the “Nurse Nancy” golden book (A little more expensive than the others but both little boys and girls love this gift.)
  • fancy toothbrush

Boys

  • small boxes of Lego ( the individual person , motorbike etc for around $6)
  • giant marbles
  • funky socks & manly underwear
  • glitter pens, gel pens, pencils, crayons, textas, scissors, note pads, novelty erasers and other stationery
  • tools (screwdriver, tape measure, adjustable spanner etc)
  • anything army print (hats, lunchbox)
  • water pistol
  • nail clippers (Master 8’s nails are getting out of control – any teenage girl would be jealous!)
  • card games and mini travel games
  • bluetac (weird I know but older boys love this stuff)
  • torch (flashlight), LED keyring light
  • wooden glue and nail together craft kits (make a boat/car etc)
  • bird or dog whistle
  • fancy toothbrush

Toddlers

  • dinky cars
  • stuffed toys
  • balls
  • puzzles
  • dolly accessories
  • hair accessories
  • picture books
  • playdough and accessories (biscuit cutters, rolling-pin)
  • pet accessories (dog bowl, basket, brush) for toy animals
  • pavement chalk
  • paint brushes (see water play)
  • sand toys (buckets, funnels, spades, scoops)
  • bath toys and squirters

I would love to hear your ideas and suggestions for inexpensive gifts so please leave a comment.


Outdoor activities: more water play ideas

How do you keep little ones entertained and playing happily outdoors for extended lengths of time? Opening the back door and simply sending several young children out is not always a very successful method. Without direction to their play it is very likely that you will be dealing with bickering, squabbles and otherwise less than useful use of their time.

Spending 5 minutes getting them started on an absorbing and appropriate activity very often makes for a harmonious time as they happily go about their play in a focussed way. This 5 minutes at the start of playtime often saves me many minutes umpiring disputes and redirecting poor choices. More ideas will follow under the heading of outdoor activities, but today it’s more water based ideas.

In the warmer weather I find it so much easier as all my children from the youngest to the oldest love water and sand based play. All water based activities require some supervision so I choose tasks to do that allow me to oversee what is going on either from a distance or close by depending on the activity. Our water table is a favourite, as are the following:

Water painting

  • Buy a couple of different sized house painting brushes from a hardware (the cheap sets are fine) and a small bucket. Fill the bucket with water, give some directions as to which outdoor areas; furniture, fences, paths, walls etc. can be painted with water and let them at it! My children, especially the younger ones, love water painting, particularly if I occasionally admire the lovely new “colours” they have painted everything.
Sprinklers
  • I know it doesn’t fit into the water saving category but if it is your watering day, set up a sprinkler on the lawn and let everyone run about in it. Old as the hills, so easy and great exercise.
Paddle Pools/sandpit shell halves
  • I’ve mentioned this before, but an inch of water or even a couple of pots and pans full of water for scooping, tipping and pouring while sitting in half of a plastic sandpit clam shell or paddle pool is good fun. Combine it with a little sand and it becomes great fun.
Sandpit
  • Point the hose into the sandpit and turn it on just a little so a trickle comes out. That’s it! Provide cars, boats or whatever else you have in your sandpit toys.
Puddle Kingdom
  • Sometimes we empty out our outdoor storage containers and put a bunch of them together on the grass. We then fill each one with a little water and again, free play! Jumping from one to another, making “houses” or whatever they fancy makes this an interesting pastime.
Water trampolining
  • We occasionally set up the sprinkler underneath or near  the trampoline for wet bouncing fun. This isn’t so good for the younger children though as it does get quite slippery. The 3 year old and up are steady enough on their feet to make this loads of wet fun.
Water slides
  • If your backyard has a slope, then a long sheet of black plastic with a little detergent and lots of water is a wonderful slide and wears those energetic youngsters out.
Water Chasey
  • Not quite our usual outdoor activity as this involves me, but when it is really hot we play water chasey with the hose. Simply put, the kids run around like crazy and I spray them with the hose, watering the garden in between.

Paddle pools and slide

  • Another one that requires adult supervision is the paddle pool properly filled up or with a small amount of water and the slide from our little plastic castle into it for the children to climb up and slide into the pool. When they’ve had enough sliding we bring the sandpit toys over and everyone sits down for a play.

The Sorting Out Prayer (Sibling conflict)

Product: Parents Arise Image

After using the “Children Arise” CD’s with my children for circle time I was interested in reading the story of how they came about in “Parents Arise” by Janine Target. I thoroughly enjoyed the book and recommend having a look. (Here at Koorong or here at Growing Families) With the author’s permission, I am reproducing below just one of the ideas she presented in her book and I think it was worth purchasing it for this alone.

We have always had our children apologise (say “sorry”) for mistakes and accidents and ask for forgiveness for deliberate sins (acts of unkindness etc.) They are required to reconcile by making eye contact, naming the specific sin, asking for forgiveness (I’m sorry I spoke unkindly to you, will you forgive me?) and then hugging the offended person. (There is just something about physical contact that melts hearts and helps siblings to reconcile. Older children, especially boys, are required to shake hands.)

Once they have worked through this process, they spend some time praying about it and asking for God’s forgiveness and help for future events. Janine’s sorting out prayer takes this part of the process a couple of vital steps further and I will be introducing it as part of our family pattern for making things right with God and between family members from now on.

Here it is as it appears on page 102 of her book:

The Sorting Out Prayer

1. I forgive ……….. for…………

(Matthew 6:14,15)

2. Dear God please forgive ……….. for ………….

(Luke 23:34)

3. Please forgive me for getting angry.

(1 John 1:9)

4. Please take all the anger and upset out of me.

(1 John 1:9)

5. Please bless ………

(Luke 6:27, 28)

In Janine’s words; “It keeps us free from resentment, kept our forgiveness up to date, and it helped create an environment for strong and healthy emotional growth in each of our children.”

Family Devotions with Joel Beeke

I highly recommend listening to Joel Beeke (here) as he speaks at the Conference for Pastors on Family Worship. He gives a simple yet profound message on the importance of family worship (family devotions/bible study time) with tips on how to go about doing it successfully. I think most Christians would agree that having time together as a family to study God’s word is important, but many find it difficult to know how or where to start. This talk may be what you need to get you equipped and off and running as you seek to lead your family to Christ.

Sorting: Montessori Style Tray Activities

Here are some more Montessori style tray activities for sorting. These are a little more open-ended and follow on from sorting experiences already presented (Click here for an explanation of how to introduce and sequence sorting experiences and here for the follow-on with 4 and 5 category sorting ideas.)

DESCRIPTION:

  • The child uses the plates to sort the plastic cutlery according to their chosen attribute. There is more than one way to sort the cutlery and once children have sorted one way (usually by colour) I ask them to see if they can do it another way (by type; knives, forks, small and large spoons.)

CATEGORY/SUBJECT AREA:

  • Mathematics

CONCEPT/SKILL:

  • Sorting, classifying, identifying attributes

EQUIPMENT & MATERIALS:

  • 4 plates
  • 4 sets of real or plastic cutlery

DESCRIPTION:

  • Children place the chopsticks into the egg carton holes then drop the beads onto each chopstick according to their colour.

CATEGORY/SUBJECT AREA:

  • Mathematics

CONCEPT/SKILL:

  • Sorting, classifying, identifying attributes

EQUIPMENT & MATERIALS:

  • large beads (same shape) with 4 colours or
  • large beads of the same colour with 4 different shapes
  • 4 chopsticks
  • egg carton segment

DESCRIPTION:

  • Children sort the animals into the craft container according to their chosen attribute (type of animal, colour, number of legs, zoo or farm etc.)

CATEGORY/SUBJECT AREA:

  • Mathematics

CONCEPT/SKILL:

  • Sorting, classifying, identifying attributes

EQUIPMENT & MATERIALS:

  • plastic animals (these are called cocktail animals and came from the party section of a discount variety store.)
  • segmented container or collection of small containers to sort animals into.

DESCRIPTION:

  • Children place the chopsticks into the holes before sorting the beads onto each chopstick according to their chosen attribute. (This is a commercial set of attribute beads and can be sorted by several different attributes.)

CATEGORY/SUBJECT AREA:

  • Mathematics

CONCEPT/SKILL:

  • Sorting, classifying, identifying attributes

EQUIPMENT & MATERIALS:

  • attribute beads
  • 6 chopsticks
  • cardboard box with contacted top for strength and holes for chopsticks

Please see my pages titled “Workjobs and Learning Styles” and “Brief Montessori Overview” for more general information on Montessori and workjob activities.

Make your own baby and toddler toys – ball posting

Ball posting is another very basic activity for babies and toddlers. Plonking the balls in through the hole and learning how to shake them back out again is absorbing and clear containers add to the interest. Ball posting is great for  playpen time and mat time, but not as good for table time or highchair time simply because the balls fall off and roll away.

DESCRIPTION:

  • The child posts the balls through the hole and tips them back out again by shaking the container.

CATEGORY/SUBJECT AREA:

  • Practical life

CONCEPT/SKILL:

  • Fine motor development

EQUIPMENT & MATERIALS:

  • Container with lid (cut a hole into the lid slightly larger than the balls)
  • Balls or other objects to post and shake out again

Please see my articles titled “Workjobs and Learning Styles” and “Brief Montessori Overview” for more information.

What’s for lunch Mum?

We’ve all heard it before; get organised and menu plan! Save time and money and get rid of the daily headache of thinking about what we are going to prepare for dinner half an hour before we should be serving it.

I have menu planning systems (weekly, monthly, shopping) and I do use them (most of the time!) but I was finding lunch particularly difficult to wrap my head around. I wanted it to be quick and easy but not just bread, bread and more bread. There were also occasions when I needed to pack lunch boxes and I didn’t want them to be nothing but sandwiches either.

My favourite lunch is what we call a ploughman’s plate. Sounds fancy, but all it means is that I pull out all the fruit, salad, veggies, cheese, left overs, cold meats or anything else I can spot laying about the fridge, cut it into pieces and arrange it on a plate. That works great when the fridge is stocked, the fruit bowls are brimming over and there is plenty of choice, but by the end of the week this is not a good option.

I decided to sit down and make a list of as many lunch ideas as I could come up with, barring leftovers and hot meals. Much of my list came from the excellent resources at Meerilinga plus a few ideas of my own.

I have printed it out, laminated it and taped it to the pantry door for inspiration at the last minute and to use when making up my shopping list for the week. You will find a printable version here.