Sensory tub: Animal habitat

IMG_1216

Our latest sensory bin is an animal habitat. This time I had our 3 youngest help me set it up and decide what we should add to it.

IMG_1211

We started with a bunch of tins and boxes for caves and hills and draped a green cloth over the top .

IMG_1218

To our basic landscape we added artificial leaves for trees (old Christmas tree branches work well for this), blue jewels for water, black stones and a bunch of assorted wooden beads – and of course the animals.

You could easily change this idea to a different environment with a different coloured sheet – white for snow, yellow for desert etc. and add the appropriate animals and accessories.

IMG_1209

Apparently finding shelter and lining it with dry leaves so the animals would be warm and comfortable was the priority. We have been watching a lot of Bear Grylls survival DVDs recently and the conversation certainly revolved around his advice. (NB You know you have been watching TOO many Bear Grylls survival shows when your 4-year-old eats an ant, a bug and a daddy-long-legs spider within one week. Yes, I did say eats and yes, we have talked to him about the dangers of doing this and pointed out repeatedly that he is not starving nor in a life or death survival situation!)


Advertisement

Sensory tub: fun with cars, roads and rocks

IMG_1030

Our latest sensory tub was put together in 5 minutes flat using a bunch of cars, our rocks from the last tub and a basket of blocks that rarely sees the light of day. I replaced the oats sensory activity with cars with the two youngest boys in mind but was surprised to see that the girls also couldn’t keep out of it.

IMG_1028

I just tipped it all in but this is what it looked like after  my 4 1/2 and 9-year-old girls spent 20 minutes setting it up to their liking – I couldn’t have done it better myself!

IMG_1041

Everyone from the 2-year-old to the 11-year-old got in there!

Now, I would like to leave you with the false impression that everyone played together in perfect harmony while I sipped a hot cup of tea and smiled on my angelic brood. Unfortunately the sound track to the seemingly peaceful picture above went something like this:

He’s knocking down my building! Drive on the road! DRIVE ON THE ROADS! MUUUUUUUUM THEY”RE NOT DRIVING ON THE ROADS!!!! Don’t touch my rocks! He’s touching MY rocks! MUUUM, He’s wrecking EVERYTHING! – You get the picture. Pairs seems to be the ideal arrangement for our sensory tubs. Any more than that and the conflict starts.

The previous paragraph has been included for the benefit of some of my friends who operate under the delusion that our family is approaching perfection! 🙂

IMG_1044

This is what it looked liked a couple of hours later.


Sorting: Montessori Style Tray Activities

Here are some more Montessori style tray activities for sorting. These are a little more open-ended and follow on from sorting experiences already presented (Click here for an explanation of how to introduce and sequence sorting experiences and here for the follow-on with 4 and 5 category sorting ideas.)

DESCRIPTION:

  • The child uses the plates to sort the plastic cutlery according to their chosen attribute. There is more than one way to sort the cutlery and once children have sorted one way (usually by colour) I ask them to see if they can do it another way (by type; knives, forks, small and large spoons.)

CATEGORY/SUBJECT AREA:

  • Mathematics

CONCEPT/SKILL:

  • Sorting, classifying, identifying attributes

EQUIPMENT & MATERIALS:

  • 4 plates
  • 4 sets of real or plastic cutlery

DESCRIPTION:

  • Children place the chopsticks into the egg carton holes then drop the beads onto each chopstick according to their colour.

CATEGORY/SUBJECT AREA:

  • Mathematics

CONCEPT/SKILL:

  • Sorting, classifying, identifying attributes

EQUIPMENT & MATERIALS:

  • large beads (same shape) with 4 colours or
  • large beads of the same colour with 4 different shapes
  • 4 chopsticks
  • egg carton segment

DESCRIPTION:

  • Children sort the animals into the craft container according to their chosen attribute (type of animal, colour, number of legs, zoo or farm etc.)

CATEGORY/SUBJECT AREA:

  • Mathematics

CONCEPT/SKILL:

  • Sorting, classifying, identifying attributes

EQUIPMENT & MATERIALS:

  • plastic animals (these are called cocktail animals and came from the party section of a discount variety store.)
  • segmented container or collection of small containers to sort animals into.

DESCRIPTION:

  • Children place the chopsticks into the holes before sorting the beads onto each chopstick according to their chosen attribute. (This is a commercial set of attribute beads and can be sorted by several different attributes.)

CATEGORY/SUBJECT AREA:

  • Mathematics

CONCEPT/SKILL:

  • Sorting, classifying, identifying attributes

EQUIPMENT & MATERIALS:

  • attribute beads
  • 6 chopsticks
  • cardboard box with contacted top for strength and holes for chopsticks

Please see my pages titled “Workjobs and Learning Styles” and “Brief Montessori Overview” for more general information on Montessori and workjob activities.

Make your own baby and toddler toys – ball posting

Ball posting is another very basic activity for babies and toddlers. Plonking the balls in through the hole and learning how to shake them back out again is absorbing and clear containers add to the interest. Ball posting is great for  playpen time and mat time, but not as good for table time or highchair time simply because the balls fall off and roll away.

DESCRIPTION:

  • The child posts the balls through the hole and tips them back out again by shaking the container.

CATEGORY/SUBJECT AREA:

  • Practical life

CONCEPT/SKILL:

  • Fine motor development

EQUIPMENT & MATERIALS:

  • Container with lid (cut a hole into the lid slightly larger than the balls)
  • Balls or other objects to post and shake out again

Please see my articles titled “Workjobs and Learning Styles” and “Brief Montessori Overview” for more information.

Make your own baby and toddler toys: posting bottles

Babies and toddlers just love to put things inside small spaces and empty containers out. It is great fine motor practise and they will often concentrate for amazing lengths of time if the challenge level is just right. If a child is frustrated by their inability to do the task, simply change the activity for now and re-introduce it a little later. It should have an element of difficulty, but not so difficult that they cannot be successful. This is a great activity for highchair time, playpen timemat time or table time.

DESCRIPTION:

  • The child posts the dolly pegs into the lid of the bottle and pulls them back out the bottom.

CONCEPT/SKILL:

  • Fine motor development

EQUIPMENT & MATERIALS:

  • Large plastic bottle with hole cut into the front. (Tape hole to cover sharp edges)
  • Dolly pegs or any other suitable object to post into the top of the bottle (regular pegs, wooden peg halves, popsticks etc.)

In this example the solid bottle adds a different dimension and the pegs are shaken out once posted.

The posting bottle can be combined with other skills. Sliding the dolly pegs on and off the edge of a sturdy cardboard box is a complete activity in itself. My children usually enjoyed taking the pegs off the box but did not choose to put them back on again. When they were finished with the activity we slid them back on to the box together as part of the packing up process and they happily practised this skill.

Please see my articles titled “Workjobs and Learning Styles” and “Brief Montessori Overview” for more information.

5 Category Sorting: A Montessori style tray activity

(For a detailed introduction on how to introduce sorting to toddlers, it may be helpful to read this post first.)

4 colour metal patty-pan sorting.

After my toddlers have been introduced to sorting and have extended their skills to independently identifying 4 or 5 attributes or more, I continue to swap the materials that they sort, but keep the base tray or sorting containers the same. This means that I can change the material and present a “new” tray activity with little or no explanation. The children are immediately familiar with the type of activity and therefore already know what to do.

This is important for when I am teaching older children at the same time as a toddler is working on their Montessori style activities so that I am not constantly interupted. It also means that I am not having to demonstrate or “teach” every single new tray activity – once the format is familiar, I can change materials and off they go.

I set up each term’s worth of tray activities with chosen categories (transferring, sorting, matching, counting, pouring etc.) and simply update the materials as necessary without having to re-introduce each activity.

This wooden tray lends itself well to 4 or 5 attribute sorting and by simply changing the materials I can easily update it throughout a term with very little effort. I also add a pair of tongs, tweezers, scoop or spoon to incorporate fine motor skills and turn it into a transferring activity at the same time, which adds an extra level of challenge to the activity.

5 colour pony bead sorting. (The bowl needs to be moved off to the side to provide room for the 5th colour.)

5 colour jewel sorting. Most of these objects pose a choking hazard so take care with young children who still like to put things in their mouths. Jewels are so tempting for toddlers to suck on.

4 colour plastic flower sort.

5 types of dried beans.

5 kinds of buttons.

5 colours of Christmas craft bells.

5 kinds of pasta and dried beans.

5 coloured marble sort.

5 kinds of pasta.

5 kinds of shells.

5 kinds of farm animals.


An introduction to Sorting: A Montessori Style Tray Activity

Two colour bead sort with attribute or category already given. The first exposure to sorting for my toddlers.

Sorting is an important foundational skill requiring reasoning, logic and mathematical thinking. It enables children to be able to look at a group of objects and identify similarities and differences and to make logical decisions as to how to categorise the objects. Sorting skills will transfer into other academic subjects such as science and mathematics later in life.

Sorting frequently covers other basic skills such as colour recognition and counting and if combined with some kind of transfer tool such as tongs, spoons, tweezers or scoops, will develop fine motor skills at the same time.

I usually tape a peg to the top of each container to designate the attribute category until the child is able to determine a category independently.

I present sorting to my toddlers with only 2 categories to begin with, in the form of a Montessori style tray activity. In other words, only 2 attributes are present. These attributes could be the colour of the object, the shape, size, length or thickness etc. but whatever it is, there are only 2 possible ways to sort them. I also tape or glue one of each kind of object to the sorting container so it is essentially a matching activity as well as sorting for their first experience.

Once they are able to look at the objects (in this case beads) and identify the similarities (all beads of the same size and shape) and differences (colour) they are ready to sort according to the attribute they have identified without a pre-determined category to guide them.

We talk about the objects; what they are, what colour, size, shape etc and focus on what is the same and different about them. I then sort the first few objects (talking about their attributes) while the child watches and ask them to see if they can tell why I am separating them as I am. If they are able to tell me, I ask them to see if they can sort the rest or simply explain why I have sorted as I did and demonstrate further before asking them to have a go.

Once they are able to sort by the two attributes with a category already given (one of each object taped to the container) I present two attribute sorting again without the categories already chosen and help the child to identify the two attributes themselves and sort accordingly.

An example of 3 category/attribute sorting. Generally colour is an easy way for toddlers to sort as a beginning skill. More abstract attributes can be introduced later.

After they have mastered sorting 2 attributes with a variety of objects, I extend the possible attributes or categories to 3, 4, 5 or more attributes, until they are able to sort any objects set before them and justify their reasoning.

In this example the coloured bowls determine the category or attribute so it doubles as a matching activity also.

Make your own toddler toys: Jar of spoons

I love this kind of activity. It takes approximately 30 seconds to put together and older babies and toddlers love it! Obviously being glass, care must be taken so that it will not drop onto a hard surface. I use my jar for highchair time, in the playpen or for mat time as these all occur over carpeted floors. You may prefer to replace the glass with something metal but make sure it makes a great sound as that is part of the attraction.

DESCRIPTION:

  • The child drops the spoons into the jar which makes a satisfying jangle and tips them back out again. That’s it!

CATEGORY/SUBJECT AREA:

  • Baby and toddler toys – beginning posting

CONCEPT/SKILL:

  • Fine motor development
  • Concentration

EQUIPMENT & MATERIALS:

  • 1 jar
  • a bunch of small spoons

Teaching Toddlers to Cut

Thin card strips (about one inch) are a good first cutting experience. Parallel and diagonal lines can be added to the strips for a new challenge once random snipping has been mastered.

With older siblings to watch, the littlies are always very keen to cut. Rather than have them constantly nag me or try to grab those scissors and have a go on whatever is handy when I’m not looking, I prefer to spend some time and teach them to cut safely – under supervision! It is great for long stints of uninterrupted school time with older children while young ones are happily occupied on a purposeful and satisfying activity.

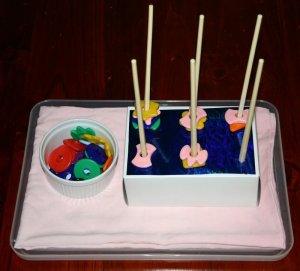
The stiffness of straws makes them easy to hold and cut. Cut straw pieces can be used for threading activities.

A good pair of child-sized scissors is important. Make sure that they have a larger hole in one side of the handle so the all of the child’s fingers can fit inside, rather than the kind that have two equal sized small handle holes. (See the pair in the photo.) I also buy proper scissors straight away, rather than safety scissors, simply because of the frustration children feel when scissors are not sharp enough to cut well. The initial paper based cutting experiences outlined here would be fine with safety scissors, but once they move on to the straws and other materials they may not be sharp enough.

Streamers are more difficult to cut because they do not stand stiffly out from the "holding hand."

Cutting strips should be about one inch wide so that the child can cut completely through the strip in one snip. Sliding scissors forward and making a second snip to cut through paper is a more difficult skill and should be introduced later. Show your child which hole is for the thumb and check that they continue to hold the scissors correctly with the blades facing away from them. Young children tend to turn their hands around, rather than the object they are cutting, which causes them to end up in all sorts of interesting and uncomfortable positions.

A new level of difficulty. Use cut beads for various craft projects later.

The first material to present is the easiest to cut – one inch strips of thin card stock. Regular paper is too thin and does not stand out stiffly from the child’s hand, flopping down and making it difficult to cut. Remind your child to keep moving their holding hand away from the scissors as they go.

Tinsel makes pretty off-cuts for craft projects. It is quite difficult to handle for beginner cutters though.

I usually set my cutting activities up in the same format (same tray with basket or two wooden bowls) so that once familiar with the task, there is no need to re-explain what to do when a new material is introduced. Scraps are caught in the empty bowl or basket and can be collected and used for art activities such as gluing or collage.

Curling ribbon is also quite difficult to cut because it curls! Add snippets to your collage or other crafty supplies.

When the first cutting experience is presented I demonstrate first, explain what they need to do, then supervise very closely for a time, until I am sure that the child has mastered holding the scissors correctly, points them away from their body, moves their holding hand while cutting, collects their scraps in the container provided and is generally using the scissors in a responsible manner. I am then able to relax my supervision a little and begin to vary the materials once interest in those already available is beginning to wane.

The photographs throughout this article are in a suggested order of difficulty. Stick with thin card strips until the skill is well mastered, moving to thin card strips with straight and diagonal lines to cut along, before introducing the other suggested materials. Moving too fast will simply result in frustration as the material proves too difficult for the child to manipulate and cut successfully. Other items (such as the animals pictured below) can be added to keep interest levels high. Following on from here, a variety of interesting papers, shapes and other materials can be presented, including those that require the child to slide the scissors along and make several cuts. Start with free cutting, straight lines, then curves and other shapes.

My toddlers love this activity. They focussed for an incredibly long time, cutting the streamers into food for the animals to eat. (The scissors should be presented on the tray with the blades facing away from the child.)

Routines: Introducing table activities

Table time is a valuable addition to any flexible routine. Simply put, it is a time when the children sit at the table (or desk or kitchen bench or wherever) and work on a quiet activity. It is a time set by the parent for this to happen and the activities used are those that are previously approved and designated as table activities.

I choose the activities for my toddlers and younger children and set them out, the middlies usually get to choose between a limited number of activities (“Would you like drawing or felt board today?”) and the older children choose for themselves from activities that they know are already approved table activities. I chat to the children while they play at the table and am able to get the dinner made and served at the same time.

While my routines have changed over the years, for the majority of the time I have used table activities after bath and shower time and just before dinner time. This allows me to get everyone finished in the bathroom and send them to their activities as they are done – no roaming about the house getting into mischief.

I find that it is the transition times, the few minutes here and there between activities, that cause the most trouble and produce the most accidents. Left to their own devices, even for just a few minutes at this time of day, a cranky, tired, hungry toddler or child will rarely make good choices with their time!

The possibilities for table time activities are virtually unlimited. I have a cupboard with shelves that is designated for table activities which makes it easy for the children to see what they can do. Anything you have that can be used independently while sitting at the table is a suitable activity. Some families like to use this time for homework. I’ll be posting some table time ideas soon and of course, any of the toddler, workjob or Montessori ideas I post would be suitable, as long as your child can do them without assistance.