Ziploc activity bags for toddlers and preschoolers

Noodle threading is always fun, just remember to tie one on the end to stop all the others sliding off while children are threading. When they have had enough of threading they can pretend to cook the noodles for dinner.

Ziploc activity bags are simply self-contained activities for toddlers, preschoolers and young children that include everything necessary for the child to complete the activity. Thus named because they are often stored in Ziploc plastic bags that are readily available from the supermarket. These bags have a plastic zip-style closing system that is easy for young children to manipulate, however we haven’t found them to be very long-lasting. Shoe boxes, trays or other containers are of course equally suitable but not so easily transported. Press-loc or snap-loc plastic bags are not as good because young children are not able to re-seal them independently, but if you don’t mind a few seconds to close each bag when they are done, they seem to last longer.

The kind of activity you can include is endless and their uses wide and varied. Some Mothers save them for school time activities while the older children require their attention. Others use them to take on holidays, while travelling in the car or when visiting with friends. They are useful for meals out in a restaurant, at home for mat time, blanket time, highchair time or table time activities. Whenever you need to keep a young child happily occupied these can be whipped out for hours of entertainment.

So what do you put in them? Almost anything really. Ideally they wouldn’t contain anything too messy if you want them to be easily transportable, but for home use anything goes.

Department stores have packs of paper shapes in the scrapbooking section which are great for gluing.

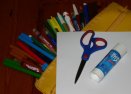
  • Glue stick and paper shapes for gluing

    When young toddlers first start to draw, tape one page at a time onto the table or highchair tray. For two reasons – it won’t keep slipping around and every page of the colouring book will not end up with a single blue line down the middle!

  • Drawing
  • Playdough
  • Stamping (stamp pads and ink stamps)
  • Lacing, threading or beading
  • Puzzles
  • Books
  • Construction toys
  • Pattern blocks
  • Stickers and sticker books
  • Small tea sets and mini teddies

    Finger puppets work best when the characters represent well knows stories that the children have heard you tell before.

  • Finger puppets
  • Mini whiteboard and eraser
  • Small chalk board and duster

    Simple stacking pegs are interesting once toddlers have the dexterity for it. This one kicked in at about 2 years when they could handle the quite stiff pegs.

  • Peg boards
  • Board games
  • Dot-to-dots and mazes
  • Colour-by-number
  • Stencils

You could include learning activities for basic maths and language skills. Starter Styles are a maths activity that cover a variety of beginning language and mathematical skills.

There are heaps of brilliant websites and blogs with an abundance of ideas for Ziploc bag activities;

Chasing Cheerios is one of my favourites with lots of wonderful toddler activities.

Natural Parents Network has some good ideas, including coloured pasta beading, pasta sorting, mini-books and stickers, lid sorting, playdough, cut and glue collage bag, and mini-playmats with cars and things.

Intrepid Murmurings has preschooler activity bags here.

There are lots of ideas for what they call “tote bags” here – just scroll down. They get better as they go.

Montessori inspired practical life tray activities for toddlers: Tong transfer

With a general category in mind such as “tong transfer” and a drawer full of useful bits and pieces I have collected over time, I now find it very easy to come up with new tray activities for table time, highchair time or mat time that will keep my toddlers developing new skills while they learn to focus and concentrate at the same time. (See here for a list of materials and equipment that might be useful for creating Montessori style tray activities.)

Simple two container transferring is a good starting point.

Using tongs is great preparation for writing and other skills that require fine motor control, helping to develop the hand muscles necessary for successful manipulation of writing implements.  All you need are tongs of some sort, 2 containers and something to transfer. Keep in mind that toddlers find it very difficult to manipulate tongs so look for small pairs that are not too stiff to close. Avoid those with a metal closing ring that slips down all the time – very frustrating! The best pair I have for beginners is a small set of ice tongs (see top photo) that I picked up at an op shop for 50 cents. Tea-bag tongs are also easy to squeeze and quite short. I found mine in a $2 shop.

Tonging activities link in well with other skills such as one-to-one correspondence. Plastic iceblock trays, egg cartons, chocolate trays or any other container with an obvious number of holes are ideal for this. Simply put, the child has to place one item in one hole. If there are any left over, or they run out before all the holes are filled, they are prompted by the empty space or left-over pieces to self-correct their work.

Flexible ice-block trays are an attractive material for children to work with. My girls LOVE this pink tray. (I should mention that it is the 6 and 4 year olds who clamour to do this one even though it is set out for the toddlers!)

Tea-bag tongs are easy for toddlers to manipulate.

Tonging is easily adapted to many other concepts, particularly mathematical skills. Beginning sorting with two simple categories is an easy way to combine the skill of tonging with a more challenging task for older toddlers and preschoolers. In the photo above, children sort the hair elastics into 2 separate colour piles; the first step along in learning the concept of sorting by colour.

Here we move to a slighlty more challenging activity with items to tong that require greater dexterity, 3 colours to sort and 3 bowls to match them to.

Attribute beads can be sorted more than one way and are quite difficult to pick up. They are a good challenge after simple tonging has been mastered.

Linking tonging to counting is fun for the preschooler and provides valuable practice of fine motor skills. Here the child tongs the correct amount of jewels into each segment of the dip plate. My 3 year old is pictured doing this activity in the photo at the top of this post. The counting side of things wasn’t too difficult for her to do even early on, but it was a test of her endurance and concentration skills to persevere with the tongs to complete all 10 segments.

Make your own baby and toddler toys

There comes an awkward age somewhere between 12 months and two years where it becomes more difficult to keep babies and young toddlers interested in their toys. They are no longer content to just shake and slobber on something that feels and look appealing, toys now need to DO something.

To complicate matters further, children generally do not develop imaginative play skills until around the age of 2. New toys are appealing but often lose that appeal quickly once they have been explored a few times and are too expensive to be constantly purchased. You can swap with friends, join a toy library or simply make your own. For me, the make your own option is the easiest, the possibilities are almost endless and they often turn out to be the long-term favourites. Here are some of my home-made baby toys that I use for mat time, highchair time, playpen time, table time and room time.

Find a bunch of small flat-bottomed toys, blocks, shapes, plastic figures or suitable objects and a base to stick them to; piece of smooth wood, plastic lid, small tray etc. Use self-adhesive velcro to attach each piece to the base so that children can stick them on and take them off again, enjoying that satisfying ripping sound as they do so. If you have enough, it is better to cover the base with the velcro so that objects can be stuck anywhere rather than only on a small matching dot. Older toddlers like this too if small people, animals or other figures are used and enjoy manipulating the pieces to play-act and tell stories.

Use an old baby wipes container and any flat objects that are slim enough to fit through the slot and not so small as to pose a choking hazard. Old credit cards, large plastic construction pieces, dominoes, poker chips, Jenga blocks  or anything similar will do. When interest wanes, simply change the material to post.

Wooden dolly pegs have dozens of uses. Young children find it challenging to slide them on and off objects and enjoy the sound of plunking them into tins and containers. My youngest loved to take them off the sides of containers like the ones above but not to put them back on again. They only did that part once – when they packed the activity away! Posting bottles and tissue box posting are other ways to use dolly pegs.

Formula tins have a large number of uses. They are great as rattle cans for crawlers to push about and with a hole, slot or cross-shaped cut in the top, act as posting tins for any number of small objects. Pegs, popsticks, dominoes, wooden shapes, milk bottle lids or whatever you have will do.

Toddlers are fascinated with Mum’s purse although most of us will agree that it is not a toy and it is unwise to allow toddlers to access it in that way. Because of that, some parents feel that even providing a similar option is not a good idea, fearing that children will not know the difference and think it is ok to touch Mum and Dad’s. I wondered about this too but in my experience have found that by the time they are able to manipulate cards and photos in and out of a purse or wallet, they are old enough to tell the difference between the play version and the real thing.  Find a bunch of old family photos, some fake credit cards (the display version that comes in junk mail trying to get you to sign your life away) and any other small objects that will slide in.  An old handbag is another version that toddlers love. Pick one up from an op-shop with as many zippers, pockets, divisions and press-studs as you can find and fill it with a bunch of small items. This works great for mat time on the go and can be re-stocked with different items on a regular basis to keep interest high.

For more toddler and baby activities, click on the “toddlers and babies” or “workjobs and Montessori activities…” categories on the left hand side bar.

Materials and storage for workjobs and Montessori tray activities

Plastic Chinese food containers fit neatly into my drawers and are a cheap and easy storage system for the items I use to make home-made workjobs and Montessori tray activities.

If you are setting yourself up for workjobs  or Montessori style tray activities for the first time there are unlimited numbers of materials that you could buy. Commercial Montessori products are beautiful but very expensive and particularly for the toddler and preschool ages it is relatively easy to make your own activities  for a fraction of the cost.

I generally source my materials secondhand form op shops, swap-meets and markets and buy the rest cheaply from discount variety stores or gather them from around the house. Each tray activity or workjob usually costs no more than $4.00 and many of the items can be re-used and presented with a different combination to make other “new” and interesting activities.

Some useful items to collect include the following:

Materials to count, transfer or manipulate:

  • Feathers
  • Buttons
  • Spools & film canisters
  • Jar & milk bottle lids
  • Pasta, macaroni, dried beans & rice
  • Corks
  • Sea shells
  • Popsicle sticks (popsticks)
  • Jewels & beads
  • Rocks, stones & pebbles
  • Straws
  • Fancy toothpicks
  • Golf tees
  • Stirring or cocktail sticks
  • Costume jewelry, bangles & strings of beads
  • Pipe cleaners
  • Rubber bands
  • String, twine, yarn, wool,shoe laces & cottons
  • Oversized metal or plastic needles
  • Paper bags, plates & cups
  • Plastic cutlery
  • Ribbon & bows
  • Hair clips & lackies
  • Magnets
  • Pompoms
  • Wedding favours eg. fake rings, mini doves, glass slippers etc.
  • Plastic & wooden pegs & dolly pegs
  • Dog clips, over-sized paperclips & other fasteners
  • Cardboard shapes
  • Number and letter tiles, cards & pieces from old board games
Materials for storage or presentation of trays and workjobs:
  • Glass, metal, china, cane & wooden bowls, trays, baskets & containers
  • Plastic tubs & lids
  • Cardboard tubes, boxes, egg cartons & food containers
  • Plastic containers & lids
  • Material/fabric scraps
  • Wood scraps
  • Shoe boxes
  • Ice-cube trays, dip trays & other divided containers
  • Plastic & glass jars
Utensils & tools for manipulating materials:
  • small hammers
  • Tongs, scoops, spoons & ladles
  • Tweezers
  • Measuring cups & funnels
Stationery:
  • Pens, pencils, textas, scissors & crayons
  • Glue, staplers, masking tape, sticky tape
  • Rulers, stencils, fasteners
If you have other ideas, please let me know and I will add them to the list.

Other posts you may like:

Montessori style tray activities; starting out

Montessori overview

Workjobs & learning styles

Hands-on Montessori tray activities for toddlers: Length comparison

Following on from my last post, here is an example of one of my toddler activity tray categories. For one term I designated a tray to length comparison; sorting various materials into “long” and “short.”

The child first finds the two matching pieces (strings of coloured beads in the tray above) and places them together to make a pair (a matching activity in itself.) They then sort the pair into the “long” or “short” containers which are also long and short in themselves to reinforce the concept.

After a week or two, when they are losing interest in the material they are sorting, I simply change it for a new material, leaving the containers and tray set up the same. Interest is revived and the concept is practised and reinforced.

My daughter who last used these length activities was 2 years and 2 months of age when she started and easily grasped the the concept. I used the Montessori activities while I was breastfeeding because it allowed me to supervise, encourage and explain if necessary while she was well occupied with challenging, yet age and developmental appropriate and enjoyable activities.

Matching, comparing and sorting coloured ribbons.

Matching, comparing and sorting coloured pencils.

Matching, comparing and sorting strips of coloured paper.

More lace ribbons to sort and compare.

Ideally the popsticks should be the same thickness so as not to confuse a child with two changing attributes; length and width. I may have been better to use the large popsticks and cut some shorter rather than use the two different kinds. It didn't seem to worry my daughter though.

Matching, comparing and sorting more coloured ribbons.

Matching, comparing and sorting coloured straws.

Matching, comparing and sorting coloured chenille sticks (tinsel pipe-cleaners.)

Montessori style tray activities for toddlers: starting out

Easter holidays are almost over and it’s time to get back into the swing of things. The twins are old enough to start Montessori tray activities so I thought I’d post today about some of the activities I’ve used for my beginners in the past.

The first thing you need to think about when you are setting out tray activities for the first time is how you will store and present them. They do take up a bit of space so a small bookshelf or shelved cupboard is ideal to place open trays, bowls and baskets in. If you don’t have enough space for this, perhaps you will need to use a system of shoe-boxes or similar so that they can be stacked away when not in use. They are not ideal as the toddler cannot see the contents easily, however they are better than nothing.

The tray or container itself is the next step. True Montessori style places a big emphasis on beautiful natural materials; everything being wood, metal, stone, glass etc and avoiding plastic and the like. While commercial Montessori materials are truly beautiful, the reality for me is that they are expensive and I am making my own, so I have to work with what I have. I initially visited a bunch of swap-meets, op shops, second-hand shops, discount variety stores and the like and bought a stack of wooden bowls, wooden trays, glass dishes, metal baskets and anything else that fitted into the natural and aesthetically pleasing category.

The trays were another matter. Wooden trays look great but cost too much and I couldn’t find any secondhand so I ended up using the flat plastic lids from small plastic storage crates I already had around the house. A roll of non-stick drawer liner cut to size for each tray stops the dishes and smaller items from slipping around.

The next step was to find a bunch of attractive materials to use for practical life activities. (See materials and storage ideas here)

To make it workable for me, I choose a selection of categories for my activities and have one tray for each kind. For example, one tray is for tong and spoon transfer, one tray for counting, one tray for colour matching and sorting, one for pegging and clipping, one for matching etc. Once I have my chosen categories set up, I use the same tray and containers for the whole term and only change the material that is presented.

This means that once my toddler is familiar with the tonging activity (I have presented it and demonstrated what to do) they are able to approach each new material without me having to re-explain what to do. They see a pair of tongs (different each week or two) with a new material to transfer but the same two containers to transfer back and forth from.  Eventually I change the containers too, but to begin with I keep it very similar so that they feel confidant in what they need to do.

On the first day the shelves are empty apart from 3 or 4 tray activities. I sit down and present each new activity which I demonstrate first before the toddler takes a turn. Depending on their attention span, I will introduce all 4 trays and stop for the day. Part of this process is showing them how to carry the tray to their work area (a carpet mat), complete the activity, place all materials back in their places and return the tray to the shelf.

The following day the child chooses which activities they would like to work on and completes them independently. If necessary, I will sit down and demonstrate the activities again. Once I can see that they understand what to do with the 4 that are already out I introduce just one new tray a day until I have built up to having all the categories in circulation.

Once they are confidently using one of each type of activity, I can change the materials without changing how it is presented (as explained above) and usually do not have to spend time explaining what to do as the concept is already familiar to them. (The next post will give you a photographic example of what I mean.)

Other posts you may like:

Mega marble transfer

An introduction to sorting

Teaching toddlers to cut

Outdoor activities: Painting


I have a confession to make. As a homeschooling Mum it’s difficult to admit it, but I really don’t like to paint. That is, I like to paint, I just don’t like setting up painting for my children to do. It takes time to set up, creates heaps of mess and takes ages to pack up again, all for a few minutes of colourful fun.

In an effort to overcome this dislike and occasionally provide this apparently vital experience for my children, we have developed a method that works for us… occasionally….when I can mentally gear up for it.

I have some large packing boxes that I keep folded down flat. We set these up outside on the lawn with the top flaps folded shut to hold them together and the bottom flaps bent outwards to catch the drips. Now that the children are a little older they set up the whole experience pretty much by themselves. They cart out the boxes, taping paper on every single side, 2 per side so that each child gets several pages to do. The children pull out the paint pots and brushes and even mix up the colours from the prime colours we own. (It’s amazing how their knowledge of paint mixing, creating a variety of  shades etc. has developed when they do not have the option of prepared colours and have to mix their own.)

Off come the clothes and on go the painting shirts and we’re all set. I plop a bucket of water out on the grass with some cloths and hands are washed here, as well as the brushes once they are done. Pictures stay taped to the boxes until dry, eliminating paint splodges from all over my clothes drying rack and everyone has a ball. They even seem to enjoy the clean-up time. If they are really covered in paint I line them up and spray them down with the hose before sending everyone inside for an early shower.

The children get to paint, I get to …. not do anything much at all except supervise and everyone enjoys the process. Obviously the weather must be fine but in winter we use tablet water colours at the table. These are far less drippy and messy and I can cope with them inside far better than liquid paints. My children will not be artistically deprived or have to see counsellors to work through the fact that they never got to paint and I don’t feel guilty when I see all those arty blogs about painting!
Other posts you may like:

Routines with a newborn

We now have a lovely updated colour-coded routine on our whiteboard. Of course, the 8th person included in this routine is a baby that hasn’t actually been born yet so things may need some tweaking once the reality hits 🙂 It is however, a very useful exercise to look over my current routine and to plan ahead for the multiple breastfeeding sessions I will need to fit into my day and the interruptions that will invariably come with a newborn.

We will be (and have done with all our children) following a flexible  feed, wake, sleep cycle with our little one which allows me to make a rough plan of approximately where the daily feeds will fall. Of course, some days will not go as planned and we will often have to switch activities that are side by side around to fit a feed in earlier or later than planned. That is where the routine serves us and our family needs, rather than the other way around.

For anyone who is interested, I would be happy to email you a copy if you thought it would be of any help to you and your family. I have been trying to upload it here without success and am sick of fighting with the computer!

Other posts you may like:

Highchair and mat activities: Montessori style practical life tong transfer activity for toddlers: Pom-poms, fruit and bugs

Over-sized pom-poms and tea bag tongs are a great starter set for tong transfer activities. The tongs are easy to manipulate and the pom-poms do not slip out.

As I have been tweaking my routine this week in readiness for our latest bundle of joy (now 3 days overdue!) I have been setting up some new tray activities for highchair time. Having toddlers on the loose while I breastfeed (especially when there are two of them) is a recipe for disaster. These activities can be used in a highchair, on a mat, for table time or for playpen time , however because I am introducing them to young toddlers and need to keep a close eye on them to begin with , I use highchair time.

Tonging is a simple practical life activity for toddlers and is excellent for fine motor control. Try to find small tongs that are not too stiff or your little ones may not have the dexterity to manage them. Tea bag tongs are easy to squeeze, as are ice tongs. Check your local opportunity shop (secondhand shops, $2 shops etc.) for supplies. Two containers and something to tong are your only other materials and usually with a bit of imagination you can find something around the house that fits the bill.

When I set up my trays I have a category for each kind of activity so that I can quickly change them over every couple of weeks without a lot of thought. Tong transfer is one category that I use and these are some of the examples I have set up in the past.

Slightly smaller pom-poms with the same easy to manipulate tea-bag tongs take the activity to the next level of difficulty.

The easiest first experiences are soft items like oversized pom-poms, cotton wool balls, balls of wool, or anything else that will not easily slip out of the tongs. Put only a few items in the container to begin with to encourage success as toddlers may quickly tire of the concentration and control needed to manage the tongs. Our “rule” with tray activities is that they should be completed before they are packed away so I want to ensure that the toddlers can be successful right from the beginning.

Larger and longer tongs are more difficult to use. These are still easy to squeeze but their length makes them more unwieldy to handle.The fruit are plastic iceblock shapes from the $2 shop.

A small set of salad tongs and a bag of plastic bugs were all that was needed for this tray.

The reality of young toddlers and tray activities is that they will have a limited concentration span and the interest shown for each activity will vary. I try to make each tray so that they can be easily completed in around 5 minutes. This means that if you want 30 minutes of highchair time to be well occupied, you will need around 6 activities. Some will be very absorbing for the child and they will complete and repeat them over and over. They will find some very challenging and perhaps even difficult and may want to spend less time on these. Reduce the amount of material on these trays accordingly. If you see that an activity is too difficult for the child to complete successfully, simply remove it and re-introduce at a later date. The perfect activity has a bit of a challenge but not so much that the child is frustrated by their inability to complete it.

Other posts you may like:

Mega marble transfer

An introduction to sorting

Bucket of giant beads transfer

Routines: Room time

Amazing things can be created in room time!

At around 18 months to 2 years of age, a toddler is ready to transition to room time instead of playpen time. Having said that, my two and a bit year old twins still have playpen time rather than room time for a number of reasons – space and lack of available rooms being two!  The following are some ideas for how to go about room time. My next post will help you to transition to room time smoothly. (It may be helpful to have a quick read through these posts first: playpen time, toys and starting late, choices)

What is room time? A time each day that is set by Mum when a child plays in their room (or a designated room) for a period of time determined by Mum. Do not confuse room time with a child choosing of their own volition to spend time playing in their room. This is a time chosen by you, with toys chosen by you (or a limited choice for older children) for the length of time chosen by you.

Tips for successful room time: 

  • try to arrange the room so that you can check on the child but they can’t see you.
  • start with 10-15 minutes and work up to longer time periods over several days. Even children who have been contentedly spending an hour in their playpen need smaller time increments to start with. This is a new freedom and you want to be able to praise them for their success in staying in their room and making wise play choices. Once the transition has been made and all is running smoothly you can increase the time again.
  • get the child started on an activity they enjoy before you walk out.
  • do not plan to use this time for the first week or so. Hover nearby, check on children frequently and deal with situations before they get started. Remember, the purpose of the short time period to start with is to finish while it is going well and praise, praise, praise! Do not be tempted initially to extend the time because it is going well and leave it until a problem happens – end on a good note.
  • start when you know you will be able to be home for a few days in a row
  • for young children, consider doing it through the weekend until well established
  • have it at a similar time each day
  • set out the toys you want a toddler to use or provide a limited selection of toys for an older child to choose from – not unlimited access to everything in the room.
  • introduce packing away from first use – demo, help, then independent. Have an easy storage system such as open crates. Sort toys out. One large toy box for everything not a good idea. Toys get lost, pieces are mixed up, toys are buried and forgotten and children can’t be bothered digging through to find what they need.
  • The success of room time depends on the focus and control that you are modelling and teaching throughout the whole day. A child who has too many freedoms and will not obey you during the day will not suddenly obey you when it comes to room time. Using a gate in the doorway can be useful for little ones during the initial transition and takes away the temptation to keep coming out. However a child who is not being trained in obedience will find a way to get out if they REALLY want to, despite the barrier.

 Toys:

  • You may like to keep room time toys only for room time so that the interest level stays high. Alternatively, toys can be sorted into crates for each day of the week or changed on a monthly basis.
  • Have a system in place to put the crates/boxes etc. into. A low bookshelf or cupboard that the child can reach is ideal. A few shelves that are out of reach can also be handy for those toys that are not for general playtime but are saved only for room time or for playing with Mummy and Daddy etc.
  • Clear plastic crates allow you to see contents at a glance.
  • Remove lids and simply have open containers that slide onto shelves. Remember, the easier it is to pack away, the more likely the child will do it without a fuss.
  • Sort toys out into smaller containers of similar sort (as children get older, toys become more complicated and have more pieces – mixing sets or kits with other toys makes it difficult to access.)
  • Do not store toys in draw-string bags, cardboard boxes with lids etc. until the child is able to manage those by themselves. If they have to ask you to take a lid off for them, they will be coming out of their room to do so and/or unable to pack up without your assistance.
Transitioning from playpen time to room time:
  • Put the playpen in the bedroom to begin with.
  • Use a mat or some other kind of blanket/carpet etc under the playpen that will become the designated play area in the room once the playpen is removed.
  • Have the toys sorted out and in the same places you will put them when room time begins without the playpen.
  • Take down only one crate at a time and say every day that this crate must be packed away before another one can come out – while in playpen one crate is all they get, so include enough variety to last the entire session. This means that later there should be a controlled amount of mess – no more than the contents of one crate should ever be out at one time.
  • Pack up with the child to begin with, one kind of item at a time, in a methodical way – remember you are teaching them how to pack up for all those times later they will do it themselves. Say out loud what you are doing, “First lets put away all the cars, now lets find all the books” etc.
  • Once the child is used to helping you, do some together then leave them to finish a set amount. No consequence for not packing up is needed, they are simply not free to come out until it is done.
  • If  there is a lot to pack up, simplify the pile into perhaps one or two kinds of toys – too many items from different containers/kits will be confusing and children often end up sitting there packing away nothing at all. For example, if a box of Duplo is out, along with books and a puzzle, perhaps clean up the books and puzzles for the child and require them to do only the Duplo.

Removing the playpen:

  • Explain that they need to play on the mat or other area you have designated.
  • Remind them of the toys that they may choose from – the same system you have well established while still in the playpen.
  • Initially, continue with the crate system. As children get older and toys become more complicated, begin to slowly hand over the choice to the child eg. you choose 3 items from the shelf, I will choose the rest.
  • Pack away most of the toys in the bedroom to begin with and only have out a few options that the child can choose from. More can be added later.
  • Remove any treasures or irresistible things that shouldn’t be touched.
  • Always have a set place for items. Teach how to pack away every toy as it is re-introduced back into the bedroom or a new toy is added.

Troubleshooting:

  • Try to ensure that household traffic is not passing by the door of a child who is having room time or they will be constantly distracted and more likely to want to come out.
  • Keep activities that sound like a lot of fun away from the sight and hearing of a child in room time. If they love to paint and you use this time for the older children to paint, it is much more difficult for them to be content knowing what they are missing out on.
  • In large families where children share rooms there may not be enough room time rooms to go around. If you are homeschooling and have older children at home, they could perhaps use this time to complete school work and have their room time at a different time of day. I prefer to have everyone in room time together so I get a break therefore we use almost every room of the house. Toddler and baby nappers go in portacots in rooms other than those they sleep in. Middle ages have their own desks and toys set up in separate bedrooms, including their own sleeping room and the baby room. The eldest is the most mobile as his interested are more portable. A crate with wheels makes his Lego set moveable and books are easy to pick up and cart about. Any other project is collected before room time begins and moved to where he will be. This may be the family room or loungeroom or even outside if the weather is nice.
  • Make sure that the toys are age appropriate, interesting and provide enough stimulus to last the whole time. Older children move away from just toys and in my household are given their own desk around the age of 4. We give them a mini set of drawers stocked with all manner of craft and drawing items, scissors, glue, construction paper and all sorts of bits and pieces and they have a wonderful time creating with these every day. Construction toys are pretty much essential for boys and good books are great for all.

Having room time for everybody every day leaves me with a chunk of time every day to recharge and gives the children a much-needed break from each other. They are often refreshed and in much happier moods when they re-emerge. Those personality types who crave time alone are rested and recharged and the more sanguine children benefit from learning to be by themselves and using their time in a worthwhile fashion. The projects the older children get up to are often quite amazing and the time is rarely wasted.