Birthdays and travelling with toddlers

Our wonderful twins turned two today. It’s amazing to look back at their birth photos and remember how it all began.

Our three eldest chose to make gifts rather than visit the Mummy and Daddy shop and as we are travelling via plane to Melbourne this week we thought activities to keep the toddlers occupied while travelling were a good idea. They will also be good to add to the homeschooling activities for when school starts again as there will be no morning nap to keep these little ones occupied while I school the older children anymore.

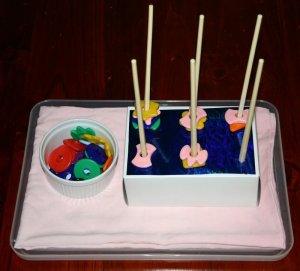
Our 6 year old used coloured contact paper to cover a small box to make this Montessori style practical life activity. A bunch of straws to post through the hole at the top and a small window on the side to shake them back out again did the trick. It was a hit immediately and I had to hide it away to ensure that the novelty hadn’t worn off before we even got to the plane as our youngest lady seemed determined to repeat the activity over and over!

Our 8 year old designed this one completely on his own without any input from me at all. He covered strips of cereal box on both sides to make them look attractive and pulled out a plastic money-box to post them in. Another Montessori style practical life activity for the plane trip.

This was the four year old’s creation. Strips of contact around a baking powder tin, several length of ribbon tied together and a cross shape cut into the lid to pull it through. Again, it was a great hit with the ribbon being pulled out and stuffed back in (by a grown-up) at least 5 times in a row. This one is more a baby activity but will keep their interest for a while. For many more ideas for keeping children happy and content during a plane or car trip, check out this post on travelling with young children. We will be making up our snack bags and pulling out the water painting, drawing and other ideas again and hopefully this trip will go as smoothly as the last one did.

Outdoor activities: more water play ideas

How do you keep little ones entertained and playing happily outdoors for extended lengths of time? Opening the back door and simply sending several young children out is not always a very successful method. Without direction to their play it is very likely that you will be dealing with bickering, squabbles and otherwise less than useful use of their time.

Spending 5 minutes getting them started on an absorbing and appropriate activity very often makes for a harmonious time as they happily go about their play in a focussed way. This 5 minutes at the start of playtime often saves me many minutes umpiring disputes and redirecting poor choices. More ideas will follow under the heading of outdoor activities, but today it’s more water based ideas.

In the warmer weather I find it so much easier as all my children from the youngest to the oldest love water and sand based play. All water based activities require some supervision so I choose tasks to do that allow me to oversee what is going on either from a distance or close by depending on the activity. Our water table is a favourite, as are the following:

Water painting

  • Buy a couple of different sized house painting brushes from a hardware (the cheap sets are fine) and a small bucket. Fill the bucket with water, give some directions as to which outdoor areas; furniture, fences, paths, walls etc. can be painted with water and let them at it! My children, especially the younger ones, love water painting, particularly if I occasionally admire the lovely new “colours” they have painted everything.
Sprinklers
  • I know it doesn’t fit into the water saving category but if it is your watering day, set up a sprinkler on the lawn and let everyone run about in it. Old as the hills, so easy and great exercise.
Paddle Pools/sandpit shell halves
  • I’ve mentioned this before, but an inch of water or even a couple of pots and pans full of water for scooping, tipping and pouring while sitting in half of a plastic sandpit clam shell or paddle pool is good fun. Combine it with a little sand and it becomes great fun.
Sandpit
  • Point the hose into the sandpit and turn it on just a little so a trickle comes out. That’s it! Provide cars, boats or whatever else you have in your sandpit toys.
Puddle Kingdom
  • Sometimes we empty out our outdoor storage containers and put a bunch of them together on the grass. We then fill each one with a little water and again, free play! Jumping from one to another, making “houses” or whatever they fancy makes this an interesting pastime.
Water trampolining
  • We occasionally set up the sprinkler underneath or near  the trampoline for wet bouncing fun. This isn’t so good for the younger children though as it does get quite slippery. The 3 year old and up are steady enough on their feet to make this loads of wet fun.
Water slides
  • If your backyard has a slope, then a long sheet of black plastic with a little detergent and lots of water is a wonderful slide and wears those energetic youngsters out.
Water Chasey
  • Not quite our usual outdoor activity as this involves me, but when it is really hot we play water chasey with the hose. Simply put, the kids run around like crazy and I spray them with the hose, watering the garden in between.

Paddle pools and slide

  • Another one that requires adult supervision is the paddle pool properly filled up or with a small amount of water and the slide from our little plastic castle into it for the children to climb up and slide into the pool. When they’ve had enough sliding we bring the sandpit toys over and everyone sits down for a play.

Sorting: Montessori Style Tray Activities

Here are some more Montessori style tray activities for sorting. These are a little more open-ended and follow on from sorting experiences already presented (Click here for an explanation of how to introduce and sequence sorting experiences and here for the follow-on with 4 and 5 category sorting ideas.)

DESCRIPTION:

  • The child uses the plates to sort the plastic cutlery according to their chosen attribute. There is more than one way to sort the cutlery and once children have sorted one way (usually by colour) I ask them to see if they can do it another way (by type; knives, forks, small and large spoons.)

CATEGORY/SUBJECT AREA:

  • Mathematics

CONCEPT/SKILL:

  • Sorting, classifying, identifying attributes

EQUIPMENT & MATERIALS:

  • 4 plates
  • 4 sets of real or plastic cutlery

DESCRIPTION:

  • Children place the chopsticks into the egg carton holes then drop the beads onto each chopstick according to their colour.

CATEGORY/SUBJECT AREA:

  • Mathematics

CONCEPT/SKILL:

  • Sorting, classifying, identifying attributes

EQUIPMENT & MATERIALS:

  • large beads (same shape) with 4 colours or
  • large beads of the same colour with 4 different shapes
  • 4 chopsticks
  • egg carton segment

DESCRIPTION:

  • Children sort the animals into the craft container according to their chosen attribute (type of animal, colour, number of legs, zoo or farm etc.)

CATEGORY/SUBJECT AREA:

  • Mathematics

CONCEPT/SKILL:

  • Sorting, classifying, identifying attributes

EQUIPMENT & MATERIALS:

  • plastic animals (these are called cocktail animals and came from the party section of a discount variety store.)
  • segmented container or collection of small containers to sort animals into.

DESCRIPTION:

  • Children place the chopsticks into the holes before sorting the beads onto each chopstick according to their chosen attribute. (This is a commercial set of attribute beads and can be sorted by several different attributes.)

CATEGORY/SUBJECT AREA:

  • Mathematics

CONCEPT/SKILL:

  • Sorting, classifying, identifying attributes

EQUIPMENT & MATERIALS:

  • attribute beads
  • 6 chopsticks
  • cardboard box with contacted top for strength and holes for chopsticks

Please see my pages titled “Workjobs and Learning Styles” and “Brief Montessori Overview” for more general information on Montessori and workjob activities.

Make your own baby and toddler toys – ball posting

Ball posting is another very basic activity for babies and toddlers. Plonking the balls in through the hole and learning how to shake them back out again is absorbing and clear containers add to the interest. Ball posting is great for  playpen time and mat time, but not as good for table time or highchair time simply because the balls fall off and roll away.

DESCRIPTION:

  • The child posts the balls through the hole and tips them back out again by shaking the container.

CATEGORY/SUBJECT AREA:

  • Practical life

CONCEPT/SKILL:

  • Fine motor development

EQUIPMENT & MATERIALS:

  • Container with lid (cut a hole into the lid slightly larger than the balls)
  • Balls or other objects to post and shake out again

Please see my articles titled “Workjobs and Learning Styles” and “Brief Montessori Overview” for more information.

Make your own baby and toddler toys: posting bottles

Babies and toddlers just love to put things inside small spaces and empty containers out. It is great fine motor practise and they will often concentrate for amazing lengths of time if the challenge level is just right. If a child is frustrated by their inability to do the task, simply change the activity for now and re-introduce it a little later. It should have an element of difficulty, but not so difficult that they cannot be successful. This is a great activity for highchair time, playpen timemat time or table time.

DESCRIPTION:

  • The child posts the dolly pegs into the lid of the bottle and pulls them back out the bottom.

CONCEPT/SKILL:

  • Fine motor development

EQUIPMENT & MATERIALS:

  • Large plastic bottle with hole cut into the front. (Tape hole to cover sharp edges)
  • Dolly pegs or any other suitable object to post into the top of the bottle (regular pegs, wooden peg halves, popsticks etc.)

In this example the solid bottle adds a different dimension and the pegs are shaken out once posted.

The posting bottle can be combined with other skills. Sliding the dolly pegs on and off the edge of a sturdy cardboard box is a complete activity in itself. My children usually enjoyed taking the pegs off the box but did not choose to put them back on again. When they were finished with the activity we slid them back on to the box together as part of the packing up process and they happily practised this skill.

Please see my articles titled “Workjobs and Learning Styles” and “Brief Montessori Overview” for more information.

Make your own toddler toys: teddy food play


Teddies, cooking equipment and food are such an easy activity to put together for toddlers. Little boys and girls love to pretend cook and feed their willing teddy companions. I use this kind of activity for highchair time, mat timeplaypen time or as a table activity and it’s open-ended nature lends itself to long periods of concentration.

It is easily updated and kept fresh by simply adding some different containers, cooking equipment, food or teddy. It can be a “new” activity every week without much work on your behalf.

Simply look around the house, gather up some interesting containers, plates, cups, cutlery and the like, some kind of “food”, a teddy and you are set. Keep in mind the age of the child and choking hazards. Beans, pasta and jewels are best used under supervision or not at all if a child is very tempted to stick them in ears, noses and mouths or anywhere else they shouldn’t be!

Sometimes I use doll-house sized teddies and doll-house furniture so the teddies can eat at the table, go to sleep in a little bed afterwards and even sit on the couch to relax. I have used plastic food, felt food, wooden food, dry pasta and beans, jewels and rocks and even pictures of food glued onto card from junk mail.

As soon as your little one has begun use their imagination (pretend play) you can introduce this activity. For the very little children, you might even sit and play with it with them first, teaching by your example what to do with each item. Children with older siblings have had this modelled extensively, but a first child will not always know how to play unless you show them. They will of course work it out for themselves, but if you want a young child to use this kind of activity enthusiastically for an extended time, some modelling will go a long way to extending their play.


5 Category Sorting: A Montessori style tray activity

(For a detailed introduction on how to introduce sorting to toddlers, it may be helpful to read this post first.)

4 colour metal patty-pan sorting.

After my toddlers have been introduced to sorting and have extended their skills to independently identifying 4 or 5 attributes or more, I continue to swap the materials that they sort, but keep the base tray or sorting containers the same. This means that I can change the material and present a “new” tray activity with little or no explanation. The children are immediately familiar with the type of activity and therefore already know what to do.

This is important for when I am teaching older children at the same time as a toddler is working on their Montessori style activities so that I am not constantly interupted. It also means that I am not having to demonstrate or “teach” every single new tray activity – once the format is familiar, I can change materials and off they go.

I set up each term’s worth of tray activities with chosen categories (transferring, sorting, matching, counting, pouring etc.) and simply update the materials as necessary without having to re-introduce each activity.

This wooden tray lends itself well to 4 or 5 attribute sorting and by simply changing the materials I can easily update it throughout a term with very little effort. I also add a pair of tongs, tweezers, scoop or spoon to incorporate fine motor skills and turn it into a transferring activity at the same time, which adds an extra level of challenge to the activity.

5 colour pony bead sorting. (The bowl needs to be moved off to the side to provide room for the 5th colour.)

5 colour jewel sorting. Most of these objects pose a choking hazard so take care with young children who still like to put things in their mouths. Jewels are so tempting for toddlers to suck on.

4 colour plastic flower sort.

5 types of dried beans.

5 kinds of buttons.

5 colours of Christmas craft bells.

5 kinds of pasta and dried beans.

5 coloured marble sort.

5 kinds of pasta.

5 kinds of shells.

5 kinds of farm animals.


An introduction to Sorting: A Montessori Style Tray Activity

Two colour bead sort with attribute or category already given. The first exposure to sorting for my toddlers.

Sorting is an important foundational skill requiring reasoning, logic and mathematical thinking. It enables children to be able to look at a group of objects and identify similarities and differences and to make logical decisions as to how to categorise the objects. Sorting skills will transfer into other academic subjects such as science and mathematics later in life.

Sorting frequently covers other basic skills such as colour recognition and counting and if combined with some kind of transfer tool such as tongs, spoons, tweezers or scoops, will develop fine motor skills at the same time.

I usually tape a peg to the top of each container to designate the attribute category until the child is able to determine a category independently.

I present sorting to my toddlers with only 2 categories to begin with, in the form of a Montessori style tray activity. In other words, only 2 attributes are present. These attributes could be the colour of the object, the shape, size, length or thickness etc. but whatever it is, there are only 2 possible ways to sort them. I also tape or glue one of each kind of object to the sorting container so it is essentially a matching activity as well as sorting for their first experience.

Once they are able to look at the objects (in this case beads) and identify the similarities (all beads of the same size and shape) and differences (colour) they are ready to sort according to the attribute they have identified without a pre-determined category to guide them.

We talk about the objects; what they are, what colour, size, shape etc and focus on what is the same and different about them. I then sort the first few objects (talking about their attributes) while the child watches and ask them to see if they can tell why I am separating them as I am. If they are able to tell me, I ask them to see if they can sort the rest or simply explain why I have sorted as I did and demonstrate further before asking them to have a go.

Once they are able to sort by the two attributes with a category already given (one of each object taped to the container) I present two attribute sorting again without the categories already chosen and help the child to identify the two attributes themselves and sort accordingly.

An example of 3 category/attribute sorting. Generally colour is an easy way for toddlers to sort as a beginning skill. More abstract attributes can be introduced later.

After they have mastered sorting 2 attributes with a variety of objects, I extend the possible attributes or categories to 3, 4, 5 or more attributes, until they are able to sort any objects set before them and justify their reasoning.

In this example the coloured bowls determine the category or attribute so it doubles as a matching activity also.

Routines: Table activity ideas

Following on from my post on table activities, I thought it might be helpful to include some ideas of the kinds of things I give my children to do at table time. The toddlers sit in their highchairs to do theirs (see highchair activities) and the older children sit at a variety of tables and occasionally on the floor.

  • Drawing
  • Playdough
  • Stamping (stamp pads and ink stamps)
  • Lacing, threading or beading
  • Puzzles
  • Books
  • Felt board
  • Construction toys
  • Pattern blocks
  • Contact collage
  • Water colour painting
  • Paper craft
  • Sticker books
  • Tea sets and teddies
  • Finger puppets
  • Mini whiteboard and eraser
  • Small chalk board and duster
  • Peg boards
  • Board games
  • Tap tap
  • Scrapbooking
  • Contact pictures
  • Dot-to-dots
  • Mazes
  • Magnadoodle
  • Colour-by-number
  • Stencils

I like to keep table activities separate from our other activities for a couple of reasons:

  • the children only use them during table time, which keeps interest levels high
  • they do not request activities that I do not want them to do at this time; those they may choose from are already set aside for this purpose
  • when I am choosing activities for the toddlers and younger children I don’t have to think of what to get or wander around looking for inspiration, I simply open the cupboard and choose from the selection there, rotating through those that are appropriate
  • the children have ready access and can pack up after themselves
Another time that we find table activities very useful is when we have visitors. We love having friends and family around but the children do get very excited. After some time to talk and play with the visitors (depending on who it is of course) I often direct the children to get out a table activity. It provides a focus, quiets down the excited behaviour and allows the adults to have a conversation. Sometimes Grandparents or other visitors will do the activities with the children (which of course they love) but we find it just gives them a great way to be around the adults and interact appropriately without dominating the entire evening.

Routines: Playpen time – Toys and starting late

An example of my playpen ready for playpen time. An attractive selection of age appropriate toys - not too many - of different types.

My toys are stored in plastic crates so that a good selection of toys of a variety of types are all ready for me to pop into the playpen. Crates are rotated from day-to-day so that interest in the toys presented stays high for quite some time.

For those of you who have older babies or toddlers who have not yet been introduced to playpen time, here are some notes on starting late.

Starting late:

For a baby or toddler who has had a lot of freedom, the transition to a playpen can take a little time.  Make sure it is a good time of day to begin (not when they are hungry or tired) and start will a small increment of time – even 5 minutes. Put in a small basket of toys, or a toy or two in each corner of the playpen, instruct the child that they need to play here and that Mummy will be back to get them in a little while.

Yes, they probably will cry and that’s ok. If you are consistent and stick with it, your child will come to play happily for this time. You may like to play a CD or favourite book on tape, letting you child know that they can come out when the CD or story finishes or set a timer and tell them that playpen time will be finished when the timer beeps. Having a cue of some sort to signal the end of playpen time is helpful in the training period because it lets the child know that it is the signal, not their crying, that has decided playpen time is over for the day.

Start with the small increment of time and stick to it, coming in immediately once the signal sounds (timer beeps etc.) and with a happy face and positive tone say something like “Playpen time is finished, you can come out now.” A well fed, well rested child, with age appropriate toys is not harmed in any way by a little time in the playpen, in fact it actually helps them to develop those all important concentrating skills that will enable them to learn so many important things later.

Initially, have playpen time 2 or 3 times a day for 5 minutes. Once your little one is used to spending this short period of time in a playpen, gradually start to extend the time. Once they are spending longer blocks of time in the playpen, reduce the number of times in a day you use it to two and then once a day. By around 12 months all of my children would happily play in the playpen for around 45 minutes which extended to an hour by the age of 18 months. I have watched them examining objects with intense concentration, seen the cogs ticking as they use it in different ways and investigate everything about it. Babies and toddlers often do not do this for longer than a few moments unless you create situations that foster this skill.

Once a child is characterised by happily spending time in a playpen then on odd days you can make exceptions when they are not happy eg. extra tired, sick etc.

Although you may be thinking “My boisterous 12 month old will never do that” let me encourage you that they will. There will certainly be a transition time involved, however if you are consistent, playpen time will be a pleasant time for you both.

Introducing playpen time as part of a daily flexible routine will greatly improve the success you have with it. Trying to implement one planned moment in a day of chaos and unlimited choices for a child will be very difficult.