Developing Fine-Motor Skills in Toddlers and Young Children

Self-control, concentration, following instructions and fine motor skills are very important foundational skills for all children. Teaching your young child to sit and focus on an activity and see it through until completion will go a long way towards preparing them for later learning – whether that be in the homeschool or traditional school environment. Some children seem to be naturally better able to do this, others need training and practise to do it. Children who do not develop these skills early will find it much harder to learn and you will find it more difficult to teach them!

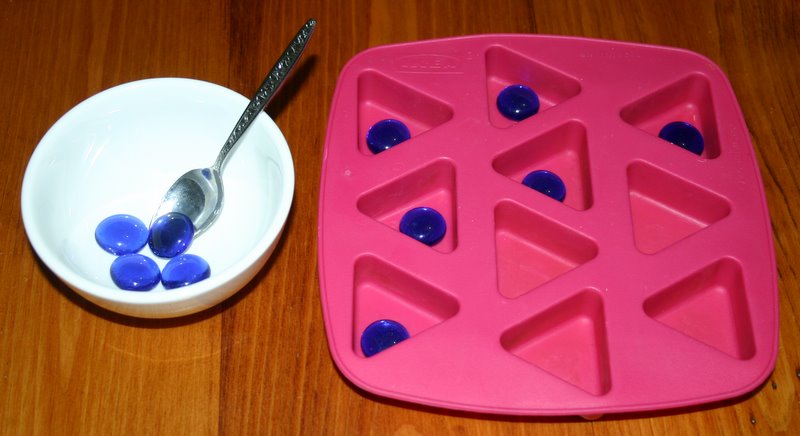
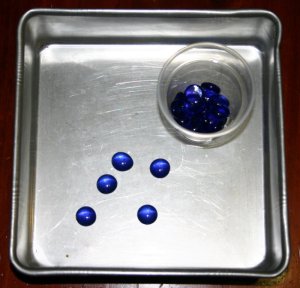
Here are several Montessori style tray activities for toddlers and preschoolers that will help to develop their fine motor skills. Many parents of young children say that their children will not sit still long enough to attempt, let alone complete an activity like these and that may be the case right now. It is however most certainly possible to train them in this skill so that sitting and focussing becomes something they readily cope with, both at home and when out.

Putting a flexible routine into place and teaching your child to stay where you want them to stay will be an important first step. Introducing playpen or room time, highchair time or table time, mat time and other periods of planned activity to your child’s day will reap the rewards of a child who is able to sit and focus and learn from the materials available to them. Self-control will begin to grow and the benefit will spill over into all parts of their lives. Time for some free play with age-appropriate choice making is also important, however if a toddler’s whole day is unstructured and contains many choices you will be seeing many “sticky patches” as Mel Hayde terms them in her book “Terrific Toddlers.”

Start with very basic activities like the first couple below that do not take very long to do and are not too challenging to complete. Help the child to learn the process first: take the tray out, sit in the designated place, complete the activity in the same way you have demonstrated it, place everything in the same place on the tray as it was found before returning the tray to where it belongs.

You may like to attempt only one tray to begin with so as to finish on a positive note. Praise your child for their attentiveness, perseverance etc. Five minutes for a toddler who is not used to this kind of task is a beginning. Work up from there until they can sit for an extended block of time. My twins at 2 1/2 years can sit for 20-30 minutes with activities that change every 5 to 10 minutes, depending on what it is. My other three children would have spent 30 to 45 minutes working on these at the same age and even up to an hour at times.

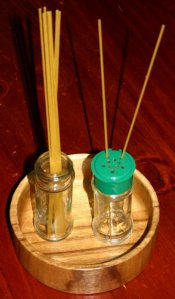
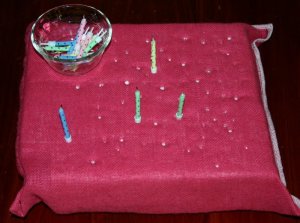
Threading and removing large wooden beads from these giant pipecleaners can be extended to pattern making for an older child. (Yes they are giant {about 40cms long} you just can’t tell from the photo!)

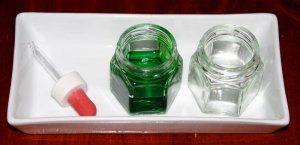
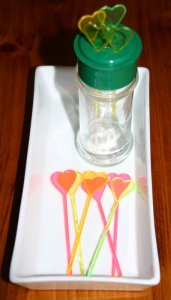
The chopstick is placed into the neck of the spice jar and large beads threaded onto the end.

sdsd

Toothpick flags are stabbed into the oasis. (Florist’s foam.)
Small beads are threaded onto the pipecleaners which are then put into the holes in the lid of the spice bottle. (These smaller beads require a higher level of fine motor control and accuracy to thread.)
It takes quite a bit of coordination to operate an eyedropper. Transferring liquid from one small container to another is a challenge for many toddlers. Perhaps use uncoloured water to begin with and provide a sponge for spills.
Yes, they will probably taste the angel hair pasta as they feed it into the small holes in this spice bottle but it’s only pasta after all!
This is a piece of polystyrene packaging with a loose weave hessian cover. You could include a set of numbers and have an older child set out the correct number of birthday candles.
Another spice jar with toothpicks – don’t throw out those old spice shakers!
Stretching hair elastics over a jar is surprisingly difficult for young children but they enjoy it anyway.

Teaching toddlers and preschoolers to glue


There is a lot to be said for a beautifully organised and sorted collage tray. All those colourful pieces just waiting to be used in so many creative ways are so attractive to toddlers and preschoolers; in fact children of all ages.
One of the easiest ways to keep collage materials sorted and ready for gluing  is a party dip platter like the one in the photo above. The compartments hold a number of different materials for children to choose from and the lid slots on over the top and seals with a turn to stop all those bits and pieces ending up on the floor.

This tray was $4 at a recycled boutique  (Good Sammy’s) so keep your eye out in second-hand stores and swap-meets or perhaps even Grandma’s plastics cupboard. I use the centre space for a jar that is filled with glue and re-sealed with it’s own lid once the activity is finished. If you include items like pasta, fabric and shells, make sure you include white glue (PVA) or children will be continually frustrated with pieces falling off their craft. Glue sticks are less messy but really only useful with paper and cardboard.
I personally am attracted to the organised collage style, however after an activity day at our local park a couple of years ago I had my eyes opened to the world of what I like to think of as “bargain bin” style gluing. You know the clearance bins they have in the shopping centres with a jumble of odds and ends for bargain basement prices? The ones that scream at you to have a search through because you just might find the bargain of the century lurking underneath the pile. The collage they put out at the park day worked just like this for the children. It was simply a box of assorted stuff in one giant jumble. You should have seen them hunting through it like treasure seekers. They scrabbled happily through, exclaiming with delight when something new and sparkly was discovered.

They seemed to have a bizzare attraction to the jumbled assortment of goodies and enjoyed the gluing just as much as when presented with my neatly sorted dip tray. Consequently, we now have both. When the dip tray gets jumbled and messy, I simply tip it all into a small crate with a lid and re-fill the compartments in the dip tray with new materials. That way both collections are continually changing.

For toddlers who are just beginning to learn how to glue (see cutting, gluing and stickers here), try adding a small drop of paint to the glue to colour it and make it easier for them to see where they have spread the glue. Focus on training them how to use the materials, as well as how to:

  • put a plastic tablecloth, gluing mat, placemat or newspaper on the table before they begin.
  • wear a painting shirt, smock or apron.
  • wash the brushes after use and return to their place to dry.
  • sort unused materials back into the correct compartments (a skill in itself.)
  • place wet pictures and crafts in an appropriate place to dry.
  • return the tray to the cupboard or shelf.
  • spray and wipe their workspace (Provide a spray bottle and cloth or sponge for this purpose.)
  • wash themselves up before removing their painting shirt.
  • hang their painting shirt up to dry.

Montessori style toddler activities: transferring and one to one correspondence

Egg cartons are a cheap and readily accessible option with clear depressions for each object. A large object to transfer such as these stones or wooden eggs will keep a toddler well occupied.

One-to-one correspondence is an important foundational maths skill. Here are some ideas I have used with my older babies, toddlers and into preschool years.

What is it?

  • Saying one number to one object as you count (therefore the “one to one” correspondence.)
  • Children often begin learning to count by saying numbers out loud while pointing or touching objects, without those numbers actually matching up with the objects being counted.
  • Children also count the same object more than once or skip objects entirely.

    These super sized marbles are a favourite material in our house, even for the older children. They fit perfectly into this mini-muffin tray.

    Making activities:
  • One to one correspondence activities should be self-correcting; there are exactly the correct number of objects for the receptacle. Any left over or running out before all the spaces are filled signals to the child that there has been an error.
  • Start with large, non-slippery objects that fit easily into a scoop or are transferred by hand and move on to activities that require greater fine motor control.
  • Even older babies can experiment with one-to-one correspondence. Babies love to put things in containers and tip them out again. A freezer popsicle tray is fabulously enthralling for a child at this stage. They work especially well if no more than one object can fit in each segment, but this is not essential.

Popsicle tray and wooden dolly pegs. It’s surprising how something this simple can hold a young child’s attention.

A basic activity for babies.

Extending activities:

  • Keep interest by changing the way objects are transferred; by hand, with  spoons, scoops, tongs then tweezers.
  • Change the material to be transferred; stones, pompoms, pegs, jewels, plastic animals or anything else you can think of. Keep in mind the age of the child and be wary of choking hazards.
  • Change the receptacle used; bowls, baskets, tins, containers, iceblock trays, egg cartons, jars or any other container with a definite number of depressions.

Pompoms come in many different shapes and sizes and are a safe material for little ones. The worst mine have ever done is suck on them or pull them apart.

Using their hands to transfer large, easily grasped objects is a great beginning for babies.

This tray came out of our fridge. It is meant to hold eggs but to my knowledge has never actually done so!

Be careful with jewels. They are very attractive but also feel nice to suck and babies and toddlers do tend to out them in their mouths.

For older children using small objects that require greater fine motor control adds a little more challenge. Combining one-to-one practice with beginning counting is the next step.

Montessori style tray activities for toddlers

These square jewels were so attractive to the twins that they spent a good deal of time examining each one and just moving them around by hand. Only once they had had their fill of touching and examining them were they ready to try transferring them which was the original purpose of this activity.

The twins are 2 years and 5 months old and were in need of some new highchair and table activities. These are the latest Montessori style trays that I made up for them in under an hour a couple of weeks ago. Once you have a good selection of materials and equipment to work with, it’s easy to mix and match and throw together some new ideas. Using a category for each tray type is helpful to me. (See Montessori tray activities for toddlers: starting out.)

I have done tray activities in the traditional Montessori style before (on a piece of carpet to designate a work space) but I find it easier at this age and with two at a time to keep them in their highchairs. This means I can use the time to prepare or clean up a meal or any other task and flit in and out of the room while they work on their activities without coming back in to find 5 trays up-ended on the floor at once! It also helps them to concentrate on the task at hand and learn to fully complete each activity before starting a new one. Concentration time is extended as they learn to stay focussed until I am ready to change the materials for them.

Pegging is excellent fine motor practice. Make sure the pegs you use are easy to press to begin with as toddlers do not have the finger strength to open very firm pegs. Dolly pegs or pegs that slide are a good option for those who cannot manage regular squeeze style pegs.

Providing a four sided container and pegs in four colours quickly turns this into a colour sorting activity. If you added some coloured sticky dots in the same colours as the pegs then younger children can begin to match the colours by pegging each peg onto the corresponding coloured dot.

This bead threading activity was the favourite of the lot and both twins want to do this again and again. They do enjoy chewing the straw though so I have had to replace it several times. Luckily this takes only a matter of seconds to do – see below.

All you need are some large beads, a container, a straw and a piece of masking tape. Bendy straws already bend over at the ends so I simply taped it over so that the beads will not fall off the end. That’s it! I will definitely be making some more threading activities soon. Beads on pipecleaners next.

A simple tong transfer practical life activity. I found a huge packet of large hair lackies at the $2 shop and they are great for beginning tong transfer because they are so easy to pick up.

One to one correspondence is an important pre-number mathematics skill. In this activity, preschoolers scoop one pompom into each depression in the iceblock tray.

Jewels, rocks and other decorations that are used for potplants and vases make excellent Montessori materials. They are very attractive to children of all ages and even my older children love to use these for maths manipulatives. This is a simple scooping transfer activity from one bowl to another.

Another transferring activity. I tried several kinds of tongs for transfer but my son was very frustrated by them, finding them too difficult to use. I decided to leave them for him for a while and let him enjoy transferring with spoons and scoops. His pencil grip is perfect so I am not too worried about his fine motor skills at this stage!

Other related posts you may like:

Montessori style tray activity for toddlers: Bucket of giant beads

Homeschooling activities for toddlers: Pasta play

Getting dinner on the table: arsenic hour

Multiplication: Learning your times tables

Most of us will remember the days of practising our times tables over and over again until they came without a  second thought. As much as children often detest learning this skill it is nonetheless a very important mathematical foundation that will underlay so many of the more difficult maths concepts later on. If these simple multiplication equations are not mastered it will slow progress and make maths just that little bit harder.

With his in mind, here are some activities to drill the times tables that make it just a little bit more fun and will be especially helpful to those kinesthetic learners who need the hands-on experience to really lock these facts into their memories. They can be used as workjobs, shoebox tasks, Montessori style tray activities, work stations or simply as part of your every day maths programme.

This is an egg holding tray from my refrigerator with a cheap set of plastic ping-pong balls from the $2 shop. The multiplication problem is written on each ball with the answers in each circle on a piece of card taped to the back. The balls are simply matched up to the correct answer. (Children usually have no problem with 0, 1 or 10 times any number, so if there are not enough spaces I leave these equations out of the set.)

A paper plate has the answers written around the edge with multiplication problems slid into the end of plastic pegs. Children work out the sum and slide the peg on to the correct place.

The 7 times table is written onto wooden pegs with the answers on coloured contact stuck around the edge of a plastic container. Pegs are stored in the container when the activity is complete.

Small slots are cut into the top of each egg carton segment with the answers to the 8 times table written on each. Fat shaped popsticks (paddle-pops) have the sums written on each and are poked into the corresponding hole. The last segment has a larger hole to place al the sticks when the activity is complete.

Popsticks with answers are matched to the 9 times table written on an icecream container lid.

An empty container (lunchbox etc.) plus some pattipans and card circles are all that is needed for this activity. The patti-pans have the answers and the card circles have the 4 times table written on them.

Ziploc activity bags for toddlers and preschoolers

Noodle threading is always fun, just remember to tie one on the end to stop all the others sliding off while children are threading. When they have had enough of threading they can pretend to cook the noodles for dinner.

Ziploc activity bags are simply self-contained activities for toddlers, preschoolers and young children that include everything necessary for the child to complete the activity. Thus named because they are often stored in Ziploc plastic bags that are readily available from the supermarket. These bags have a plastic zip-style closing system that is easy for young children to manipulate, however we haven’t found them to be very long-lasting. Shoe boxes, trays or other containers are of course equally suitable but not so easily transported. Press-loc or snap-loc plastic bags are not as good because young children are not able to re-seal them independently, but if you don’t mind a few seconds to close each bag when they are done, they seem to last longer.

The kind of activity you can include is endless and their uses wide and varied. Some Mothers save them for school time activities while the older children require their attention. Others use them to take on holidays, while travelling in the car or when visiting with friends. They are useful for meals out in a restaurant, at home for mat time, blanket time, highchair time or table time activities. Whenever you need to keep a young child happily occupied these can be whipped out for hours of entertainment.

So what do you put in them? Almost anything really. Ideally they wouldn’t contain anything too messy if you want them to be easily transportable, but for home use anything goes.

Department stores have packs of paper shapes in the scrapbooking section which are great for gluing.

  • Glue stick and paper shapes for gluing

    When young toddlers first start to draw, tape one page at a time onto the table or highchair tray. For two reasons – it won’t keep slipping around and every page of the colouring book will not end up with a single blue line down the middle!

  • Drawing
  • Playdough
  • Stamping (stamp pads and ink stamps)
  • Lacing, threading or beading
  • Puzzles
  • Books
  • Construction toys
  • Pattern blocks
  • Stickers and sticker books
  • Small tea sets and mini teddies

    Finger puppets work best when the characters represent well knows stories that the children have heard you tell before.

  • Finger puppets
  • Mini whiteboard and eraser
  • Small chalk board and duster

    Simple stacking pegs are interesting once toddlers have the dexterity for it. This one kicked in at about 2 years when they could handle the quite stiff pegs.

  • Peg boards
  • Board games
  • Dot-to-dots and mazes
  • Colour-by-number
  • Stencils

You could include learning activities for basic maths and language skills. Starter Styles are a maths activity that cover a variety of beginning language and mathematical skills.

There are heaps of brilliant websites and blogs with an abundance of ideas for Ziploc bag activities;

Chasing Cheerios is one of my favourites with lots of wonderful toddler activities.

Natural Parents Network has some good ideas, including coloured pasta beading, pasta sorting, mini-books and stickers, lid sorting, playdough, cut and glue collage bag, and mini-playmats with cars and things.

Intrepid Murmurings has preschooler activity bags here.

There are lots of ideas for what they call “tote bags” here – just scroll down. They get better as they go.

Montessori inspired practical life tray activities for toddlers: Tong transfer

With a general category in mind such as “tong transfer” and a drawer full of useful bits and pieces I have collected over time, I now find it very easy to come up with new tray activities for table time, highchair time or mat time that will keep my toddlers developing new skills while they learn to focus and concentrate at the same time. (See here for a list of materials and equipment that might be useful for creating Montessori style tray activities.)

Simple two container transferring is a good starting point.

Using tongs is great preparation for writing and other skills that require fine motor control, helping to develop the hand muscles necessary for successful manipulation of writing implements.  All you need are tongs of some sort, 2 containers and something to transfer. Keep in mind that toddlers find it very difficult to manipulate tongs so look for small pairs that are not too stiff to close. Avoid those with a metal closing ring that slips down all the time – very frustrating! The best pair I have for beginners is a small set of ice tongs (see top photo) that I picked up at an op shop for 50 cents. Tea-bag tongs are also easy to squeeze and quite short. I found mine in a $2 shop.

Tonging activities link in well with other skills such as one-to-one correspondence. Plastic iceblock trays, egg cartons, chocolate trays or any other container with an obvious number of holes are ideal for this. Simply put, the child has to place one item in one hole. If there are any left over, or they run out before all the holes are filled, they are prompted by the empty space or left-over pieces to self-correct their work.

Flexible ice-block trays are an attractive material for children to work with. My girls LOVE this pink tray. (I should mention that it is the 6 and 4 year olds who clamour to do this one even though it is set out for the toddlers!)

Tea-bag tongs are easy for toddlers to manipulate.

Tonging is easily adapted to many other concepts, particularly mathematical skills. Beginning sorting with two simple categories is an easy way to combine the skill of tonging with a more challenging task for older toddlers and preschoolers. In the photo above, children sort the hair elastics into 2 separate colour piles; the first step along in learning the concept of sorting by colour.

Here we move to a slighlty more challenging activity with items to tong that require greater dexterity, 3 colours to sort and 3 bowls to match them to.

Attribute beads can be sorted more than one way and are quite difficult to pick up. They are a good challenge after simple tonging has been mastered.

Linking tonging to counting is fun for the preschooler and provides valuable practice of fine motor skills. Here the child tongs the correct amount of jewels into each segment of the dip plate. My 3 year old is pictured doing this activity in the photo at the top of this post. The counting side of things wasn’t too difficult for her to do even early on, but it was a test of her endurance and concentration skills to persevere with the tongs to complete all 10 segments.

Montessori inspired practical life: dry pouring tray activities for toddlers

If you are looking for inspiration for toddler tray activities, dry pouring is a great place to start. It is a practical life skill that is easily introduced in a simplified form and can be gradually made more challenging as your toddler progresses. Learning to pour liquids carefully and accurately is difficult for young children, so starting with a dry material is a more forgiving and easily mastered beginning. Giving children cups and containers to pour water in the bath develops the skill in a non-messy environment and dry pouring activities are great for mat time, highchair time or table time.

This is the first dry pouring experience I give my toddlers. Tipping the jewels out of the cup into a baking tin and collecting them up again is surprisingly absorbing and makes a satisfying racket as they do it. If you prefer a quieter option, try pompoms (see below), however I can guarantee the children will enjoy the jewels, beads, rocks or other noisy versions more!

Pouring from one container to another is the next step. Choose 2 containers of the same size, without handles. A set of straight-sided small tumbler type cups is best; something that is easily gripped in a toddler’s hand. Add small objects such as dried beans to pour from one to the other and change the containers and material to pour every so often to keep interest high.

Rice is one of the last materials to introduce. If you colour it, it is very attractive but it is almost guaranteed to spill and is not quite as easy to clean up. Toddlers need to be taught how to collect the spilt rice in one corner of the tray and carefully pour it back into the container.

I was able to find a cute mini dustpan and broom which I include with my rice pouring activities to clean up the spills which is a practical life skill in itself. Tape a square shape with masking tape in the centre of the tray and teach the children how to first sweep the rice into a little pile within the tape boundary before sweeping it into the dustpan.

Adding funnels to a dry pouring activity adds yet another dimension and when I have had simple pouring activities available for quite a while, I set up a combined scooping, pouring and funnelling tray for a  more complicated experience. After I have changed this around for a while, I then add teddies and other small animals or toys and turn it into more of a pretend play type activity. This allows a broader scope of play and promotes longer engagement by older toddlers and preschoolers.

Materials and storage for workjobs and Montessori tray activities

Plastic Chinese food containers fit neatly into my drawers and are a cheap and easy storage system for the items I use to make home-made workjobs and Montessori tray activities.

If you are setting yourself up for workjobs  or Montessori style tray activities for the first time there are unlimited numbers of materials that you could buy. Commercial Montessori products are beautiful but very expensive and particularly for the toddler and preschool ages it is relatively easy to make your own activities  for a fraction of the cost.

I generally source my materials secondhand form op shops, swap-meets and markets and buy the rest cheaply from discount variety stores or gather them from around the house. Each tray activity or workjob usually costs no more than $4.00 and many of the items can be re-used and presented with a different combination to make other “new” and interesting activities.

Some useful items to collect include the following:

Materials to count, transfer or manipulate:

  • Feathers
  • Buttons
  • Spools & film canisters
  • Jar & milk bottle lids
  • Pasta, macaroni, dried beans & rice
  • Corks
  • Sea shells
  • Popsicle sticks (popsticks)
  • Jewels & beads
  • Rocks, stones & pebbles
  • Straws
  • Fancy toothpicks
  • Golf tees
  • Stirring or cocktail sticks
  • Costume jewelry, bangles & strings of beads
  • Pipe cleaners
  • Rubber bands
  • String, twine, yarn, wool,shoe laces & cottons
  • Oversized metal or plastic needles
  • Paper bags, plates & cups
  • Plastic cutlery
  • Ribbon & bows
  • Hair clips & lackies
  • Magnets
  • Pompoms
  • Wedding favours eg. fake rings, mini doves, glass slippers etc.
  • Plastic & wooden pegs & dolly pegs
  • Dog clips, over-sized paperclips & other fasteners
  • Cardboard shapes
  • Number and letter tiles, cards & pieces from old board games
Materials for storage or presentation of trays and workjobs:
  • Glass, metal, china, cane & wooden bowls, trays, baskets & containers
  • Plastic tubs & lids
  • Cardboard tubes, boxes, egg cartons & food containers
  • Plastic containers & lids
  • Material/fabric scraps
  • Wood scraps
  • Shoe boxes
  • Ice-cube trays, dip trays & other divided containers
  • Plastic & glass jars
Utensils & tools for manipulating materials:
  • small hammers
  • Tongs, scoops, spoons & ladles
  • Tweezers
  • Measuring cups & funnels
Stationery:
  • Pens, pencils, textas, scissors & crayons
  • Glue, staplers, masking tape, sticky tape
  • Rulers, stencils, fasteners
If you have other ideas, please let me know and I will add them to the list.

Other posts you may like:

Montessori style tray activities; starting out

Montessori overview

Workjobs & learning styles

Hands-on Montessori tray activities for toddlers: Length comparison

Following on from my last post, here is an example of one of my toddler activity tray categories. For one term I designated a tray to length comparison; sorting various materials into “long” and “short.”

The child first finds the two matching pieces (strings of coloured beads in the tray above) and places them together to make a pair (a matching activity in itself.) They then sort the pair into the “long” or “short” containers which are also long and short in themselves to reinforce the concept.

After a week or two, when they are losing interest in the material they are sorting, I simply change it for a new material, leaving the containers and tray set up the same. Interest is revived and the concept is practised and reinforced.

My daughter who last used these length activities was 2 years and 2 months of age when she started and easily grasped the the concept. I used the Montessori activities while I was breastfeeding because it allowed me to supervise, encourage and explain if necessary while she was well occupied with challenging, yet age and developmental appropriate and enjoyable activities.

Matching, comparing and sorting coloured ribbons.

Matching, comparing and sorting coloured pencils.

Matching, comparing and sorting strips of coloured paper.

More lace ribbons to sort and compare.

Ideally the popsticks should be the same thickness so as not to confuse a child with two changing attributes; length and width. I may have been better to use the large popsticks and cut some shorter rather than use the two different kinds. It didn't seem to worry my daughter though.

Matching, comparing and sorting more coloured ribbons.

Matching, comparing and sorting coloured straws.

Matching, comparing and sorting coloured chenille sticks (tinsel pipe-cleaners.)