Montessori style tray activities for toddlers: starting out

Easter holidays are almost over and it’s time to get back into the swing of things. The twins are old enough to start Montessori tray activities so I thought I’d post today about some of the activities I’ve used for my beginners in the past.

The first thing you need to think about when you are setting out tray activities for the first time is how you will store and present them. They do take up a bit of space so a small bookshelf or shelved cupboard is ideal to place open trays, bowls and baskets in. If you don’t have enough space for this, perhaps you will need to use a system of shoe-boxes or similar so that they can be stacked away when not in use. They are not ideal as the toddler cannot see the contents easily, however they are better than nothing.

The tray or container itself is the next step. True Montessori style places a big emphasis on beautiful natural materials; everything being wood, metal, stone, glass etc and avoiding plastic and the like. While commercial Montessori materials are truly beautiful, the reality for me is that they are expensive and I am making my own, so I have to work with what I have. I initially visited a bunch of swap-meets, op shops, second-hand shops, discount variety stores and the like and bought a stack of wooden bowls, wooden trays, glass dishes, metal baskets and anything else that fitted into the natural and aesthetically pleasing category.

The trays were another matter. Wooden trays look great but cost too much and I couldn’t find any secondhand so I ended up using the flat plastic lids from small plastic storage crates I already had around the house. A roll of non-stick drawer liner cut to size for each tray stops the dishes and smaller items from slipping around.

The next step was to find a bunch of attractive materials to use for practical life activities. (See materials and storage ideas here)

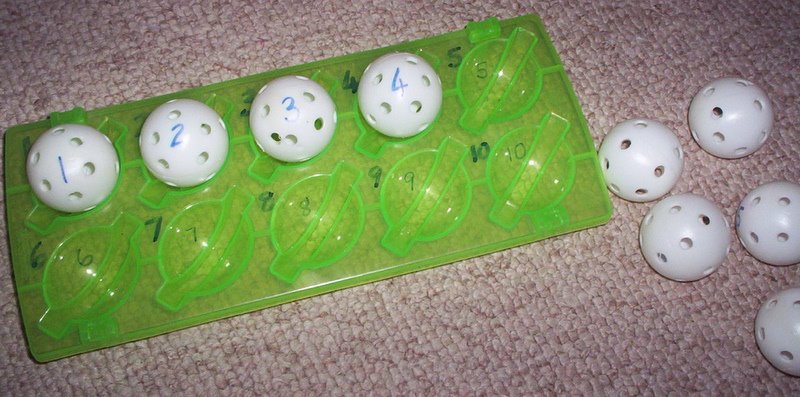
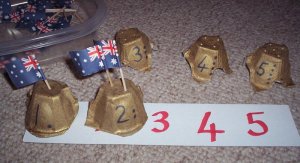
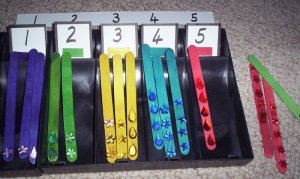
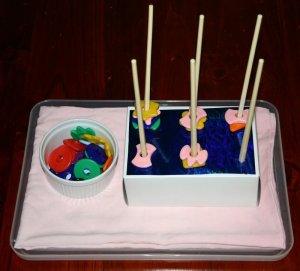
To make it workable for me, I choose a selection of categories for my activities and have one tray for each kind. For example, one tray is for tong and spoon transfer, one tray for counting, one tray for colour matching and sorting, one for pegging and clipping, one for matching etc. Once I have my chosen categories set up, I use the same tray and containers for the whole term and only change the material that is presented.

This means that once my toddler is familiar with the tonging activity (I have presented it and demonstrated what to do) they are able to approach each new material without me having to re-explain what to do. They see a pair of tongs (different each week or two) with a new material to transfer but the same two containers to transfer back and forth from.  Eventually I change the containers too, but to begin with I keep it very similar so that they feel confidant in what they need to do.

On the first day the shelves are empty apart from 3 or 4 tray activities. I sit down and present each new activity which I demonstrate first before the toddler takes a turn. Depending on their attention span, I will introduce all 4 trays and stop for the day. Part of this process is showing them how to carry the tray to their work area (a carpet mat), complete the activity, place all materials back in their places and return the tray to the shelf.

The following day the child chooses which activities they would like to work on and completes them independently. If necessary, I will sit down and demonstrate the activities again. Once I can see that they understand what to do with the 4 that are already out I introduce just one new tray a day until I have built up to having all the categories in circulation.

Once they are confidently using one of each type of activity, I can change the materials without changing how it is presented (as explained above) and usually do not have to spend time explaining what to do as the concept is already familiar to them. (The next post will give you a photographic example of what I mean.)

Other posts you may like:

Mega marble transfer

An introduction to sorting

Teaching toddlers to cut

Highchair and mat activities: Montessori style practical life tong transfer activity for toddlers: Pom-poms, fruit and bugs

Over-sized pom-poms and tea bag tongs are a great starter set for tong transfer activities. The tongs are easy to manipulate and the pom-poms do not slip out.

As I have been tweaking my routine this week in readiness for our latest bundle of joy (now 3 days overdue!) I have been setting up some new tray activities for highchair time. Having toddlers on the loose while I breastfeed (especially when there are two of them) is a recipe for disaster. These activities can be used in a highchair, on a mat, for table time or for playpen time , however because I am introducing them to young toddlers and need to keep a close eye on them to begin with , I use highchair time.

Tonging is a simple practical life activity for toddlers and is excellent for fine motor control. Try to find small tongs that are not too stiff or your little ones may not have the dexterity to manage them. Tea bag tongs are easy to squeeze, as are ice tongs. Check your local opportunity shop (secondhand shops, $2 shops etc.) for supplies. Two containers and something to tong are your only other materials and usually with a bit of imagination you can find something around the house that fits the bill.

When I set up my trays I have a category for each kind of activity so that I can quickly change them over every couple of weeks without a lot of thought. Tong transfer is one category that I use and these are some of the examples I have set up in the past.

Slightly smaller pom-poms with the same easy to manipulate tea-bag tongs take the activity to the next level of difficulty.

The easiest first experiences are soft items like oversized pom-poms, cotton wool balls, balls of wool, or anything else that will not easily slip out of the tongs. Put only a few items in the container to begin with to encourage success as toddlers may quickly tire of the concentration and control needed to manage the tongs. Our “rule” with tray activities is that they should be completed before they are packed away so I want to ensure that the toddlers can be successful right from the beginning.

Larger and longer tongs are more difficult to use. These are still easy to squeeze but their length makes them more unwieldy to handle.The fruit are plastic iceblock shapes from the $2 shop.

A small set of salad tongs and a bag of plastic bugs were all that was needed for this tray.

The reality of young toddlers and tray activities is that they will have a limited concentration span and the interest shown for each activity will vary. I try to make each tray so that they can be easily completed in around 5 minutes. This means that if you want 30 minutes of highchair time to be well occupied, you will need around 6 activities. Some will be very absorbing for the child and they will complete and repeat them over and over. They will find some very challenging and perhaps even difficult and may want to spend less time on these. Reduce the amount of material on these trays accordingly. If you see that an activity is too difficult for the child to complete successfully, simply remove it and re-introduce at a later date. The perfect activity has a bit of a challenge but not so much that the child is frustrated by their inability to complete it.

Other posts you may like:

Mega marble transfer

An introduction to sorting

Bucket of giant beads transfer

Montessori style hands-on maths workjobs: Counting 1 to 10

Following on from yesterday’s post about teaching children to count to 5, here are some ideas for extending counting to 10. Again, all you need is 10 of some kind of container, something to count and numerals to order (or already marked on the containers.) If the child is required to order the numerals themselves, then including a number strip to follow means that they can do it independently without already knowing the order.

Kinesthetic learners learn best through hands-on activities, however all young children need plenty of experience with manipulating concrete materials to develop early maths concepts. Workjobs are explained to the child (catering to auditory learners), demonstrated to the child (visual learners) and then completed by the child (hands-on or kinesthetic learners.) There is no need to use dry math work books in the early stages when these basic concepts can be so easily developed with materials that are enjoyable to use and simple to make.

For children who do not yet recognise their numerals, this workjob is very simple and requires them only to match the number on the plastic balls to the corresponding number on the iceblock tray. I would then alter it into a counting activity by using plain ping-pong balls (no holes) with dots or tiny stickers on each one to count and match to the correct number.

In this activity the child counts the number of stamps and pokes a matchstick through the hole underneath the correct group. The card is self-checking because when you turn over to the back, there is a circle around the correct hole.

This "Princess rings" activity is a favourite of my girls. 10 tiny white jewellery bowls are set out then jewels with the numerals 1 to 10 are placed in order next to each bowl and the rings are counted into each bowl. The rings come from the wedding favours section of my local discount store. We made up all sorts of extra stories about how the princesses shared their rings out and had a lot of fun with this. Sometimes a good story adds so much to the fun of the activity!

The child orders the silver stars (bought from a party supplies shop) from 1 to 10 then counts the stickers on each golden star before matching them to their pair.

Foam stickers on baby food jars and some cheap party bead necklaces cut into lengths make this a bright and attractive counting activity. After ordering the jars from 1 to 10 the child counts the number of beads on each string and drops them into the correct jar. Not a good one for absolute beginners as the beads are quite small and it is easy to miss-count as the higher numbers are reached.

Hands-on maths workjobs: Counting 1 to 5

If you are blessed with a kinesthetic learner, providing hands-on learning experiences is vital. All young child however need to move from tactile or concrete mathematical experiences (where they manipulate objects to develop mathematical understanding) to abstract (“on paper”) experiences.

There is no better way to teach children to count than to have them go ahead and count! The first step is to ensure that they are able to recite the number order. The next step is to develop one-to-one correspondence (matching one number to one object.) After that, let the counting begin! You will need to step them through the process initially with lots of opportunities to count. Use everyday activities around the house to introduce this skill; setting out 4 plates, counting 3 sets of cutlery, placing 5 sultanas on a celery stick, collecting 5 hats for outside play etc.

To transition to the tray activities, you will also need to teach the children how to recognise and order the numerals to 5. This can be done as they complete the activities with self-checking number strips to match the numbers (see the egg carton castles example below) or taught separately before you give them the tray activities.

For homeschoolers, or those who are wanting educational ideas for highchair, mat or table time, here are some hands-on ideas for presenting counting from 1 to 5. While children can easily develop this skill through their every-day experiences around the home, these workjobs will help them to develop concentrating and focussing skills and are a great introduction to more complicated workjobs and Montessori style tray activities that will extend their skills as they grasp each basic beginner skill.

My older toddlers begin with these simple counting activities which virtually guarantee their success and I am able to teach them the general concept of how the experiences are presented and what they need to do. I can then change the materials, extend the numbers and gradually increase the difficulty of the experience to match their developmental levels. They love to manipulate the materials and enjoy the sense of accomplishment once they are able to complete each activity.

Before expecting a child to do the activities independently you will need to spend some time teaching them how to set out the containers, order the numbers and add the appropriate number of objects. Depending on their previous experiences with counting, this may be a very quick or more long-term process. Once they have mastered one counting experience though, the skill is then transferred to the next new activity with only a quick demonstration from Mum.

Any kind of container can be used and with a bunch of something to count and 5 numbers to order you are all set. Ideally workjobs should be self checking so that the child is able to self-correct their own work without your assistance.


This is the first tray counting experience I use. The popsticks are first sorted into colours (with the child already having completed many colour matching and sorting activities previously) before being counted and popped into the correct cup. If children do not yet recognise their numbers they are able to count the small chunks of popstick next to the number to find out which numeral it is. Those who are just beginning can simply match up the colours to find out which cup to put them in. If they are completing the activity with colours rather than numbers, I simply spend time with them counting the number of popsticks in each cup as we pack away the activity until they are able to transition to relying on their counting skills rather than the colours.

Including a number strip for the child to match to as they order their numerals means they can be successful without already knowing the number order. The dots next to the numerals on the side of the castles mean they can count to check how many even if they do not recognise the numeral itself. The correct amount of holes are poked in the castles so that the castle must have the correct number of flags.

Milk bottle tops marked with liquid paper are the numerals here (you could include a number strip to match to if needed) and the size of the cups can be ordered as well for an extra dimension. The child sets out the 5 cups, orders the numerals, then counts out the correct number of pegs for each cup. Pegging is also an excellent fine motor skill.

Coloured pompoms are matched to the same colour sticker in the muffin tin. This is more a one-to-one correspondence experience as no numerals are included, however I have the child count how many there are in each hole before they pack them away.

The numbers are set out first (following the number strip if needed) then the  jewels on each popstick are counted to match the correct number. Popsticks are colour coded to the numerals to make them self-checking.

Check through your cupboards to find a group of containers, write some numbers on anything handy, add something to count and you have a simple counting workjob. Two dollar shops and other discount stores are great for finding appealing bits and bobs to count and manipulate and a multitude of activities can be set up with very little expense or effort required. Young children love to do “school” with their older siblings and this is the perfect introduction for them.

Montessori style tray activity for toddlers: Bucket of giant beads

Today I’m moving away from water transfer for all those who can’t stand the mess or have little ones who are just not ready for that yet! This is the second Montessori style tray activity for toddlers that I ever introduced, to follow on from the mega marbles transfer. Both require less fine  motor control and can be completed successfully by young toddlers. Easy to set up and adapt to the materials you have on hand, you can get this one together in minutes. A great highchair or table activity, it works well for keeping little ones occupied while homeschooling and can easily be carried to the Montessori mats traditionally used to delineate each child’s work-space.

DESCRIPTION:

  • The child uses the scoop provided to transfer the large wooden beads from one bucket to the other and back again.

CATEGORY/SUBJECT AREA:

  • Practical life: dry transfer

CONCEPT/SKILL:

  • Fine motor development
  • Control of ladle or scoop
  • Transferring dry materials

EQUIPMENT & MATERIALS:

  • Ladle (scoop, icecream scoop, measuring spoon, large spoon, pasta spoon or any other utensil that fits one bead at a time into it. Choose a short-handled utensil for ease of manipulation.)
  • Large beads or alternative material to transfer
  • 2  containers (metal containers make a pleasing sound as the beads drop in.)
  • Tray

Please see my articles titled “Workjobs and Learning Styles” and “Brief Montessori Overview” for more information.

Montessori style water transfer tray activity for toddlers

For those of you who like water activities, scooping water is another basic Montessori style tray activity for toddlers. Great for the sensory table, as a table activity or perhaps even a highchair activity if you can fit it on. Most toddlers love to play with water and this gives them a contained way of enjoying water while practising a worthwhile skill at the same time. If you are not afraid of colouring clothes then a few drops of food colouring adds interest. Ice blocks can also be added, as can a variety of floating objects to scoop out.

DESCRIPTION:

The child uses the scoop provided to transfer the water from one bowl to the other and back again. I normally include a small sponge to use for soaking up spills and squeezing the water back into the bowls. The cloth is for drying up the scoop and tray when the activity is done. A variety of scoops and containers can be used to keep the activity fresh and interesting over time.

CATEGORY/SUBJECT AREA:

  • Practical life (liquid transfer)

CONCEPT/SKILL:

  • Fine motor development
  • Control of scoop/ladle/spoon etc.

EQUIPMENT & MATERIALS:

  • Scoop (or other transfer utensil)
  • 2  stable containers for water
  • sponge
  • cloth
  • tray with a lip to contain spills (a baking tray or biscuit tray would do)

Please see my articles titled “Workjobs and Learning Styles” and “Brief Montessori Overview” for more information.

Montessori style toddler tray activities: Water transfer

A basic Montessori style practical life tray activity to set up for your toddlers or preschoolers is water pouring. A tray with low edges will contain any spills and little ones will have a great time pouring themselves cups of pretend tea and up their water intake for the day dramatically!

Start simple, with two small tumbler style cups that fit neatly into the hand for your toddler to pour from one to the other. Next try a small jug for pouring and finally introduce a teapot. Teapots are more difficult to manage as it is harder to judge the distance the water will pour out from the spout.

A good introduction to water pouring - a small jug (not too heavy for little hands) with a sponge to squeeze spilt water back into the jug and a tea-towel for the final drying up of the tray and dishes

For older toddlers more accessories and little tea-sets can be included with perhaps a dolly to hold tea parties with. An activity that is useful for highchair time and as a table activity, I prefer to use it at the highchair so that my younger toddlers can have a go without trailing water behind them.

Sorting: Montessori Style Tray Activities

Here are some more Montessori style tray activities for sorting. These are a little more open-ended and follow on from sorting experiences already presented (Click here for an explanation of how to introduce and sequence sorting experiences and here for the follow-on with 4 and 5 category sorting ideas.)

DESCRIPTION:

  • The child uses the plates to sort the plastic cutlery according to their chosen attribute. There is more than one way to sort the cutlery and once children have sorted one way (usually by colour) I ask them to see if they can do it another way (by type; knives, forks, small and large spoons.)

CATEGORY/SUBJECT AREA:

  • Mathematics

CONCEPT/SKILL:

  • Sorting, classifying, identifying attributes

EQUIPMENT & MATERIALS:

  • 4 plates
  • 4 sets of real or plastic cutlery

DESCRIPTION:

  • Children place the chopsticks into the egg carton holes then drop the beads onto each chopstick according to their colour.

CATEGORY/SUBJECT AREA:

  • Mathematics

CONCEPT/SKILL:

  • Sorting, classifying, identifying attributes

EQUIPMENT & MATERIALS:

  • large beads (same shape) with 4 colours or
  • large beads of the same colour with 4 different shapes
  • 4 chopsticks
  • egg carton segment

DESCRIPTION:

  • Children sort the animals into the craft container according to their chosen attribute (type of animal, colour, number of legs, zoo or farm etc.)

CATEGORY/SUBJECT AREA:

  • Mathematics

CONCEPT/SKILL:

  • Sorting, classifying, identifying attributes

EQUIPMENT & MATERIALS:

  • plastic animals (these are called cocktail animals and came from the party section of a discount variety store.)
  • segmented container or collection of small containers to sort animals into.

DESCRIPTION:

  • Children place the chopsticks into the holes before sorting the beads onto each chopstick according to their chosen attribute. (This is a commercial set of attribute beads and can be sorted by several different attributes.)

CATEGORY/SUBJECT AREA:

  • Mathematics

CONCEPT/SKILL:

  • Sorting, classifying, identifying attributes

EQUIPMENT & MATERIALS:

  • attribute beads
  • 6 chopsticks
  • cardboard box with contacted top for strength and holes for chopsticks

Please see my pages titled “Workjobs and Learning Styles” and “Brief Montessori Overview” for more general information on Montessori and workjob activities.

Make your own baby and toddler toys – ball posting

Ball posting is another very basic activity for babies and toddlers. Plonking the balls in through the hole and learning how to shake them back out again is absorbing and clear containers add to the interest. Ball posting is great for  playpen time and mat time, but not as good for table time or highchair time simply because the balls fall off and roll away.

DESCRIPTION:

  • The child posts the balls through the hole and tips them back out again by shaking the container.

CATEGORY/SUBJECT AREA:

  • Practical life

CONCEPT/SKILL:

  • Fine motor development

EQUIPMENT & MATERIALS:

  • Container with lid (cut a hole into the lid slightly larger than the balls)
  • Balls or other objects to post and shake out again

Please see my articles titled “Workjobs and Learning Styles” and “Brief Montessori Overview” for more information.

Make your own baby and toddler toys: posting bottles

Babies and toddlers just love to put things inside small spaces and empty containers out. It is great fine motor practise and they will often concentrate for amazing lengths of time if the challenge level is just right. If a child is frustrated by their inability to do the task, simply change the activity for now and re-introduce it a little later. It should have an element of difficulty, but not so difficult that they cannot be successful. This is a great activity for highchair time, playpen timemat time or table time.

DESCRIPTION:

  • The child posts the dolly pegs into the lid of the bottle and pulls them back out the bottom.

CONCEPT/SKILL:

  • Fine motor development

EQUIPMENT & MATERIALS:

  • Large plastic bottle with hole cut into the front. (Tape hole to cover sharp edges)
  • Dolly pegs or any other suitable object to post into the top of the bottle (regular pegs, wooden peg halves, popsticks etc.)

In this example the solid bottle adds a different dimension and the pegs are shaken out once posted.

The posting bottle can be combined with other skills. Sliding the dolly pegs on and off the edge of a sturdy cardboard box is a complete activity in itself. My children usually enjoyed taking the pegs off the box but did not choose to put them back on again. When they were finished with the activity we slid them back on to the box together as part of the packing up process and they happily practised this skill.

Please see my articles titled “Workjobs and Learning Styles” and “Brief Montessori Overview” for more information.